
Introduction to multilingual Apps
Multilingual apps are important for reaching a global audience and improving the usability of the app since users will be able to work with it in their native language. Some of these importances include handling translations, locale formatting, and flexible user interfaces.
React Native framework supports Internationalization and localization, making your app easily adaptable to languages and regions. You can integrate with a Strapi CMS to manage and deliver your content in several languages. It has very nice and detailed documentation explaining how to set up multilingual support for your app so that the delivered content is flexible and localized to meet the different needs of your users.
In this tutorial, we'll learn how to build a multilingual application using React Native and Strapi 5.
Prerequisites
The following are required to follow along with this tutorial:
- NodeJs installation on our local machine.
- A Good understanding of Strapi.
- Basic Knowledge of React Native
To follow along with the tutorial, clone the repository for this project on my GitHub.
Benefits of Using React Native
React Native is a JavaScript framework that is used for creating mobile applications with the help of the React library. It also allows developers to write the code once and be able to compile the code on both the iOS and the Android operating systems. Here are some benefits of using React Native for multilingual app development:
- Cross-Platform Development: Shared code base for the Android and iOS operating systems.
- Large Ecosystem: Availability of resources such as tutorials and community support.
- Performance: Increased application performance.
- Hot Reloading: Real-time code update during development without closing the app.
- Modular Architecture: It can be easily managed and scaled.
Benefits of Using Strapi
Strapi is a headless CMS (Content Management System) that is highly customizable and easy to use. It allows developers to manage and serve content through APIs, making it an excellent choice for multilingual app development. Here are some benefits of using Strapi:
- It has a robust API for fetching and managing content.
- It has customizable content types and structures.
- Offers an intuitive admin panel for content management.
- Built-in tools for handling multiple languages.
- It has a strong community and regular updates.
Installing Strapi 5
Start by creating a new Strapi 5 project by running the command below:
npx create-strapi-app@rc my-project --quickstartThe above command will scaffold a new Strapi Content Management System project and install the required Node.js dependencies.
Fill out the forms to create your administrator user account.
Creating content types and models in Strapi
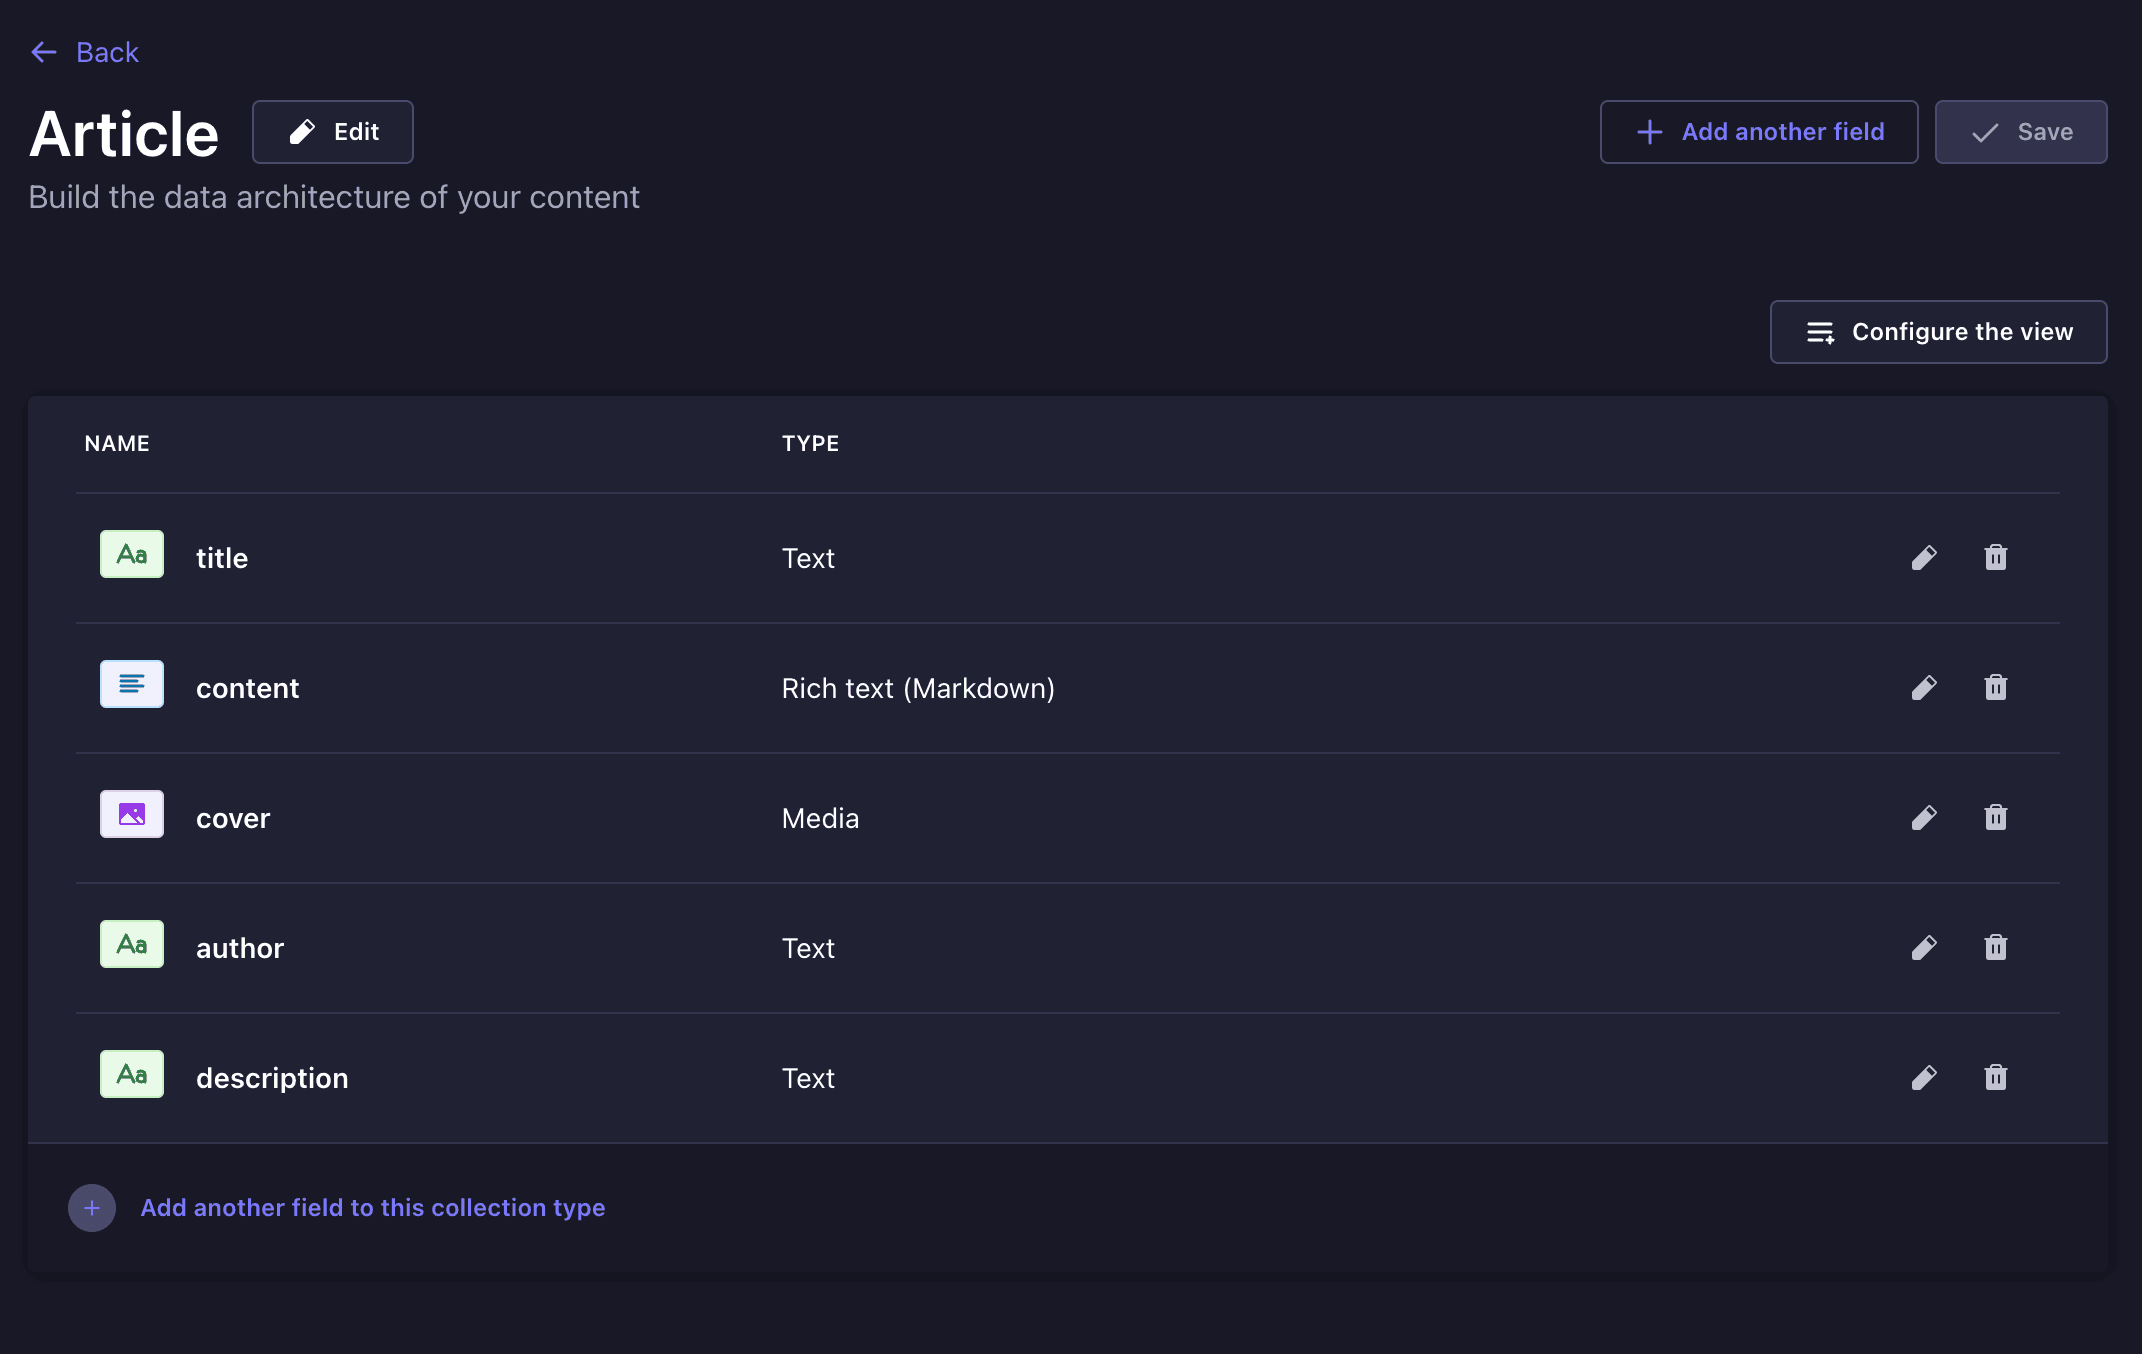
After creating a Strapi project by following the get started quick guide called my-project, create a collection named Article in your Strapi admin with these fields.
title: A text field. This field should be set as required and unique to avoid having two articles with the same title.content: A Rich text Markdown Field. This field will be the main content formatted in Markdown.cover: A media field. It will represent the cover image of each article.author: A text field. It should be set as required, as it will represent the article's author.description: A text field. It should also be set as required.
To learn more about content types in Strapi 5, visit the Strapi Documentation. After adding these fields to your Article collection, it will look the screenshot below:
Enabling Internalization
In Strapi 5, Internationalization (i18n) is not handled as a plugin anymore, and it comes enabled by default it is now part of Strapi core. But you to enable or disable it on your content type level and you can enable/disable it on the field level for i18n-enabled content type.
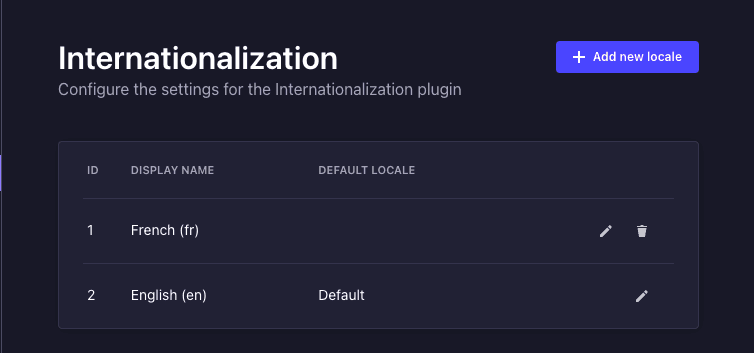
To do that, navigate to Settings > Internalization to add more locale to the array of locales allowed for your project. By default, every Strapi project uses the English(en) locale. Click the "Add new locale" button to add a new locale.
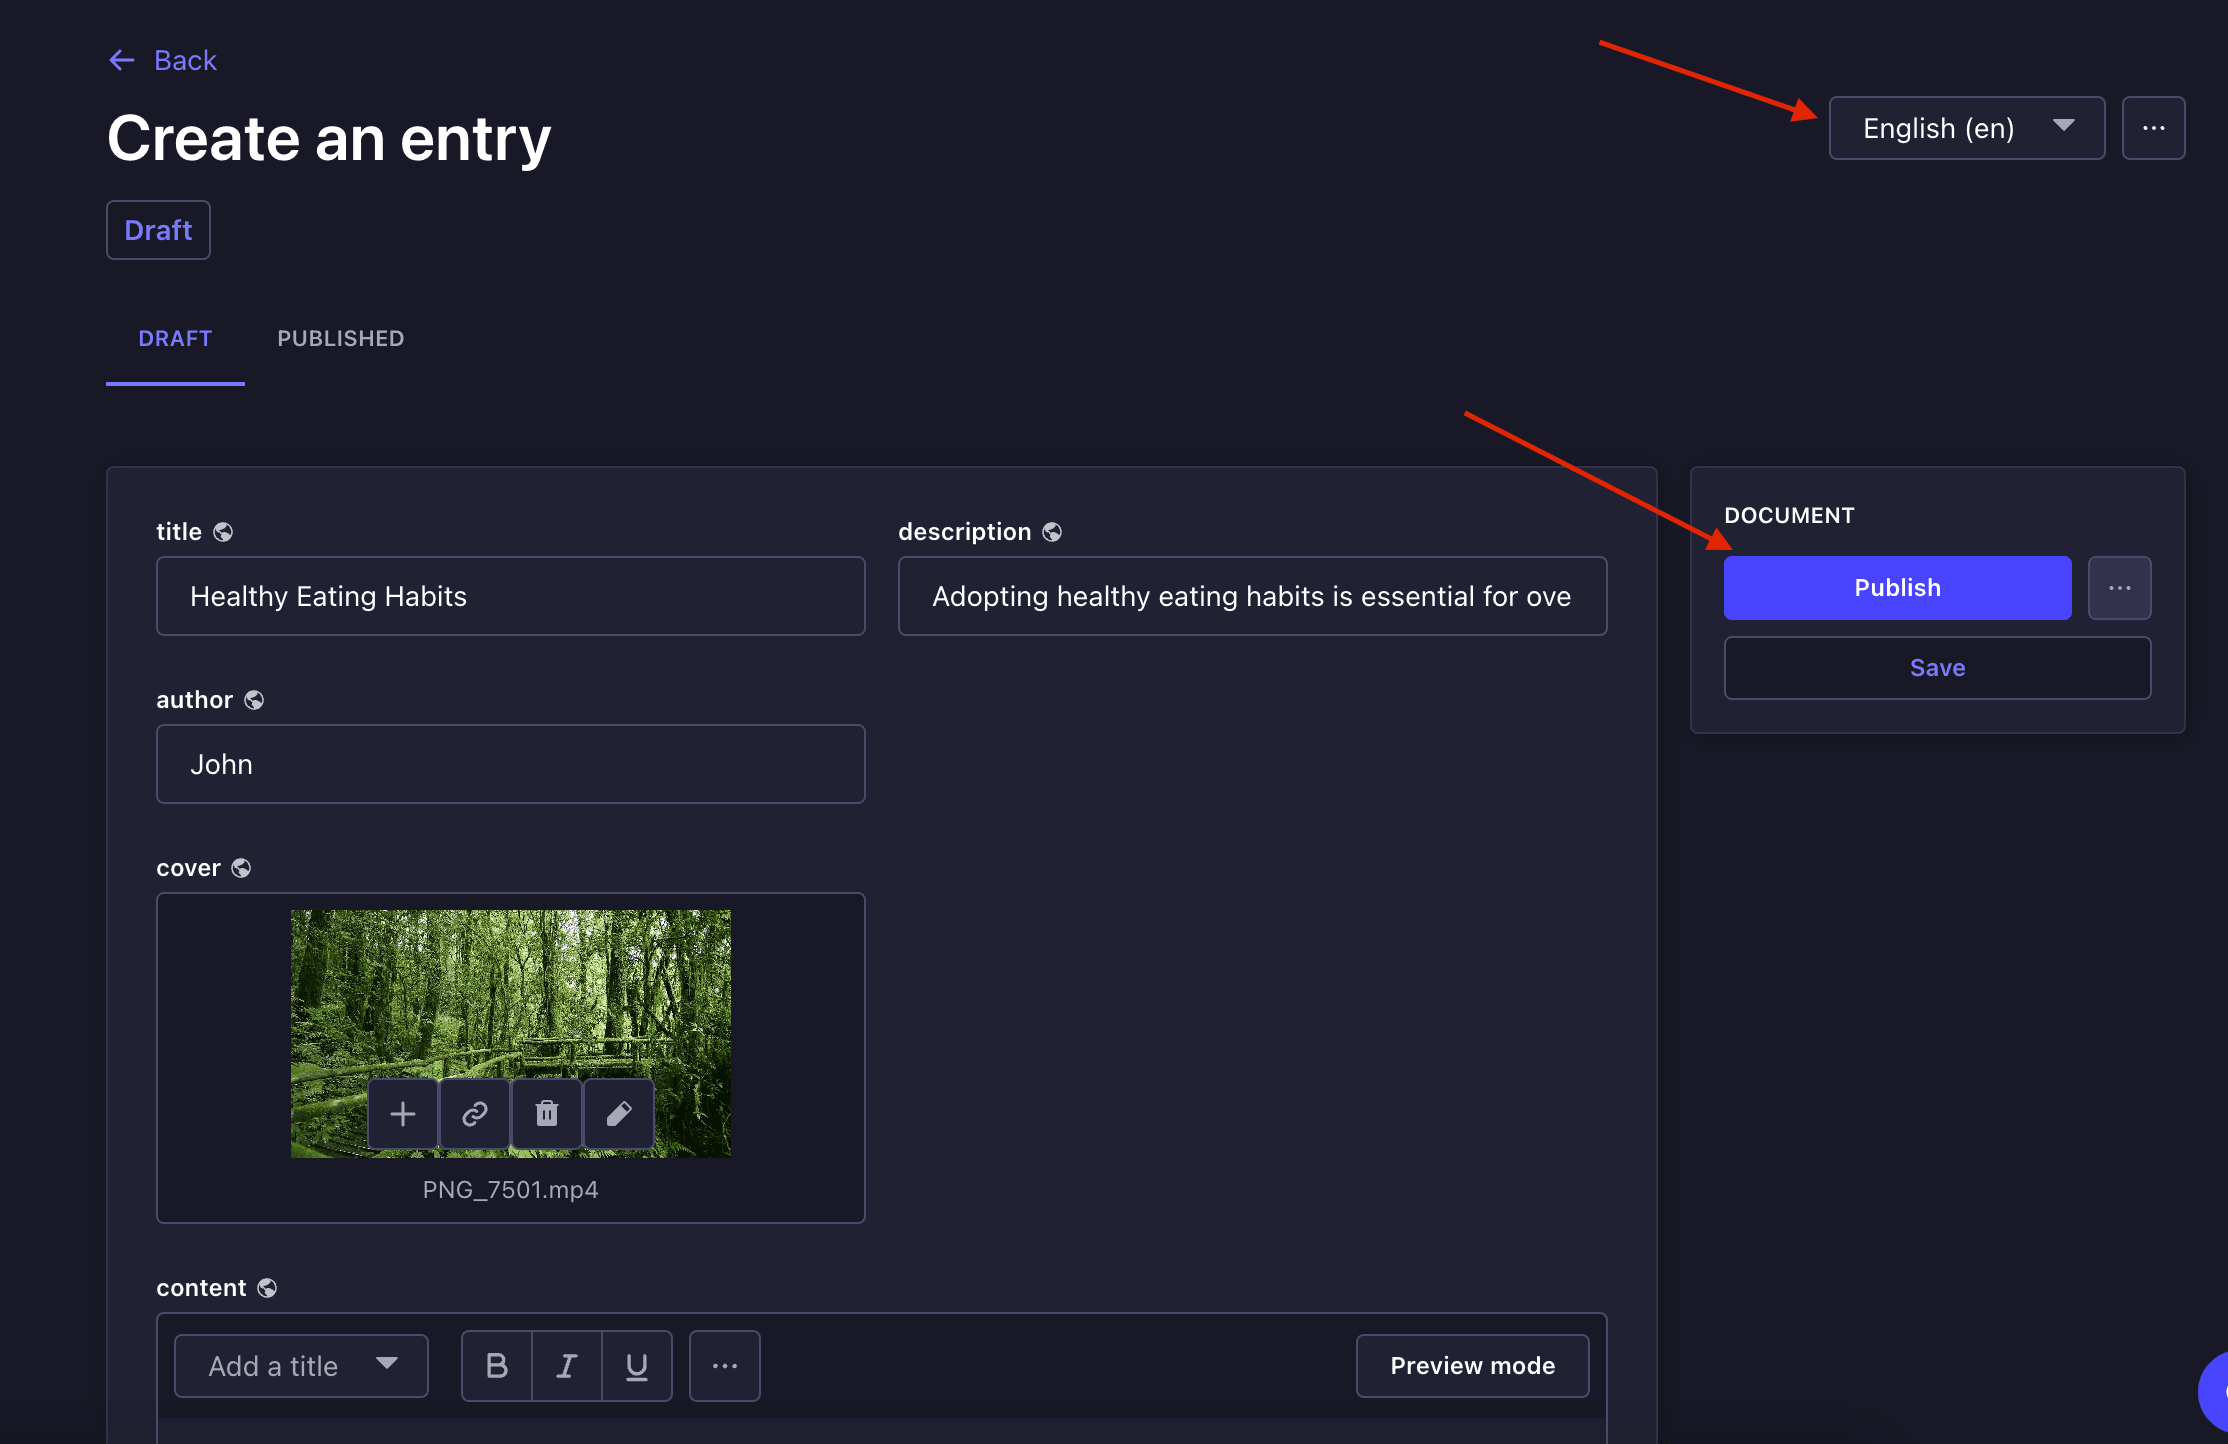
For this tutorial, we'll add the French locale. But feel free to add as many locales as you want your application to support. Your Internationalization page should look like the screenshot below:
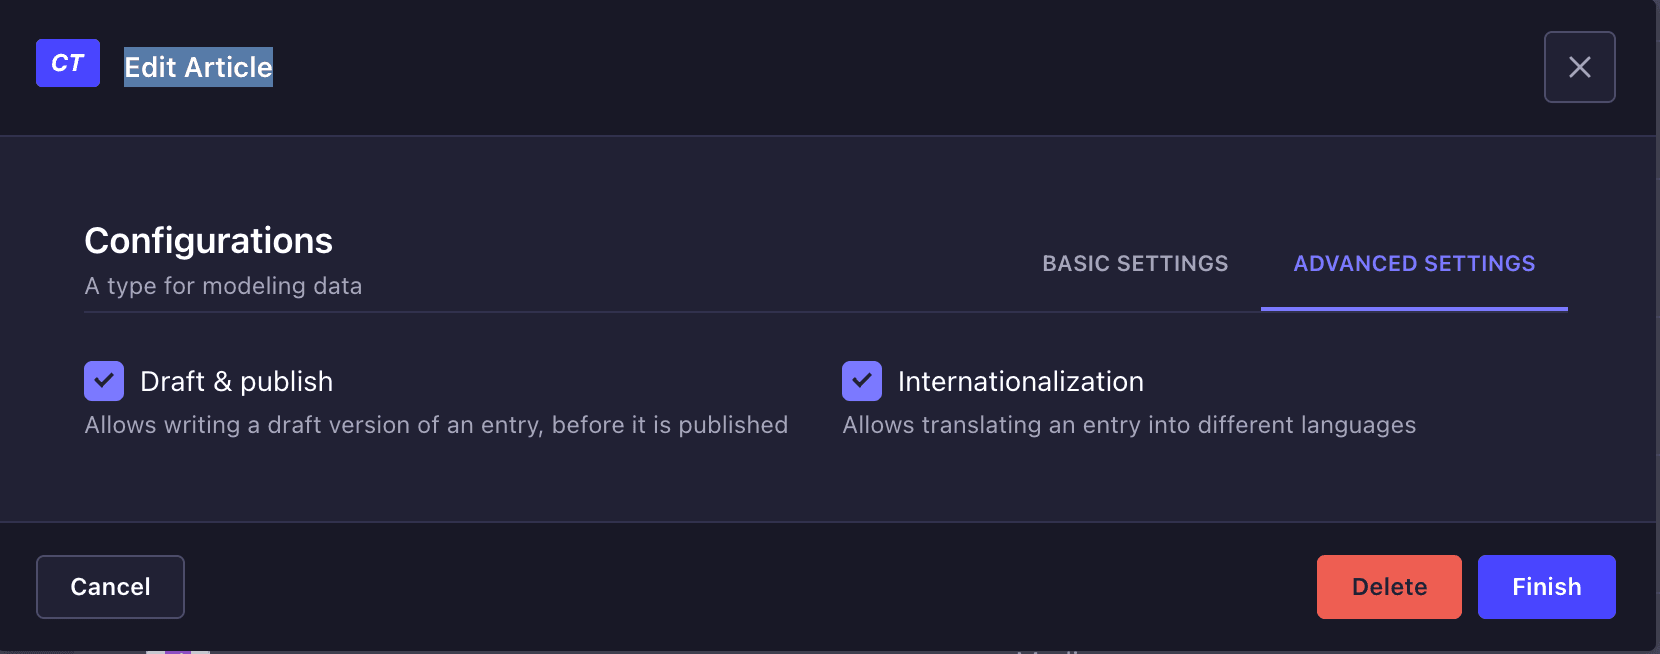
Then, navigate to Content-Type Builder > Article to edit the Article collection. From the Edit Article modal, click on the Advanced Settings check the Internalization box, and click the Finish button.
Now navigate to the Content Manager > Article and add 3 entries to the new Article collection—here's some sample data. Select the language from the dropdown field to create entries for both English(en) and French(fr).
Enable Public Access to Collection
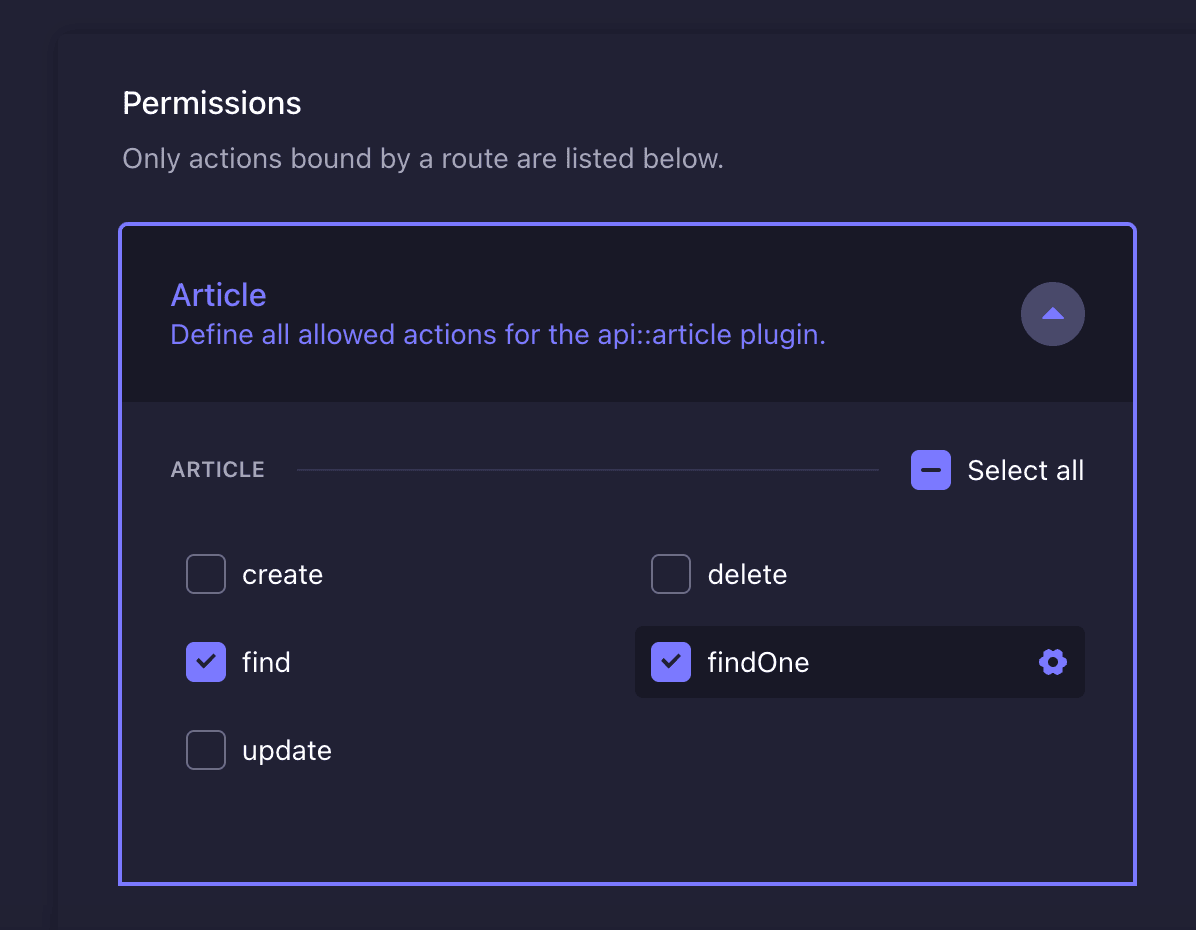
To allow public users access to the data in the Article collection, you must grant the Public role read access. Click on Settings on the left sidebar. Again, On the left panel under USERS & PERMISSIONS PLUGIN, click on Roles and Public from the table on the right. Now scroll down, click on Article, and tick Select All. After that, Click the Save button.
With these, we are set to create our React Native application.
Creating a React Native Application
Now create a new React Native project using Expo by running the command below:
npx create-expo-app multi-language-app --template blank
cd multi-language-app
The above command will scaffold a new React Native project and CD into it.
Next, install the required dependencies for this project.
npm install @react-native-async-storage/async-storage @react-navigation/native @react-navigation/stack axios install npm react-native-markdown-display react-native-safe-area-context react-native-screensHere, we installed the following dependencies:
- @react-native-async-storage/async-storage for key-value storage system for React Native.
- @react-navigation/native, @react-navigation/stack to implement navigation,
- axios to send API requests to our Strapi CMS
- async-storage to store users preferred language across the application.
- react-native-markdown-display to render the Markdown in the content field.
Fetching localized content from Strapi in React Native
With your React Native application, let's fetch the contents you have created in your Strapi CMS. Create a services folder; in the services folder, create an api.js file and add the code snippet below to fetch the contents:
import axios from "axios";

const API_URL = "http://localhost:1337";

export const fetchArticles = async (locale) => {
  try {
    const response = await axios.get(
      `${API_URL}/api/articles?populate=cover&locale=${locale}`
    );
    return response.data.data;
  } catch (error) {
    console.error(error);
    throw error;
  }
};

export const fetchArticleById = async (id, locale) => {
  try {
    const response = await axios.get(
      `${API_URL}/api/articles/${id}?populate=cover&locale=${locale}`
    );
    return response.data.data;
  } catch (error) {
    console.error(error);
    throw error;
  }
};
In the above code snippet, we defined a fetchArticles function to fetch all the articles. In this function, we accept a locale as a parameter and add it as part of the URL parameters to dynamically fetch the article and translate it to the language specified in the locale. By default, the media files stored in Strapi are unavailable when you fetch them; you need to populate them. We also define a fetchArticleById function; this function takes an additional argument id to dynamically fetch a blog that matches the id and format translate it to the language specified in the locale variable.
Handling language switching and persisting user preferences
We need to allow the users to switch between languages and save their preferred language across the application. To do that, create a context folder and create a languageContext.js file in the context folder and add the code snippets:
import React, { createContext, useState, useEffect } from 'react';
import AsyncStorage from '@react-native-async-storage/async-storage';

const LanguageContext = createContext();

const LanguageProvider = ({ children }) => {
  const [language, setLanguage] = useState('en');

  useEffect(() => {
    const loadLanguage = async () => {
      const savedLanguage = await AsyncStorage.getItem('language');
      if (savedLanguage) {
        setLanguage(savedLanguage);
      }
    };

    loadLanguage();
  }, []);

  const switchLanguage = async (lang) => {
    setLanguage(lang);
    AsyncStorage.clear();
    await AsyncStorage.setItem('language', lang);
  };

  return (
    <LanguageContext.Provider value={{ language, switchLanguage }}>
      {children}
    </LanguageContext.Provider>
  );
};

export { LanguageContext, LanguageProvider };
This code creates a context and provider for managing and persisting the language preference in a React Native application using AsyncStorage package. We defined the following:
LanguageContext: This is a context for sharing the current language and a function for switching languages across the application.LanguageProvider: A provider component that manages and persists the language state usingAsyncStorage.language: Holds the current language state, initialized toen(English).useEffectHook: Loads the saved language from AsyncStorage when the component mounts and updates thelanguagestate if a savedlanguageis found.switchLanguageFunction: Changes the current language state and saves the new language toAsyncStorage.LanguageContext.Provider: Provides thelanguagestate andswitchLanguagefunction to all child components wrapped byLanguageProvider.
Integrating React Native with Strapi API
Fetch and Render All Articles in the Home Screen
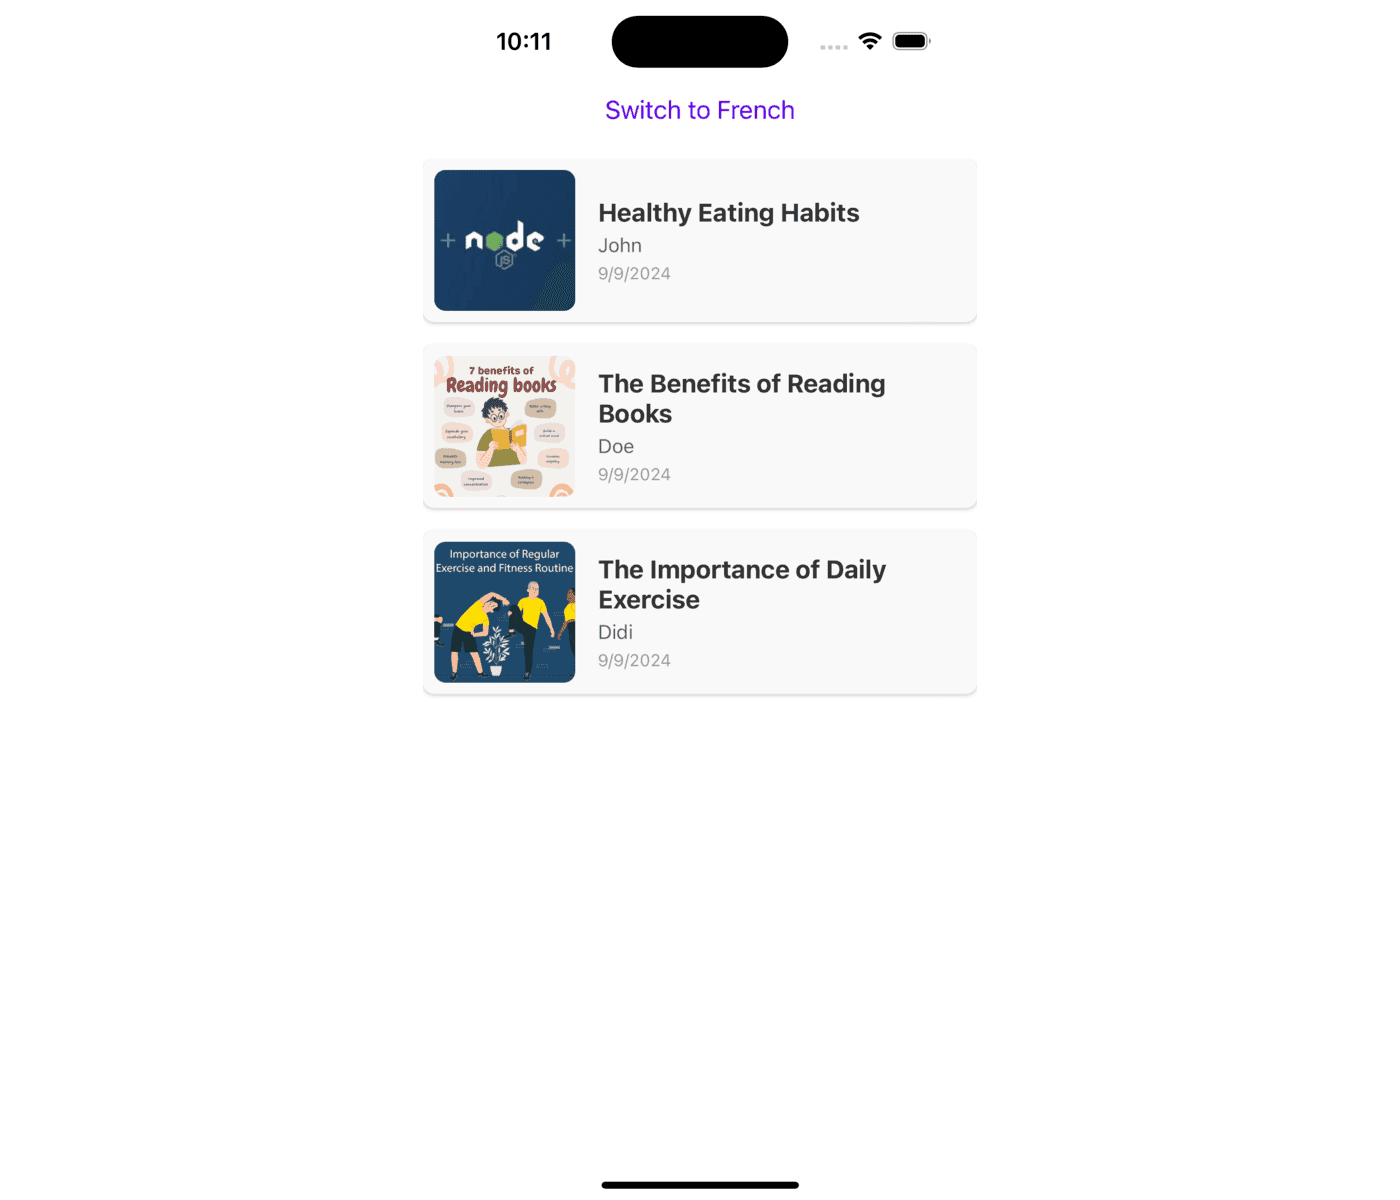
Let's use the API services and language context to integrate Strapi with our React Native application. First, create a screens folder. Create HomeScreen.js and Article.js files inside the folder, which represent the home screen and articles screen, respectively. We'll render all the articles on the home screen, and on the article screen, we'll dynamically render individual articles. Add the code snippet below to the HomeScreen.js file:
import React, { useContext, useEffect, useState } from "react";
import {
  View,
  Text,
  Button,
  FlatList,
  TouchableOpacity,
  Image,
  StyleSheet,
  SafeAreaView,
} from "react-native";
import { useNavigation } from "@react-navigation/native";
import { LanguageContext } from "../contexts/LanguageContext";
import { fetchArticles } from "../services/api";

const HomeScreen = () => {
  const { language, switchLanguage } = useContext(LanguageContext);
  const [articles, setArticles] = useState([]);
  const navigation = useNavigation();

  useEffect(() => {
    const loadArticles = async () => {
      const fetchedArticles = await fetchArticles(language);
      setArticles(fetchedArticles);
    };

    loadArticles();
  }, [language]);

  return (
    <SafeAreaView style={styles.container}>
      <View style={styles.buttonContainer}>
        <Button
          title={`Switch to ${language === "en" ? "French" : "English"}`}
          onPress={() => switchLanguage(language === "en" ? "fr" : "en")}
          color="#6200ee"
        />
      </View>
      <FlatList
        data={articles}
        keyExtractor={(item) => item.id.toString()}
        renderItem={({ item }) => (
          <TouchableOpacity
            onPress={() =>
              navigation.navigate("Article", { articleId: item.id })
            }
          >
            <View style={styles.articleContainer}>
              <Image
                source={{
                  uri:
                    `http://localhost:1337` +
                    item.cover[0].url,
                }}
                style={styles.image}
              />
              <View style={styles.textContainer}>
                <Text style={styles.title}>{item.title}</Text>
                <Text style={styles.author}>{item.author}</Text>
                <Text style={styles.date}>
                  {new Date(item.createdAt).toLocaleDateString()}
                </Text>
              </View>
            </View>
          </TouchableOpacity>
        )}
      />
    </SafeAreaView>
  );
};

const styles = StyleSheet.create({
  //...
});

export default HomeScreen;
In the above code snippet, we used the languageContext to get the language selected by the user and switchLanguage function to change the language. Then, when the component mounts, we invoke the fetchArticles function, which will run any time the value of the language changes. We added a Button component from React Native and attached an event listener to change the language and conditionally display "Switch to French" or "Switch to English," depending on the selected language.
Render the Home Screen
To allow users to navigate to the Article screen to view the article contents, we added navigation using navigation.navigate from the React Navigation useNavigation() class.
Next, update the code in your App.js to configure the navigation and render this component.
import React from 'react';
import { NavigationContainer } from '@react-navigation/native';
import { createStackNavigator } from '@react-navigation/stack';
import { LanguageProvider } from './contexts/LanguageContext';
import HomeScreen from './screens/HomeScreen';
const Stack = createStackNavigator();

const App = () => {
  return (
    <LanguageProvider>
      <NavigationContainer>
        <Stack.Navigator>
          <Stack.Screen name="Home" component={HomeScreen}  options={{ headerShown: false }}/>
        </Stack.Navigator>
      </NavigationContainer>
    </LanguageProvider>
  );
};

export default App;
Here, we defined the navigation stacks for the application using the createStackNavigator() class from React Navigation; we then added the HomeScreen to the stack, which will be the first screen that shows when a user opens the application. This is because it is the first screen on the navigation stack. The headerShown: false option passed to the HomeScreen prevents the headers from showing which is a title for the screen. Copy the styles for the HomeScreen here.
Fetch and Render Individual Article
Next, add the code snippet below to the Article.js file to render the individual articles:
// screens/ArticleScreen.js
import React, { useContext, useEffect, useState } from "react";
import {
  Text,
  Button,
  Image,
  ScrollView,
  StyleSheet,
  View,
} from "react-native";
import { LanguageContext } from "../contexts/LanguageContext";
import { fetchArticleById } from "../services/api";
import Markdown from "react-native-markdown-display";

const ArticleScreen = ({ route }) => {
  const { articleId } = route.params;
  const { language, switchLanguage } = useContext(LanguageContext);
  const [article, setArticle] = useState(null);

  useEffect(() => {
    const loadArticle = async () => {
      const fetchedArticle = await fetchArticleById(articleId, language);
      setArticle(fetchedArticle);
    };

    loadArticle();
  }, [articleId, language]);

  if (!article) {
    return <Text style={styles.loadingText}>Loading...</Text>;
  }

  return (
    <ScrollView style={styles.container}>
      <View style={styles.buttonContainer}>
        <Button
          title={`Switch to ${language === "en" ? "French" : "English"}`}
          onPress={() => switchLanguage(language === "en" ? "fr" : "en")}
          color="#6200ee"
        />
      </View>
      <Image
        source={{
          uri:
            `http://localhost:1337` +
            article.cover[0].url,
        }}
        style={styles.image}
      />
      <Text style={styles.title}>{article.title}</Text>
      <Text style={styles.author}>{article.author}</Text>
      <Text style={styles.date}>
        {new Date(article.createdAt).toLocaleDateString()}
      </Text>
      <Markdown>{article.content}</Markdown>
    </ScrollView>
  );
};

const styles = StyleSheet.create({
 //...
});

export default ArticleScreen;
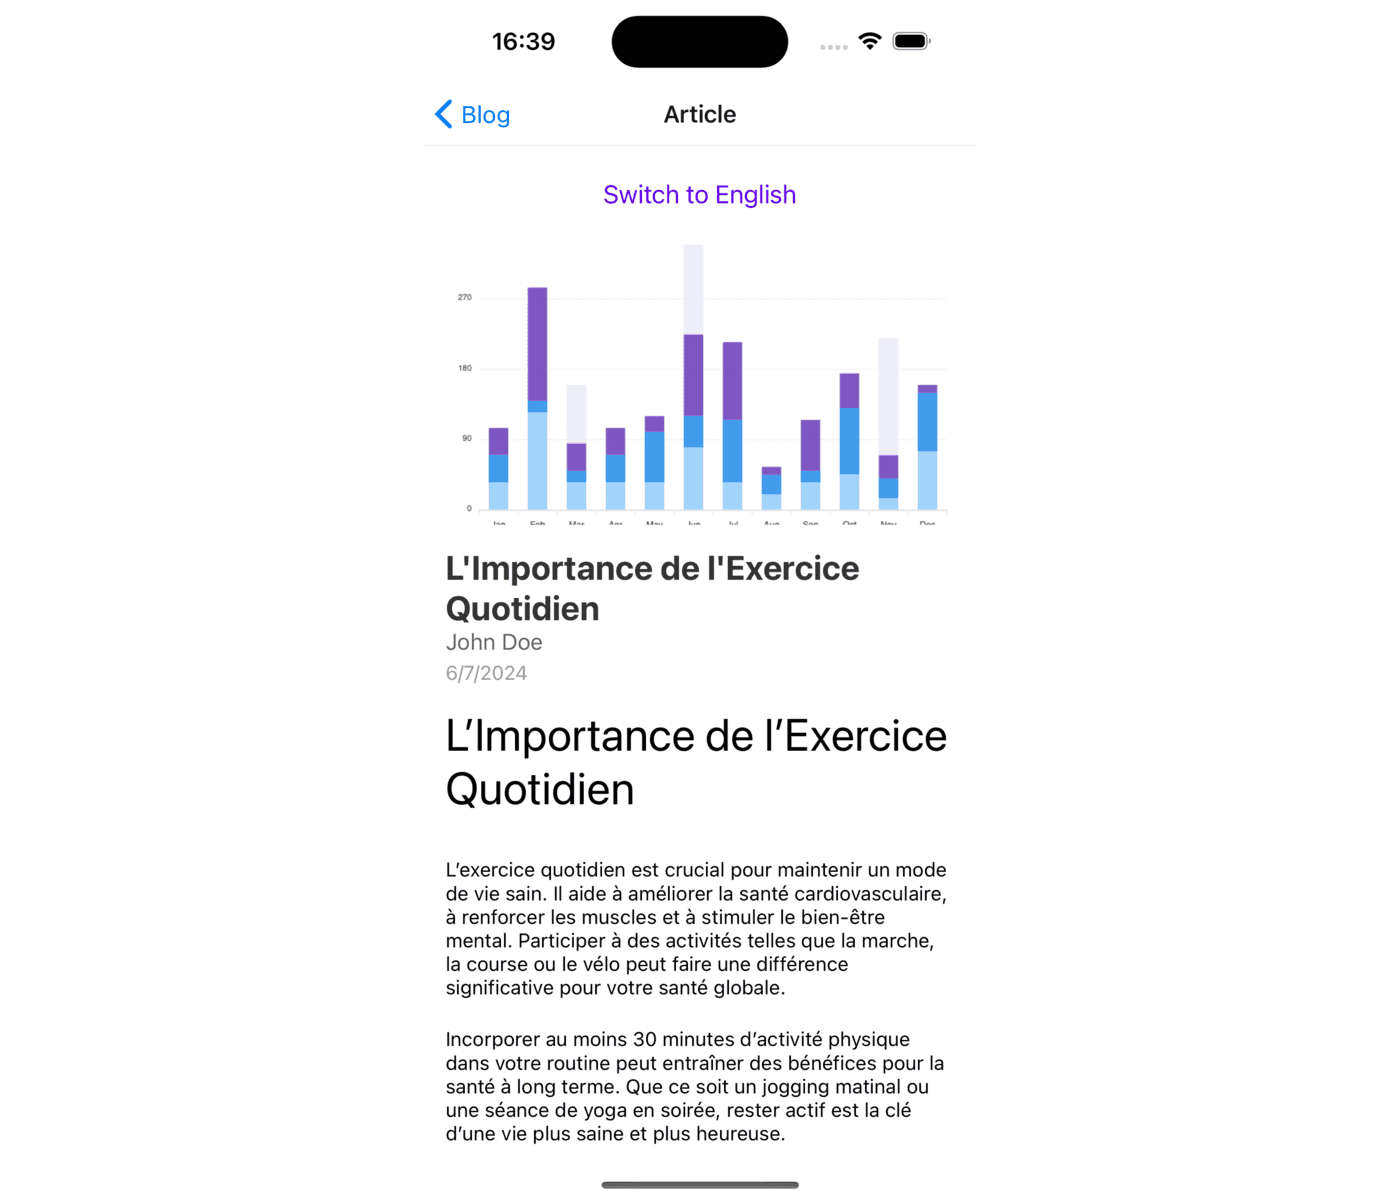
In the above code snippet, we used the languageContext to get the language selected by the user and switchLanguage function to change the language. Then, when the component mounts, we invoke the fetchArticle function, which will run any time the value of the language changes to fetch an article that matches the id of the article clicked from the HomeScreen. Then, we used the Markdown component from the react-native-markdown-display package to render the article Markdown formatted contents. Copy the styles for Article screen here.
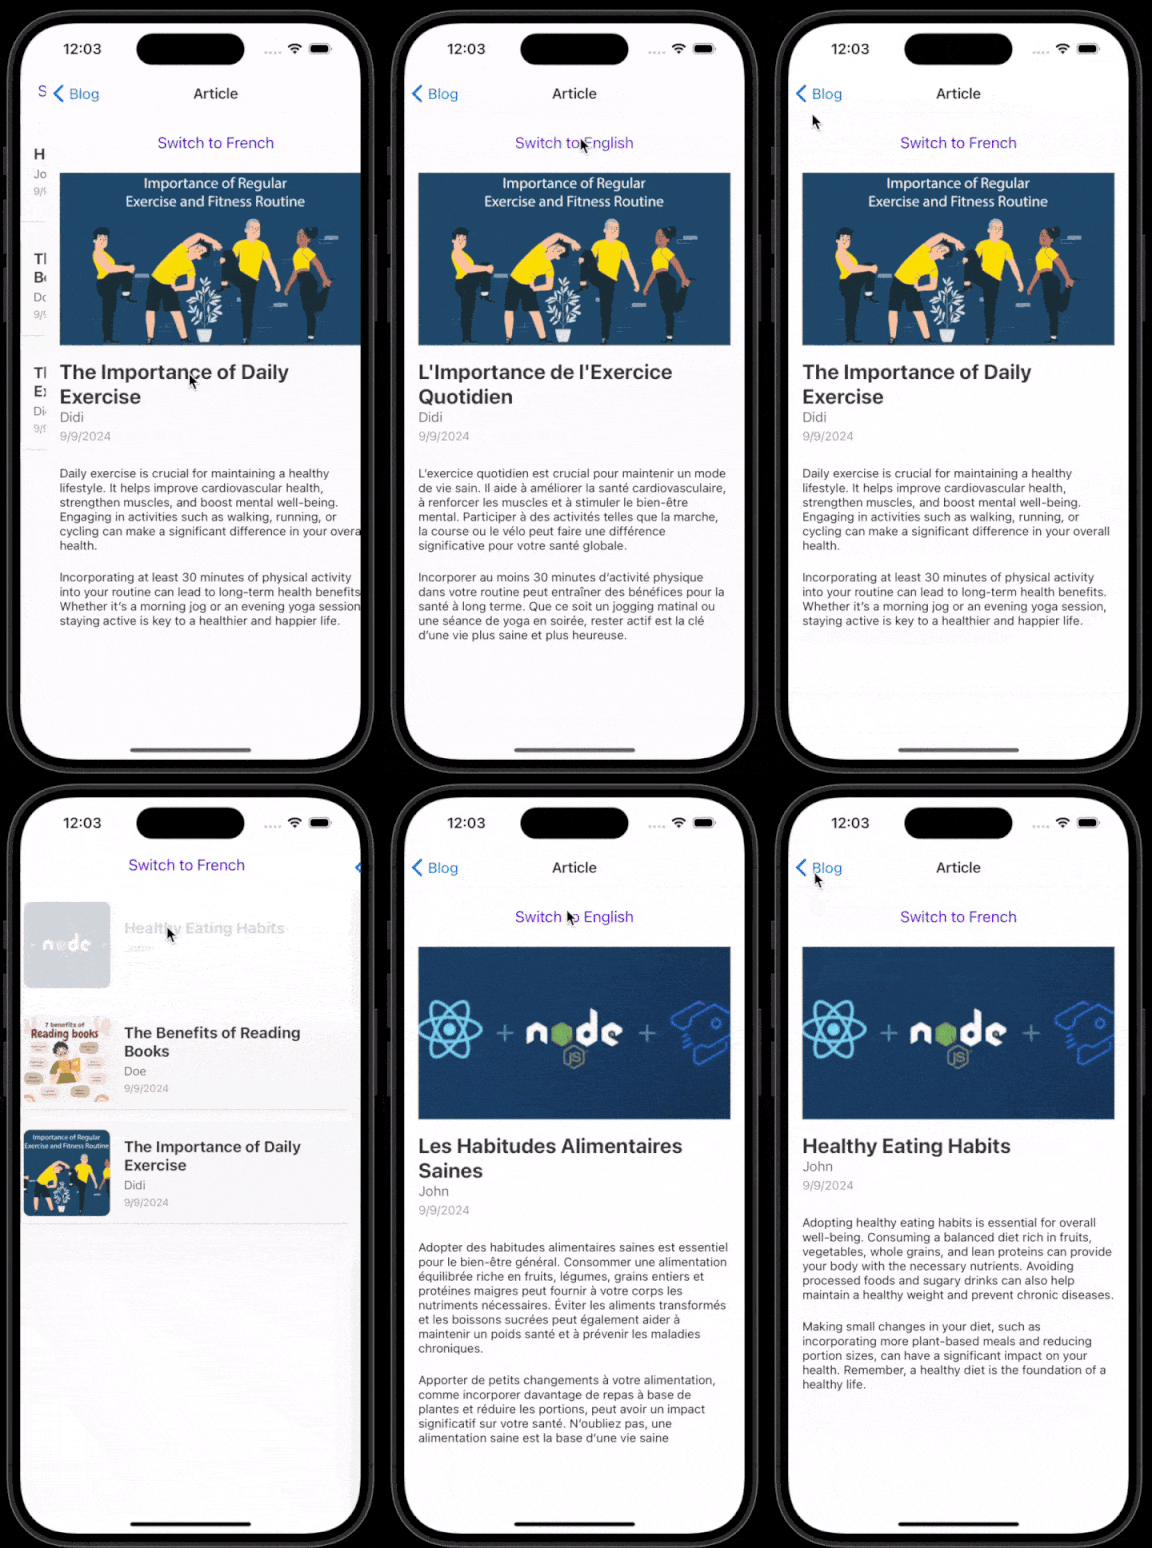
App Demo
Below is a demo of what we'll be building throughout this tutorial:
Conclusion
In this article, we explored how to build a React Native multilingual application using Strapi CMS. We achieved this by creating a collection using Strapi CMS to store articles and enabling internationalization and localization to allow us to create content in different languages. Additionally, we created a new React Native application and integrated it with the Strapi CMS. To allow users to choose and save their preferred content language across the application, we used the AsyncStorage package to achieve that.## Introduction to multilingual Apps Multilingual apps are important for reaching a global audience and improving the usability of the app since users will be able to work with it in their native language. Some of these importances include handling translations, locale formatting, and flexible user interfaces.
React Native framework supports Internationalization and localization, making your app easily adaptable to languages and regions. You can integrate with a Strapi CMS to manage and deliver your content in several languages. It has very nice and detailed documentation explaining how to set up multilingual support for your app so that the delivered content is flexible and localized to meet the different needs of your users.
In this tutorial, we'll learn how to build a multilingual application using React Native and Strapi 5.
Prerequisites
The following are required to follow along with this tutorial:
- NodeJs installation on our local machine.
- A Good understanding of Strapi.
- Basic Knowledge of React Native
To follow along with the tutorial, clone the repository for this project on my GitHub.
Benefits of Using React Native
React Native is a JavaScript framework that is used for creating mobile applications with the help of the React library. It also allows developers to write the code once and be able to compile the code on both the iOS and the Android operating systems. Here are some benefits of using React Native for multilingual app development:
- Cross-Platform Development: Shared code base for the Android and iOS operating systems.
- Large Ecosystem: Availability of resources such as tutorials and community support.
- Performance: Increased application performance.
- Hot Reloading: Real-time code update during development without closing the app.
- Modular Architecture: It can be easily managed and scaled.
Benefits of Using Strapi
Strapi is a headless CMS (Content Management System) that is highly customizable and easy to use. It allows developers to manage and serve content through APIs, making it an excellent choice for multilingual app development. Here are some benefits of using Strapi:
- It has a robust API for fetching and managing content.
- It has customizable content types and structures.
- Offers an intuitive admin panel for content management.
- Built-in tools for handling multiple languages.
- It has a strong community and regular updates.
Installing Strapi 5
Start by creating a new Strapi 5 project by running the command below:
npx create-strapi-app@rc my-project --quickstartThe above command will scaffold a new Strapi Content Management System project and install the required Node.js dependencies.
Fill out the forms to create your administrator user account.
Creating content types and models in Strapi
After creating a Strapi project by following the get started quick guide called my-project, create a collection named Article in your Strapi admin with these fields.
title: A text field. This field should be set as required and unique to avoid having two articles with the same title.content: A Rich text Markdown Field. This field will be the main content formatted in Markdown.cover: A media field. It will represent the cover image of each article.author: A text field. It should be set as required, as it will represent the article's author.description: A text field. It should also be set as required.
To learn more about content types in Strapi 5, visit the Strapi Documentation. After adding these fields to your Article collection, it will look the screenshot below:

Enabling Internalization
In Strapi 5, Internationalization (i18n) is not handled as a plugin anymore, and it comes enabled by default it is now part of Strapi core. But you to enable or disable it on your content type level and you can enable/disable it on the field level for i18n-enabled content type.
To do that, navigate to Settings > Internalization to add more locale to the array of locales allowed for your project. By default, every Strapi project uses the English(en) locale. Click the "Add new locale" button to add a new locale.
For this tutorial, we'll add the French locale. But feel free to add as many locales as you want your application to support. Your Internationalization page should look like the screenshot below:

Then, navigate to Content-Type Builder > Article to edit the Article collection. From the Edit Article modal, click on the Advanced Settings check the Internalization box, and click the Finish button.

Now navigate to the Content Manager > Article and add 3 entries to the new Article collection—here's some sample data. Select the language from the dropdown field to create entries for both English(en) and French(fr).

Enable Public Access to Collection
To allow public users access to the data in the Article collection, you must grant the Public role read access. Click on Settings on the left sidebar. Again, On the left panel under USERS & PERMISSIONS PLUGIN, click on Roles and Public from the table on the right. Now scroll down, click on Article, and tick Select All. After that, Click the Save button.

With these, we are set to create our React Native application.
Creating a React Native Application
Now create a new React Native project using Expo by running the command below:
npx create-expo-app multi-language-app --template blank
cd multi-language-app
The above command will scaffold a new React Native project and CD into it.
Next, install the required dependencies for this project.
npm install @react-native-async-storage/async-storage @react-navigation/native @react-navigation/stack axios install npm react-native-markdown-display react-native-safe-area-context react-native-screensHere, we installed the following dependencies:
- @react-native-async-storage/async-storage for key-value storage system for React Native.
- @react-navigation/native, @react-navigation/stack to implement navigation,
- axios to send API requests to our Strapi CMS
- async-storage to store users preferred language across the application.
- react-native-markdown-display to render the Markdown in the content field.
Fetching localized content from Strapi in React Native
With your React Native application, let's fetch the contents you have created in your Strapi CMS. Create a services folder; in the services folder, create an api.js file and add the code snippet below to fetch the contents:
import axios from "axios";

const API_URL = "http://localhost:1337";

export const fetchArticles = async (locale) => {
  try {
    const response = await axios.get(
      `${API_URL}/api/articles?populate=cover&locale=${locale}`
    );
    return response.data.data;
  } catch (error) {
    console.error(error);
    throw error;
  }
};

export const fetchArticleById = async (id, locale) => {
  try {
    const response = await axios.get(
      `${API_URL}/api/articles/${id}?populate=cover&locale=${locale}`
    );
    return response.data.data;
  } catch (error) {
    console.error(error);
    throw error;
  }
};
In the above code snippet, we defined a fetchArticles function to fetch all the articles. In this function, we accept a locale as a parameter and add it as part of the URL parameters to dynamically fetch the article and translate it to the language specified in the locale. By default, the media files stored in Strapi are unavailable when you fetch them; you need to populate them. We also define a fetchArticleById function; this function takes an additional argument id to dynamically fetch a blog that matches the id and format translate it to the language specified in the locale variable.
Handling language switching and persisting user preferences
We need to allow the users to switch between languages and save their preferred language across the application. To do that, create a context folder and create a languageContext.js file in the context folder and add the code snippets:
import React, { createContext, useState, useEffect } from 'react';
import AsyncStorage from '@react-native-async-storage/async-storage';

const LanguageContext = createContext();

const LanguageProvider = ({ children }) => {
  const [language, setLanguage] = useState('en');

  useEffect(() => {
    const loadLanguage = async () => {
      const savedLanguage = await AsyncStorage.getItem('language');
      if (savedLanguage) {
        setLanguage(savedLanguage);
      }
    };

    loadLanguage();
  }, []);

  const switchLanguage = async (lang) => {
    setLanguage(lang);
    AsyncStorage.clear();
    await AsyncStorage.setItem('language', lang);
  };

  return (
    <LanguageContext.Provider value={{ language, switchLanguage }}>
      {children}
    </LanguageContext.Provider>
  );
};

export { LanguageContext, LanguageProvider };
This code creates a context and provider for managing and persisting the language preference in a React Native application using AsyncStorage package. We defined the following:
LanguageContext: This is a context for sharing the current language and a function for switching languages across the application.LanguageProvider: A provider component that manages and persists the language state usingAsyncStorage.language: Holds the current language state, initialized toen(English).useEffectHook: Loads the saved language from AsyncStorage when the component mounts and updates thelanguagestate if a savedlanguageis found.switchLanguageFunction: Changes the current language state and saves the new language toAsyncStorage.LanguageContext.Provider: Provides thelanguagestate andswitchLanguagefunction to all child components wrapped byLanguageProvider.
Integrating React Native with Strapi API
Fetch and Render All Articles in the Home Screen
Let's use the API services and language context to integrate Strapi with our React Native application. First, create a screens folder. Create HomeScreen.js and Article.js files inside the folder, which represent the home screen and articles screen, respectively. We'll render all the articles on the home screen, and on the article screen, we'll dynamically render individual articles. Add the code snippet below to the HomeScreen.js file:
import React, { useContext, useEffect, useState } from "react";
import {
  View,
  Text,
  Button,
  FlatList,
  TouchableOpacity,
  Image,
  StyleSheet,
  SafeAreaView,
} from "react-native";
import { useNavigation } from "@react-navigation/native";
import { LanguageContext } from "../contexts/LanguageContext";
import { fetchArticles } from "../services/api";

const HomeScreen = () => {
  const { language, switchLanguage } = useContext(LanguageContext);
  const [articles, setArticles] = useState([]);
  const navigation = useNavigation();

  useEffect(() => {
    const loadArticles = async () => {
      const fetchedArticles = await fetchArticles(language);
      setArticles(fetchedArticles);
    };

    loadArticles();
  }, [language]);

  return (
    <SafeAreaView style={styles.container}>
      <View style={styles.buttonContainer}>
        <Button
          title={`Switch to ${language === "en" ? "French" : "English"}`}
          onPress={() => switchLanguage(language === "en" ? "fr" : "en")}
          color="#6200ee"
        />
      </View>
      <FlatList
        data={articles}
        keyExtractor={(item) => item.id.toString()}
        renderItem={({ item }) => (
          <TouchableOpacity
            onPress={() =>
              navigation.navigate("Article", { articleId: item.id })
            }
          >
            <View style={styles.articleContainer}>
              <Image
                source={{
                  uri:
                    `http://localhost:1337` +
                    item.cover[0].url,
                }}
                style={styles.image}
              />
              <View style={styles.textContainer}>
                <Text style={styles.title}>{item.title}</Text>
                <Text style={styles.author}>{item.author}</Text>
                <Text style={styles.date}>
                  {new Date(item.createdAt).toLocaleDateString()}
                </Text>
              </View>
            </View>
          </TouchableOpacity>
        )}
      />
    </SafeAreaView>
  );
};

const styles = StyleSheet.create({
  //...
});

export default HomeScreen;
In the above code snippet, we used the languageContext to get the language selected by the user and switchLanguage function to change the language. Then, when the component mounts, we invoke the fetchArticles function, which will run any time the value of the language changes. We added a Button component from React Native and attached an event listener to change the language and conditionally display "Switch to French" or "Switch to English," depending on the selected language.
Render the Home Screen
To allow users to navigate to the Article screen to view the article contents, we added navigation using navigation.navigate from the React Navigation useNavigation() class.
Next, update the code in your App.js to configure the navigation and render this component.
import React from 'react';
import { NavigationContainer } from '@react-navigation/native';
import { createStackNavigator } from '@react-navigation/stack';
import { LanguageProvider } from './contexts/LanguageContext';
import HomeScreen from './screens/HomeScreen';
const Stack = createStackNavigator();

const App = () => {
  return (
    <LanguageProvider>
      <NavigationContainer>
        <Stack.Navigator>
          <Stack.Screen name="Home" component={HomeScreen}  options={{ headerShown: false }}/>
        </Stack.Navigator>
      </NavigationContainer>
    </LanguageProvider>
  );
};

export default App;
Here, we defined the navigation stacks for the application using the createStackNavigator() class from React Navigation; we then added the HomeScreen to the stack, which will be the first screen that shows when a user opens the application. This is because it is the first screen on the navigation stack. The headerShown: false option passed to the HomeScreen prevents the headers from showing which is a title for the screen. Copy the styles for the HomeScreen here.

Fetch and Render Individual Article
Next, add the code snippet below to the Article.js file to render the individual articles:
// screens/ArticleScreen.js
import React, { useContext, useEffect, useState } from "react";
import {
  Text,
  Button,
  Image,
  ScrollView,
  StyleSheet,
  View,
} from "react-native";
import { LanguageContext } from "../contexts/LanguageContext";
import { fetchArticleById } from "../services/api";
import Markdown from "react-native-markdown-display";

const ArticleScreen = ({ route }) => {
  const { articleId } = route.params;
  const { language, switchLanguage } = useContext(LanguageContext);
  const [article, setArticle] = useState(null);

  useEffect(() => {
    const loadArticle = async () => {
      const fetchedArticle = await fetchArticleById(articleId, language);
      setArticle(fetchedArticle);
    };

    loadArticle();
  }, [articleId, language]);

  if (!article) {
    return <Text style={styles.loadingText}>Loading...</Text>;
  }

  return (
    <ScrollView style={styles.container}>
      <View style={styles.buttonContainer}>
        <Button
          title={`Switch to ${language === "en" ? "French" : "English"}`}
          onPress={() => switchLanguage(language === "en" ? "fr" : "en")}
          color="#6200ee"
        />
      </View>
      <Image
        source={{
          uri:
            `http://localhost:1337` +
            article.cover[0].url,
        }}
        style={styles.image}
      />
      <Text style={styles.title}>{article.title}</Text>
      <Text style={styles.author}>{article.author}</Text>
      <Text style={styles.date}>
        {new Date(article.createdAt).toLocaleDateString()}
      </Text>
      <Markdown>{article.content}</Markdown>
    </ScrollView>
  );
};

const styles = StyleSheet.create({
 //...
});

export default ArticleScreen;
In the above code snippet, we used the languageContext to get the language selected by the user and switchLanguage function to change the language. Then, when the component mounts, we invoke the fetchArticle function, which will run any time the value of the language changes to fetch an article that matches the id of the article clicked from the HomeScreen. Then, we used the Markdown component from the react-native-markdown-display package to render the article Markdown formatted contents. Copy the styles for Article screen here.

App Demo
Below is a demo of what our app looks like:

Conclusion
In this article, we explored how to build a React Native multilingual application using Strapi CMS. We achieved this by creating a collection using Strapi CMS to store articles and enabling internationalization and localization to allow us to create content in different languages. Additionally, we created a new React Native application and integrated it with the Strapi CMS. To allow users to choose and save their preferred content language across the application, we used the AsyncStorage package to achieve that.