Introduction
In this Astro.js tutorial series, we will explore how to work with Astro.js, a popular front-end framework, and Strapi Headless CMS.
Tutorial Outline
This post is the first of many in our Astro and Strapi tutorial. You can find the outline for upcoming post here.
- Part 1: Introduction to Astro
- Part 2: Introduction to Strapi
- Part 3: Building the Main Project
Prerequisites
- A Code Editor. You can use any code editor of your choice. However, for this project, we will use Visual Studio Code.
- Node.js Runtime installed on your local machine.
- You should have a good background in HTML and JavaScript.
- Optionally, a Postgres database instance running on your machine.
What you Will Learn
Throughout this tutorial, you will learn the following:
- Introduction to the basics of Astro.js.
- Static Site Generation in Astro.js.
- Server-Side Rendering in Astro.js.
- Internationalization in Strapi.
- Strapi Dynamic Zones.
- Strapi and Astro.js integration.
- Images in Astro.js.
- Data fetching in Astro.js.
- Pagination in Astro.js.
- Build a project using Astro.js and Strapi.
What are we Building?
In the final part of this tutorial, we will be building a website for the Harry Potter universe.
You can see a demo for the application below:

Features of the App
Below are the several features of the application. We will be putting the individual pieces together for this application in a step-by-step manner.
- Homepage
- Blog
- Articles
- Article Content
- Multilingual Blog (Spanish and English): This will be enabled using the Strapi Internationalization API.
Introduction to Astro
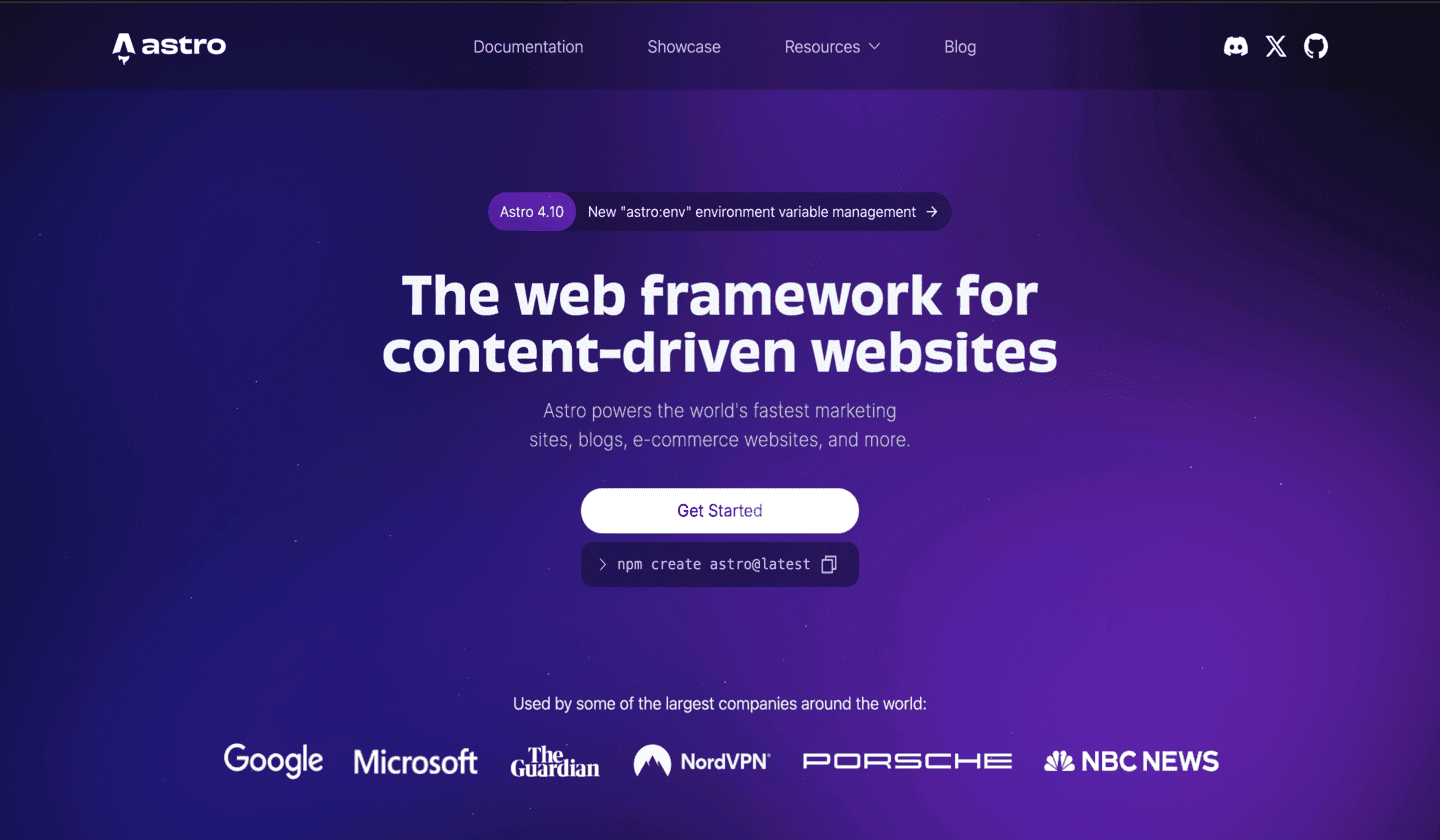
As seen above, Astro is known as "The web framework for content-driven websites".
Astro is an all-in-one framework designed for speed. The Astro website offers various resources and documentation.
Basic Astro Application Overview
Our journey with Astro begins with a simple task-creating a basic application. This straightforward step is designed to ease us into the framework.
Astro Installation
To get started, we open up an editor. In the editor, we open up the terminal and run the command below:
npm create astro@latestWhen the command above is run, we will be presented with the following:
> npx
> create-astro


 astro   Launch sequence initiated.

   dir   Where should we create your new project?
         ./astro101

  tmpl   How would you like to start your new project?
         Empty

    ts   Do you plan to write TypeScript?
         No
      ◼  No worries! TypeScript is supported in Astro by default,
         but you are free to continue writing JavaScript instead.

  deps   Install dependencies?
         Yes

   git   Initialize a new git repository?
         Yes

      ✔  Project initialized!
         ■ Template copied
         ■ Dependencies installed
         ■ Git initialized

  next   Liftoff confirmed. Explore your project!

         Enter your project directory using cd ./astro101
         Run npm run dev to start the dev server. CTRL+C to stop.
         Add frameworks like react or tailwind using astro add.

         Stuck? Join us at https://astro.build/chat

╭─────╮  Houston:
│ ◠ ◡ ◠  Good luck out there, astronaut! 🚀
╰─────╯
Ensure to specify the following:
dir: Project name should beastro101.tmpl: Astro allows us to create a blog template and include some sample files or an empty project. For our project, we will use theEmptyproject.ts: Astro supports TypeScript out of the box. However, we won't be using TypeScript for this project. We will chooseNo.depsandgit: SelectYesto install dependencies and initialize a new git repository.
Understanding the Astro Project Folder
astro101/
┣ .vscode/
┃ ┣ extensions.json
┃ ┗ launch.json
┣ public/
┃ ┗ favicon.svg
┣ src/
┃ ┣ pages/
┃ ┃ ┗ index.astro
┃ ┗ env.d.ts
┣ .gitignore
┣ README.md
┣ astro.config.mjs
┣ package-lock.json
┣ package.json
┗ tsconfig.json
The display above is a basic Astro project folder structure. Below is what they mean:
src: This is the folder for creating our Astro application.pages: This folder shows that Astro uses a file-based routing system, which is notable in other front-end frameworks.pages/index.astro: This represents the index page of a route. Every route will have an individual file calledindex.astro. It is important to note that we can also include other files such as.md,.js,.ts,.html, and so on inside thepagesfolder.public: For the time being, we have only an icon here. We can add other assets later.astro.config.mjs: This is where we can specify some of Astro's behaviours. For example, we can change from Static Site Generation mode to Server-Side Rendering. You can also add extensions and plugins here as well. With the Astro robust CLI, we can modify this configuration file automatically.tsconfig.json: This is the TypeScript configuration file, but we won't be writing any TypeScript..vscode: Here, you can add some settings for Visual Studio Code.
The index.astro File
Now, let's demystify the index.astro file. Every Astro file is divided into two clear sections, making it easy for us to understand and use.
- The template section (Bottom Section): This is what the browswer should display. The template section is the bottom section of the file. It is the HTML part of the file.
- The Script or Formatter Section (Top Section): The script section is at the top section. Three dashes denote it. In between these dashes, we can write JavaScript code. Here, we can also make API requests, database queries, request API keys and secrets, and so on. This is because this section only runs on the serverside.
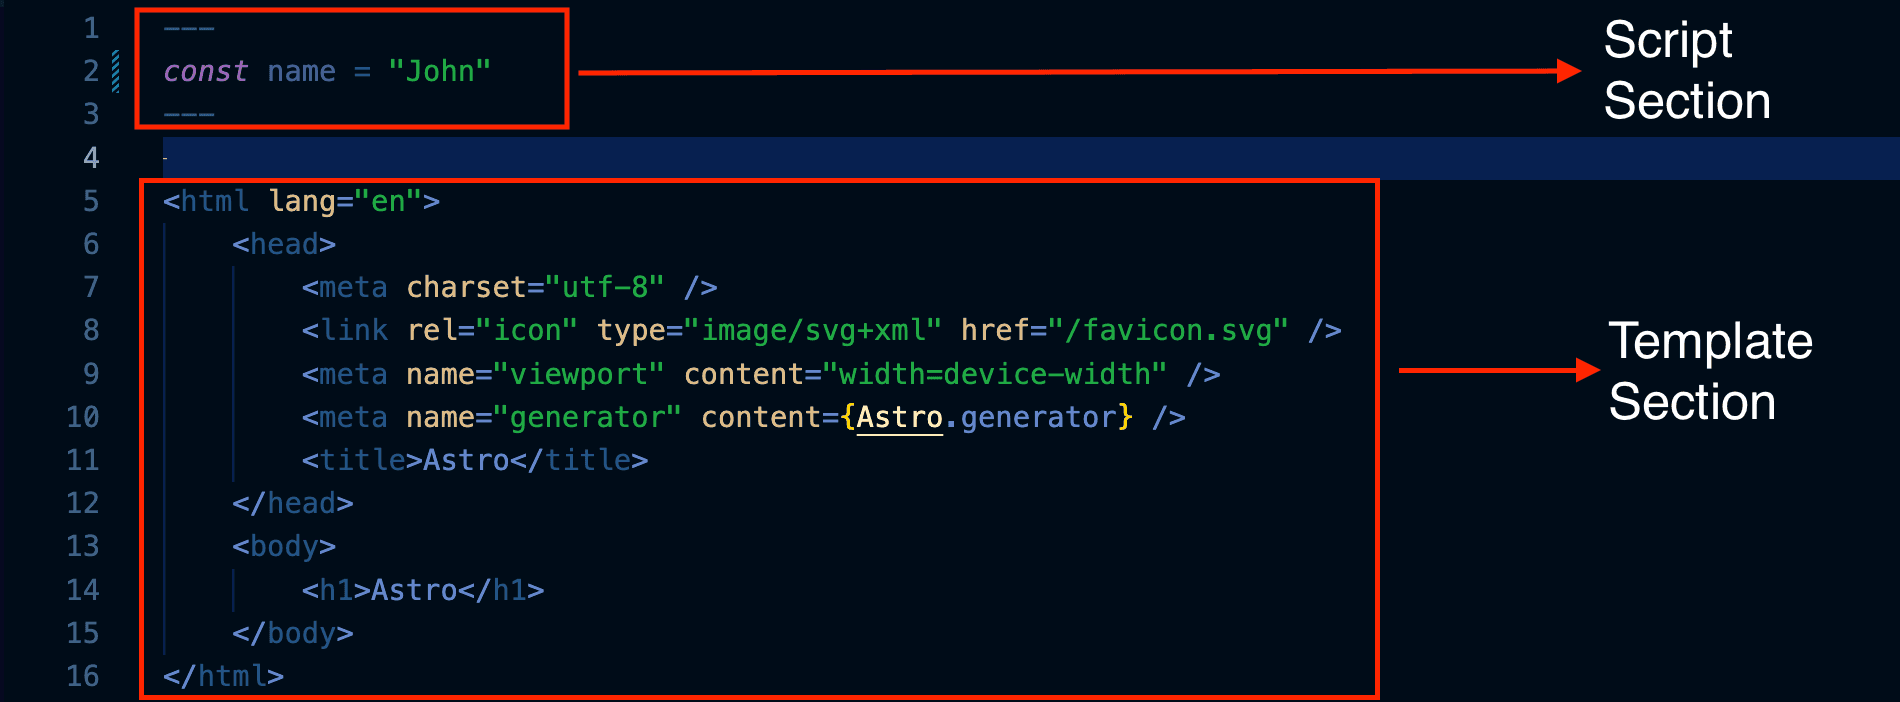
Because the default index.astro file executes at build time, Astro default behaviour is Static Site Generation (SSG). This means the application you will deploy to any provider will be generated when you create a production build.
Starting an Astro Application
Let us demonstrate what we have learned so far. Update the code inside the index.astro file in your src/pages folder with the following code:
---
const name = "John"
---

<html lang="en">
  <head>
    <meta charset="utf-8" />
    <link rel="icon" type="image/svg+xml" href="/favicon.svg" />
    <meta name="viewport" content="width=device-width" />
    <meta name="generator" content="{Astro.generator}" />
    <title>Astro</title>
  </head>
  <body>
    <h1>Hello, {name}!</h1>
  </body>
</html>
In the code above, we created a varialbe called name in the script section. And then, we evaluated and displayed this variable using the curly braces {} in the template section.
Run the Astro dev command below to fire up our development server.
npm run devOur application should be visible in the URL: http://localhost:4321/
NOTE: Astro uses PORT number
4321by default. If it is not available, Astro will use4322,4323and so on.
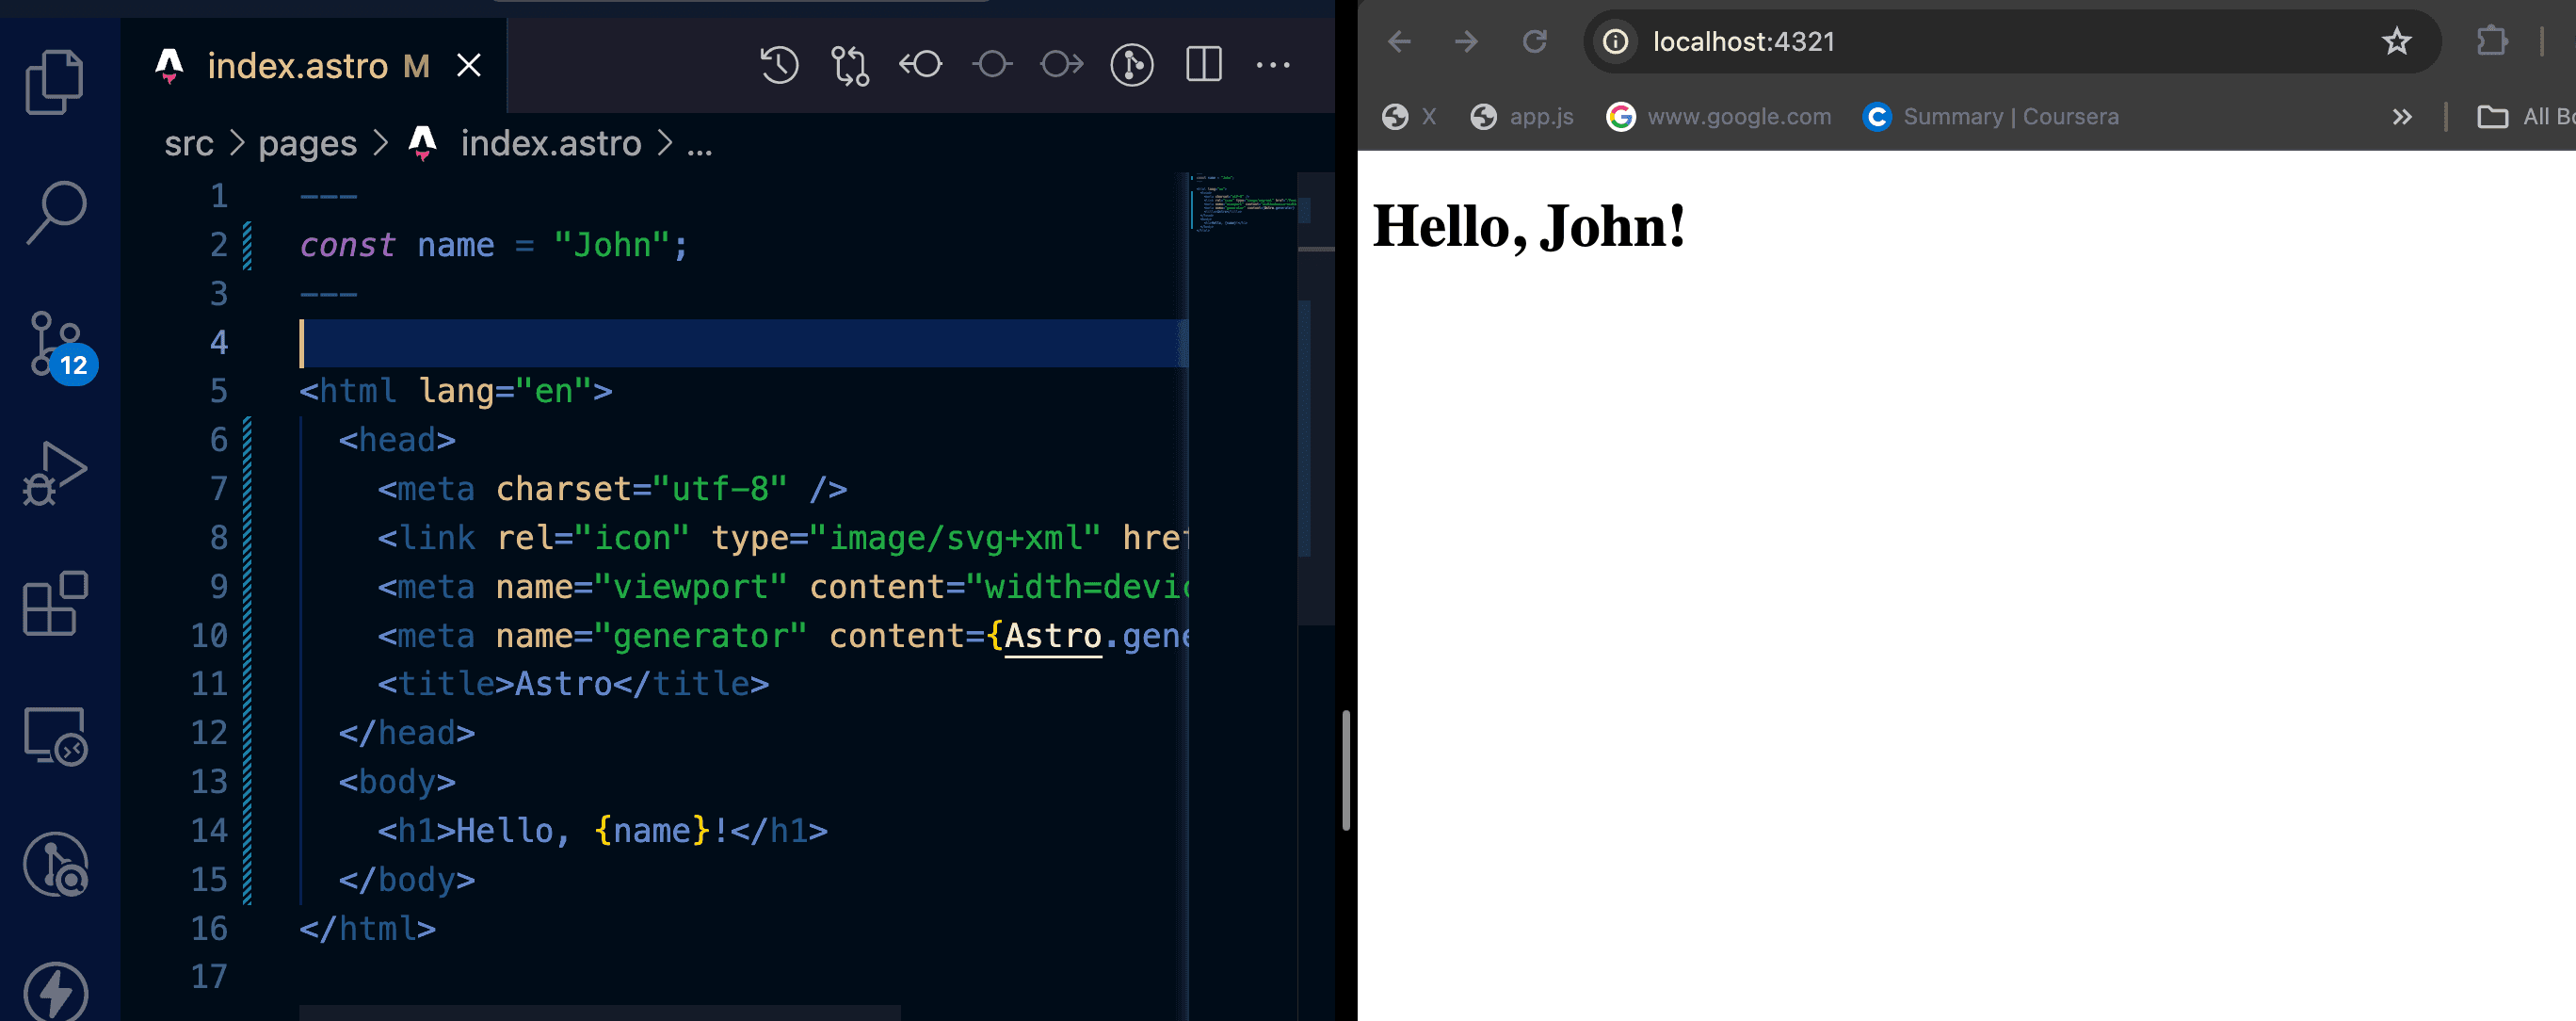
As seen above, we created a variable called name and gave it the value John which we displayed using the curly braces {}.
Try playing around with different variables and values.
Astro Layouts and Components
As stated before, the .astro pages can contain entire HTML. Creating a generic layout applicable to every Astro page makes a lot of sense. This approach will allow us to insert only some HTML into the design rather than repeating the entire HTML sections. This is the idea behind Layouts. Astro files can also be used as components, as we will see below.
Layouts
Within the src folder, create a new folder named layouts. Inside this new folder, create a new file by naming it Layout.astro.
Inside the new file, Layout.astro, paste the following code:
<html lang="en">
  <body>
    <main>
      <slot />
    </main>
  </body>
</html>
In the code above, the <slot/> tag plays a crucial role. It serves as the injection point for all the content in the astro file. We'll delve into this in a moment.
Components
Like every other Astro file, components have the .astro extension. Let us create one.
Inside the layouts folder, create a new file called Navbar.astro and paste inside it the code below:
<nav>
  <a href="/">Home</a> | <a href="/about">About</a>
</nav>
In the code above, we created a navigation bar component. The next step will be to import this into the layout file.
Open the Layout.astro file and paste in the code below:
---
import Navbar from "./Navbar.astro";
---

<html lang="en">
  <body>
    <Navbar />
    <main>
      <slot />
    </main>
  </body>
</html>
As we can see in the code above, we imported the Navbar component in the top section, the code section, or the JavaScript execution context of the Astro file and then used it as a component in the Astro file.
At this point, we are unsure how the content of index.astro, inside the pages folder will be added to the <slot/> tag to be displayed.
Now, create another file inside the pages folder and give it the name about.astro. Inside this new file, add the following code:
<p>this is the about page</p>As said before, an Astro file can be any HTML or HTML content.
Inside the index.astro file, import the layout.astro component file by adding the following code.
---
import Layout from "../layouts/Layout.astro";
const name = "John";
---

<Layout>
  <h1>Hello, {name}!</h1>
</Layout>
In the code above, we imported the Layout.astro file. We removed all other HTML content and wrapped the <h1> inside the Layoutcomponent. Notice that we left out only the <h1> element together with its content. This is because we only want this to be displayed through the <slot/> we mentioned above.
Now, do this for the about page. Modify the code inside the about.astro file and add the following code:
---
import Layout from "../layouts/Layout.astro";
---

<Layout>
  <p>this is the about page</p>
</Layout>
When you go back to the browser, we can see the navigation bar displayed. And with it, we can navigate through to the home page and the about page.
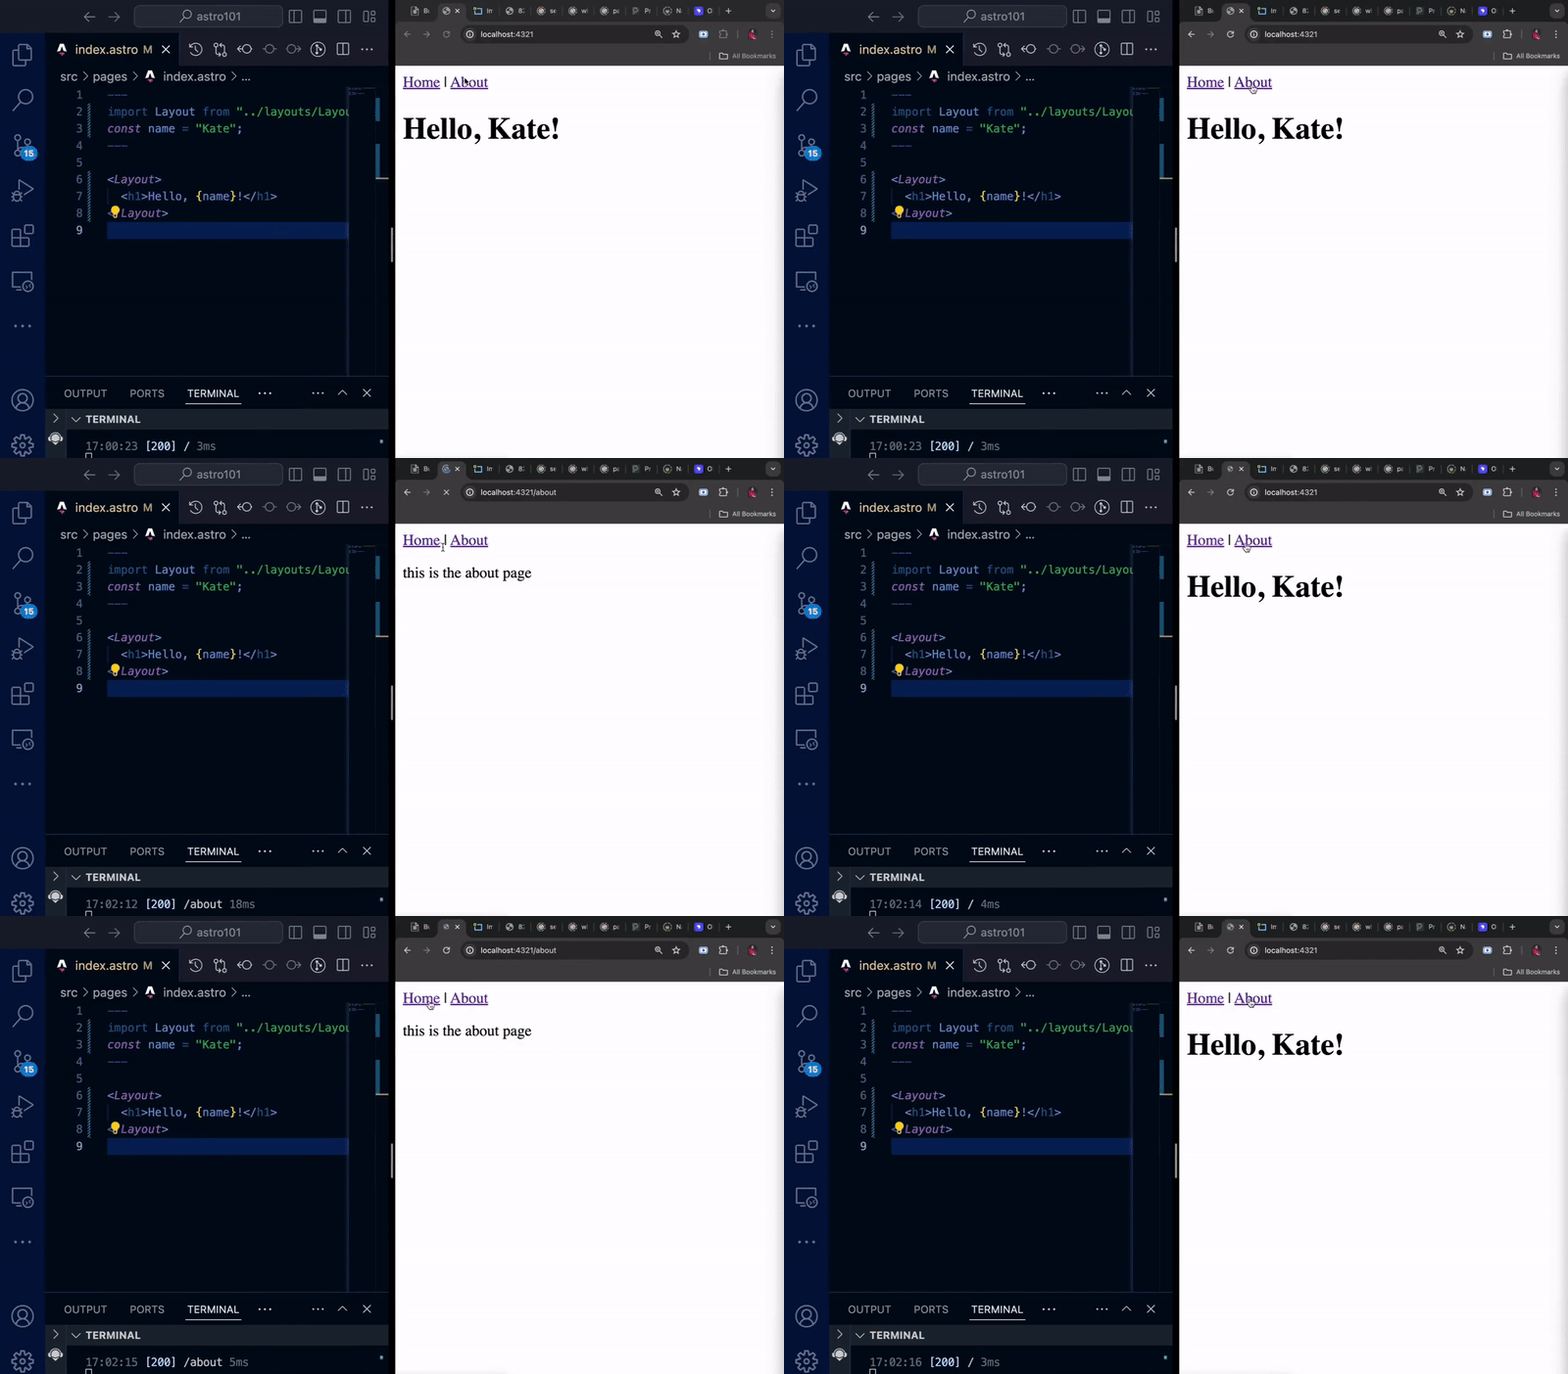
Linking Between Pages in Astro
Linking between pages in Astro is refreshingly simple. Unlike other frontend frameworks, we don't need any dedicated component. Astro uses the standard HTML and anchor element <a> to effortlessly create links between various pages.
Static Site Generation (SSG) in Astro: Dynamic Routes
Sometimes, we might need an unknown number of parameters for our route. So far, we only have the index and about pages.
What if we have data from a Content Management System (CMS), such as a list of destinations, blog posts, or any other data? Creating an Astro file in the pages folder for every potential route would be unwise because we would be creating every page for every new data. This is where Dynamic Routes in Astro comes in.
Dynamic routes in Astro offer a world of possibilities. They allow us to handle data dynamically, giving us the power to tell Astro, programmatically, all the potential options for a given route. And to do this, we have the flexibility to make use of one of Astro's in-built functions called getStaticPaths.
Creating a Dynamic Route
Create a file called [destination].astro inside the pages folder. Notice the square brackets []. This tells Astro that it is going to be a dynamic route.
Inside the [destination].astro file, paste the following code:
---
import Layout from "../layouts/Layout.astro";
const { destination } = Astro.params;

export function getStaticPaths() {
  // Data from a CMS or API
  const destinations = [
    "london",
    "rome",
    "sanfracisco",
    "singapore",
    "cairo",
    "medellin",
  ];
  return destinations.map((destination) => ({
    params: { destination },
  }));
}
---

<Layout>
  <h1>Welcome to {destination}</h1>
</Layout>
In the code above, we did the following:
- We demonstrated fetching data from a CMS using the
getStaticPathsfunction; we called this datadestinations. - Because
getStaticPathsmust return a format, we return an object with aparamsproperty. Theparamsproperty represents each destination we get by looping through the CMS or API Call data,destinations. - To display any of the destinations on the browser, we need to return the parameters we returned. Astro exposes several built-in properties through the
Astroobject. For this, we used theAstro.paramsproperty. - We can destructure
destinationfrom theAstro.paramsproperty. That way, we can get any destination and display it on the browser. - The
Layoutcomponent was imported and used to wrap the<h1>HTML element.
Below, we can see the result. When we change the route to /rome, /singapore or any of the destinations, it gets displayed in the browser.
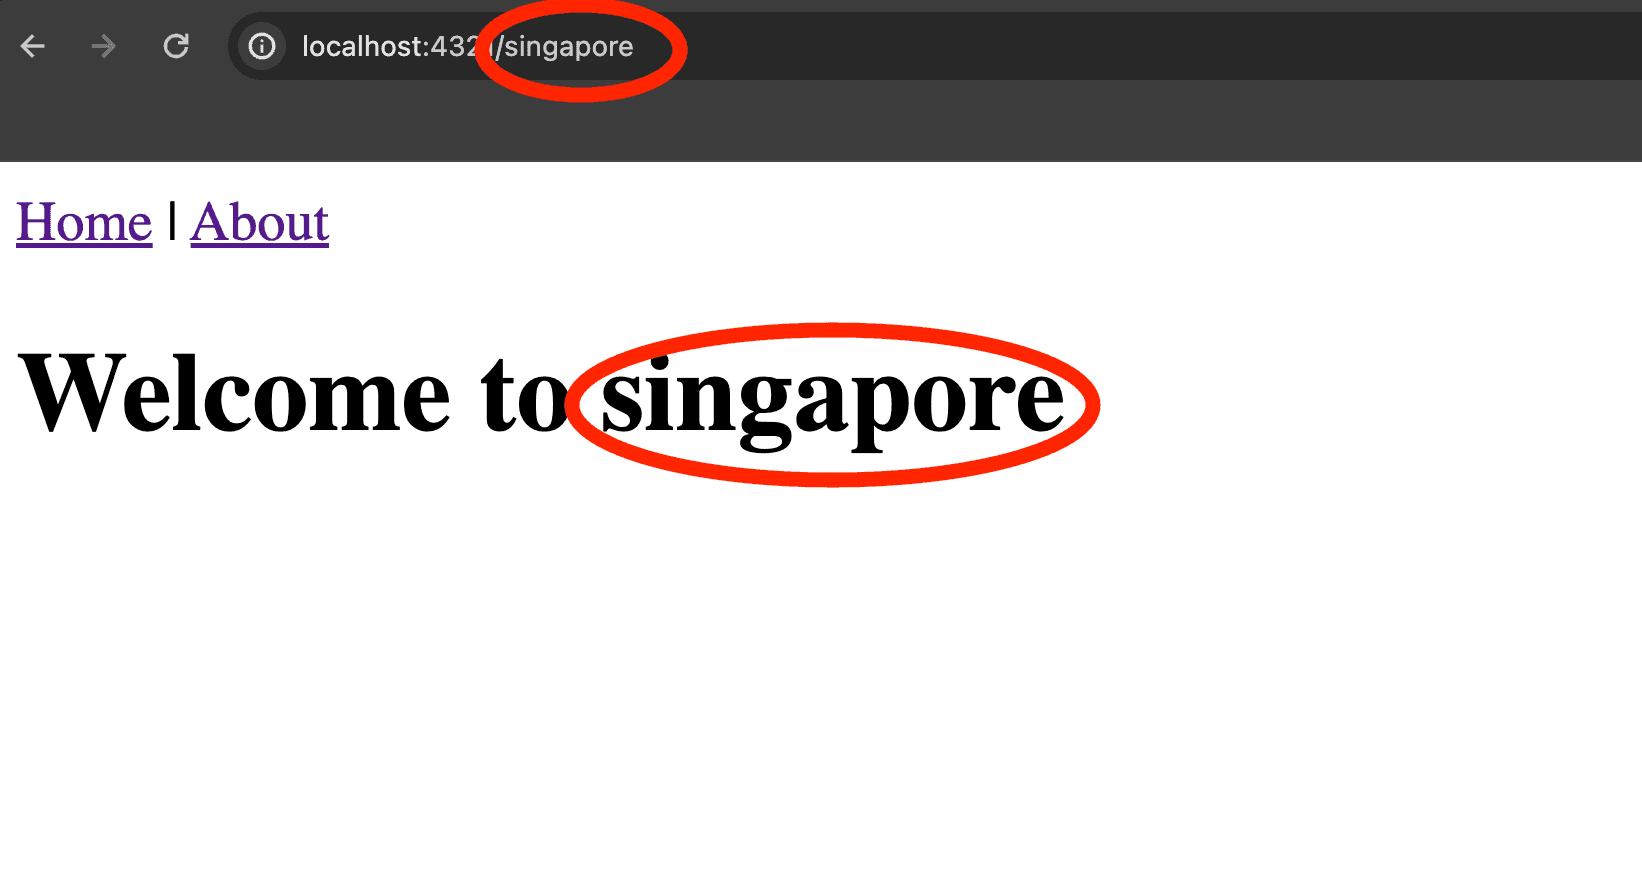
Generate Production Build
Quit the current terminal and run the command below to generate the production build of our app.
npm run buildWhen the command above is run, Astro will generate a build folder that looks like this.
dist/
┣ about/
┃ ┗ index.html
┣ cairo/
┃ ┗ index.html
┣ london/
┃ ┗ index.html
┣ medellin/
┃ ┗ index.html
┣ rome/
┃ ┗ index.html
┣ sanfracisco/
┃ ┗ index.html
┣ singapore/
┃ ┗ index.html
┣ favicon.svg
┗ index.html
Because we have a dynamic route, Astro generated HTML files for all our destinations. This means that if we deploy this project, we will not need to worry about making API requests or anything else because it has been done in build time.
While Astro's Static Site Generation is impressive, it does have its limitations. For instance, handling highly dynamic data, like an e-commerce store's product listings and quantity updates, can be tricky. But with Astro's Server-Side Rendering features, we can overcome these challenges and enjoy the benefits of a more dynamic site.
Server-Side Rendering (SSR) in Astro
Getting started with Server-Side Rendering (SSG) in Astro is a breeze. Simply configure the astro.config.mjs file to tell Astro about your preferences. You can choose to manually update this file or use the robust Astro CLI, whichever suits your workflow best.
Update Astro Behavior
Navigate to astro.config.mjs and modify the code with the following:
import { defineConfig } from 'astro/config';

// https://astro.build/config
export default defineConfig({
    output: "server"
});
In the file above, we modified output as server in the defineConfig. The server mode means we want Server-Side Rendering for most of our sites.
There are two other modes or behaviors of an Astro application aside from server, the hybrid and static modes. hybrid is used when we want Server-Side Rendering for most of our site. And static is used when we want to prerender HTML by default, and should be used if most of the content is static.
Adapters in Astro
It is important to note that since we have set our output as server, we need to install and enable an adapter. We need a server runtime since we have set up a server mode.
One advantage of using Astro is its support for various adapters, including Vercel, Netlify, and Node.js. This variety ensures that you can choose the adapter that best fits your specific requirements. In this example, we'll be using the node adapter.
Astro CLI
Instead of manually configuring Astro's behavior, you can use the Astro CLI to automate this process. This not only saves time but also ensures that the configuration is accurate. As we mentioned earlier, simply navigate to your terminal, start the active process, and run the command below to enjoy this convenience.
npx astro add nodeThe command above will add the node adapter to the configuration file.
NOTE: We can use the command above to add adapter for vercel, netlify, etc. by specifying the adapter name. For example,
npx astro add netlifyornpx astro add vercel
Make sure to select yes to the prompts. This is what we will see in our terminal after running the command above:
✔ Resolving packages...

  Astro will run the following command:
  If you skip this step, you can always run it yourself later

 ╭───────────────────────────────────╮
 │ npm install @astrojs/node@^8.3.0  │
 ╰───────────────────────────────────╯

✔ Continue? … yes
✔ Installing dependencies...

  Astro will make the following changes to your config file:

 ╭ astro.config.mjs ─────────────────────────────╮
 │ import { defineConfig } from 'astro/config';  │
 │                                               │
 │ import node from "@astrojs/node";             │
 │                                               │
 │ // https://astro.build/config                 │
 │ export default defineConfig({                 │
 │   output: "server",                           │
 │   adapter: node({                             │
 │     mode: "standalone"                        │
 │   })                                          │
 │ });                                           │
 ╰───────────────────────────────────────────────╯

  For complete deployment options, visit
  https://docs.astro.build/en/guides/deploy/

✔ Continue? … yes

   success  Added the following integration to your project:
  - @astrojs/node
After running the command above, we changed Astro's default behavior from static site generation to full-blown server-side rendering. You can see this in the newly modified astro.config.mjs file:
import { defineConfig } from 'astro/config';

import node from "@astrojs/node";

// https://astro.build/config
export default defineConfig({
  output: "server",
  adapter: node({
    mode: "standalone"
  })
});
Start up the application once again by running the dev server command:
npm run devCreate a Fake Database
Now that we have changed the behavior of our Astro application, we need to see how it indeed behaves in a Server-Side Rendering mode.
Create a new directory named utils within the src folder. In this directory, generate a new file with the name db.js and insert the provided code below.
export const products = [
  {
    id: 1,
    name: "Sunglasses",
    price: 12.99,
    inStock: 12,
  },
  {
    id: 2,
    name: "Shoes",
    price: 52.99,
    inStock: 25,
  },
];

export const listProducts = () => {
  return products;
};

export const purchaseProduct = (id, quantity) => {
  const [product] = products.filter((product) => product.id === parseInt(id));

  if (product.inStock > 0 && product.inStock >= quantity) {
    product.inStock -= quantity;
  } else {
    product.inStock = 0;
  }

  return products;
};
The code above is a fake database of products, including shoes and sunglasses. In the code, we will expose two functions: listProducts and purchaseProduct. purchaseProduct grabs the ID of the product we want to purchase and reduces the stock value with the purchased quantity, while listProducts will return the products available.
Create an API Endpoint
We will have to expose the product information above as an API endpoint. Astro also supports API endpoints.
Create a folder called api inside the pages folder. Inside the api folder, create a file called products.json.js and add the following code:
import { listProducts } from "../../utils/db";

export async function GET() {
  const products = await listProducts();
  return new Response(JSON.stringify({ products }));
}
In the code above:
- We utilize an
exportstatement with the function name mapped to an HTTP method calledGET. TheGETHTTP method here will handle requests to the/api/products.jsonendpoint. Note that during the build process, the extension.jsor.tswill be removed. - We grab the products from the
listProductsfunction we described earlier, which is a fake database. - And we specified that the endpoint should return a new response API call.
It is essential to note that if we opt into the Static Site Rendering mode, custom endpoints like the one above will be called at build time and will also produce a list of static files. This is not the case with Server-Side Rendering. These custom endpoints will turn into server endpoints and will be called on requests.
Now, when we try to access the /api/products.json on our browser, we get the following:
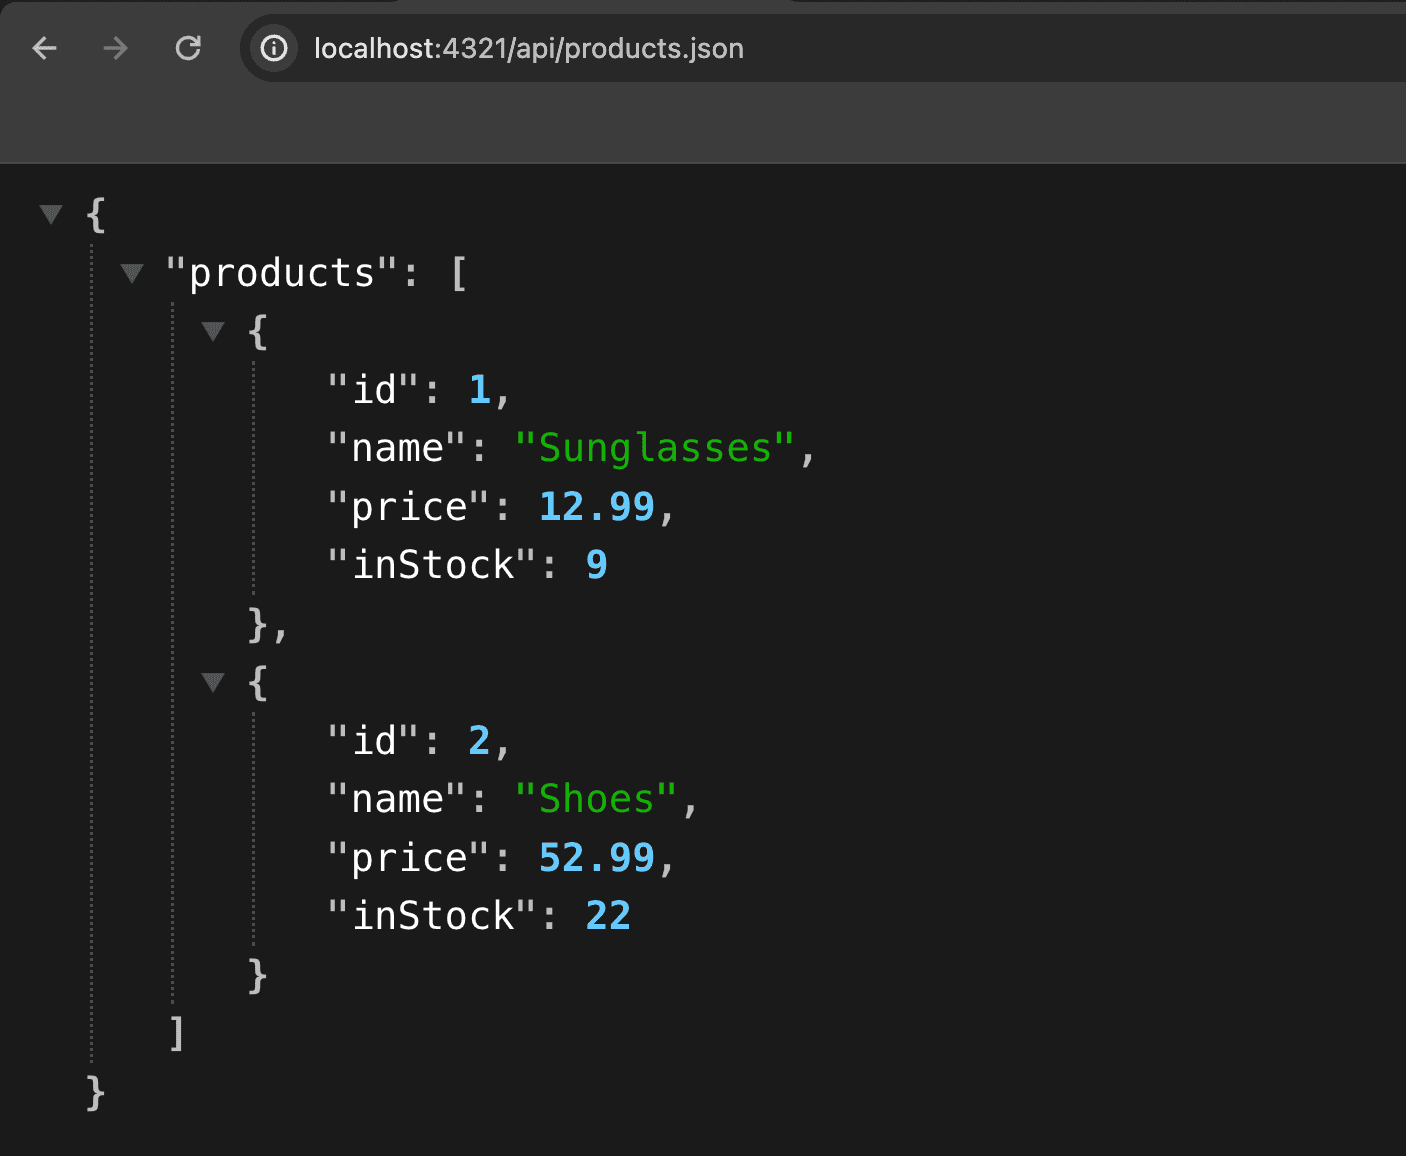
Great! Now that we have made the API endpoint accessible, let us demonstrate how to make an API request in an Astro file.
Making an API Request
Create a products.astro file inside the pages folder. We will make some API requests inside this file. Now, add the following code:
---
const response = await fetch(`${Astro.url.origin}/api/products.json`);
const { products } = await response.json();
---

<ul>
  { products.map((product) => (
  <li>{product.name} (Current stock: {product.inStock})</li>
  )) }
</ul>
In the code above:
- We make an API request to the
/api/products.jsonendpoint. - With the
Astro.url.originof the Astro object, we get the site URL dynamically instead of hard-coding it. - We destructured the
productsfrom the response list and displayed each product by looping through the products.
When we open up the products page, this is what we will see:
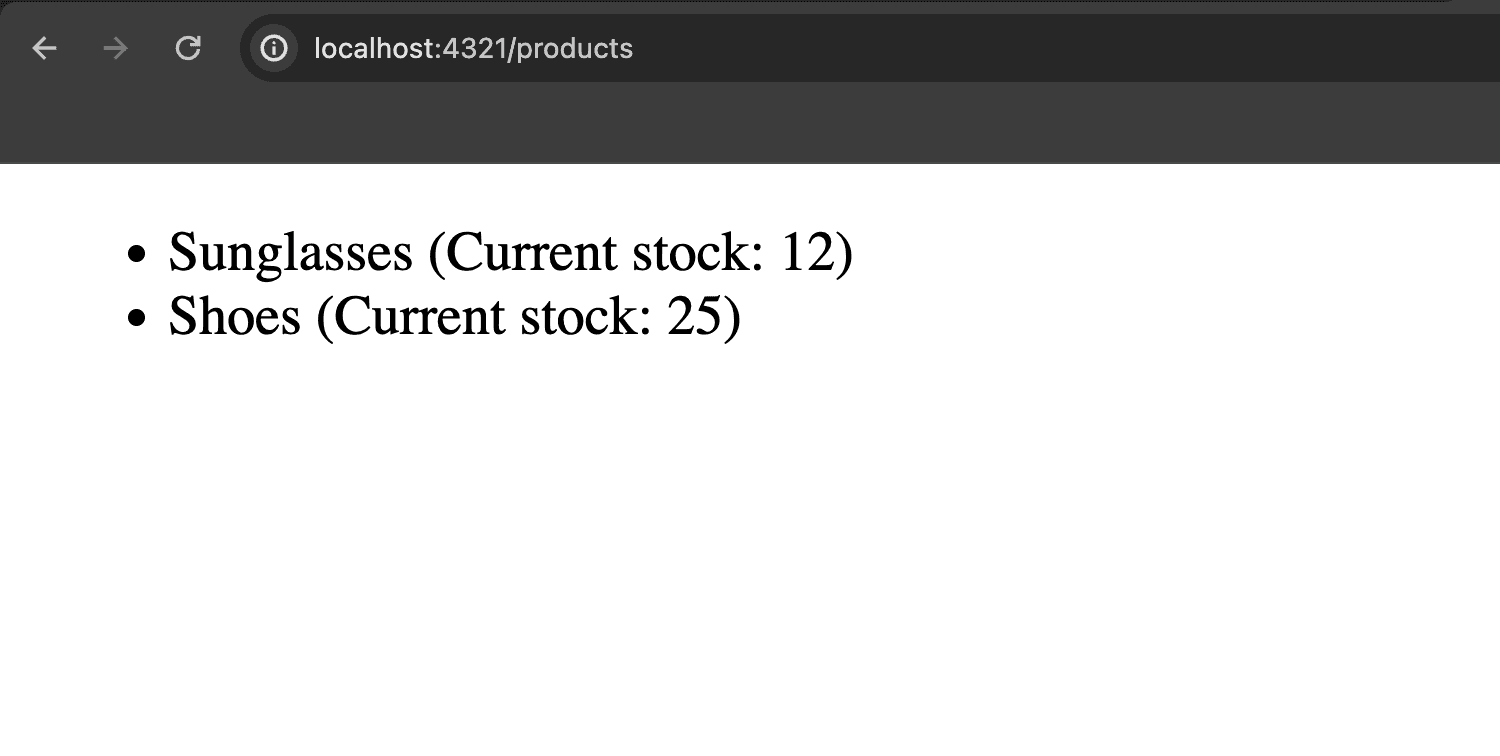
Awesome! We can see the products and their current quantity in the stock.
Since we are using Server-Side Rendering, how can we ensure that data is updated dynamically? Let's do this using JavaScript in the browser!
Using JavaScript in the Browser
We will purchase to demonstrate the dynamic data change due to Server-Side Rendering.
First, we will create a dynamic endpoint! We must send the ID of every product we want to purchase. We will create a new endpoint to handle this new API request.
Remember, just like we created the [destination].astro page, which is changeable, we will create a changeable API endpoint [id].json.js. This is because the ID of a product can change. So, inside the api folder, create a new file called [id].json.js and paste in the following code:
import { purchaseProduct } from "../../utils/db";

export async function GET({ params }) {
  const id = params.id;
  const randomQuantity = Math.floor(Math.random() * 3) + 1;
  const updatedProductList = await purchaseProduct(id, randomQuantity);
  return new Response(
    JSON.stringify({
      updatedProductList,
    }),
  );
}
In the code above:
- We wrote the logic to handle product purchases. Recall that inside the
db.jsfile, we have thepurchaseProductfunction, which reduces the valueproducts.inStock, which represents the number of products in stock. This means that when we purchase, the products in stock get reduced. - We got the ID of the product we wanted to purchase through the
GETfunction. This is because theGETfunction allows us to pass inparamsas a parameter, which allows us to access the ID of any product. - The
products.idis the file's name, and the changeable parameter between the square brackets is[id]. In other words, this represents the ID of the product we want to purchase. - We picked a random number between 3 and 1 as a random quantity
randomQuantity. - Then we returned the updated list of products by passing the
idand random quantityrandomQuantity.
Now that we have the new endpoint, we must implement this logic inside our client-side JavaScript. So, update the code inside the products.astro page with the following:
---
const response = await fetch(`${Astro.url.origin}/api/products.json`);
const { products } = await response.json();
---

<ul>
  {
    products.map((product) => (
      <li>
        {product.name} (Current stock: {product.inStock})
      </li>
    ))
  }
</ul>

<button id="purchase">Purchase something</button>
<script>
  const button = document.querySelector("#purchase");
  button.addEventListener("click", async () => {
    const randomProduct = Math.floor(Math.random() * 2) + 1;
    const response = await fetch(
      `${location.origin}/api/${randomProduct}.json`
    );
    await response.json();
  });
</script>
In the code above, we created a button that, when clicked, makes a GET request to the new endpoint /api/[id].json. It does this by generating a random product we called randomProduct. This randomProduct can be a shoe or sunglasses, which has an ID of 1 or 2. Either way, it represents the ID of the product.
We could not use the Astro.url.origin property or the Astro global object because we are on the client side. Luckily, with the location.origin, we get the site's URL. And with the URL, we can call the API endpoint that will execute the purchase of a product.
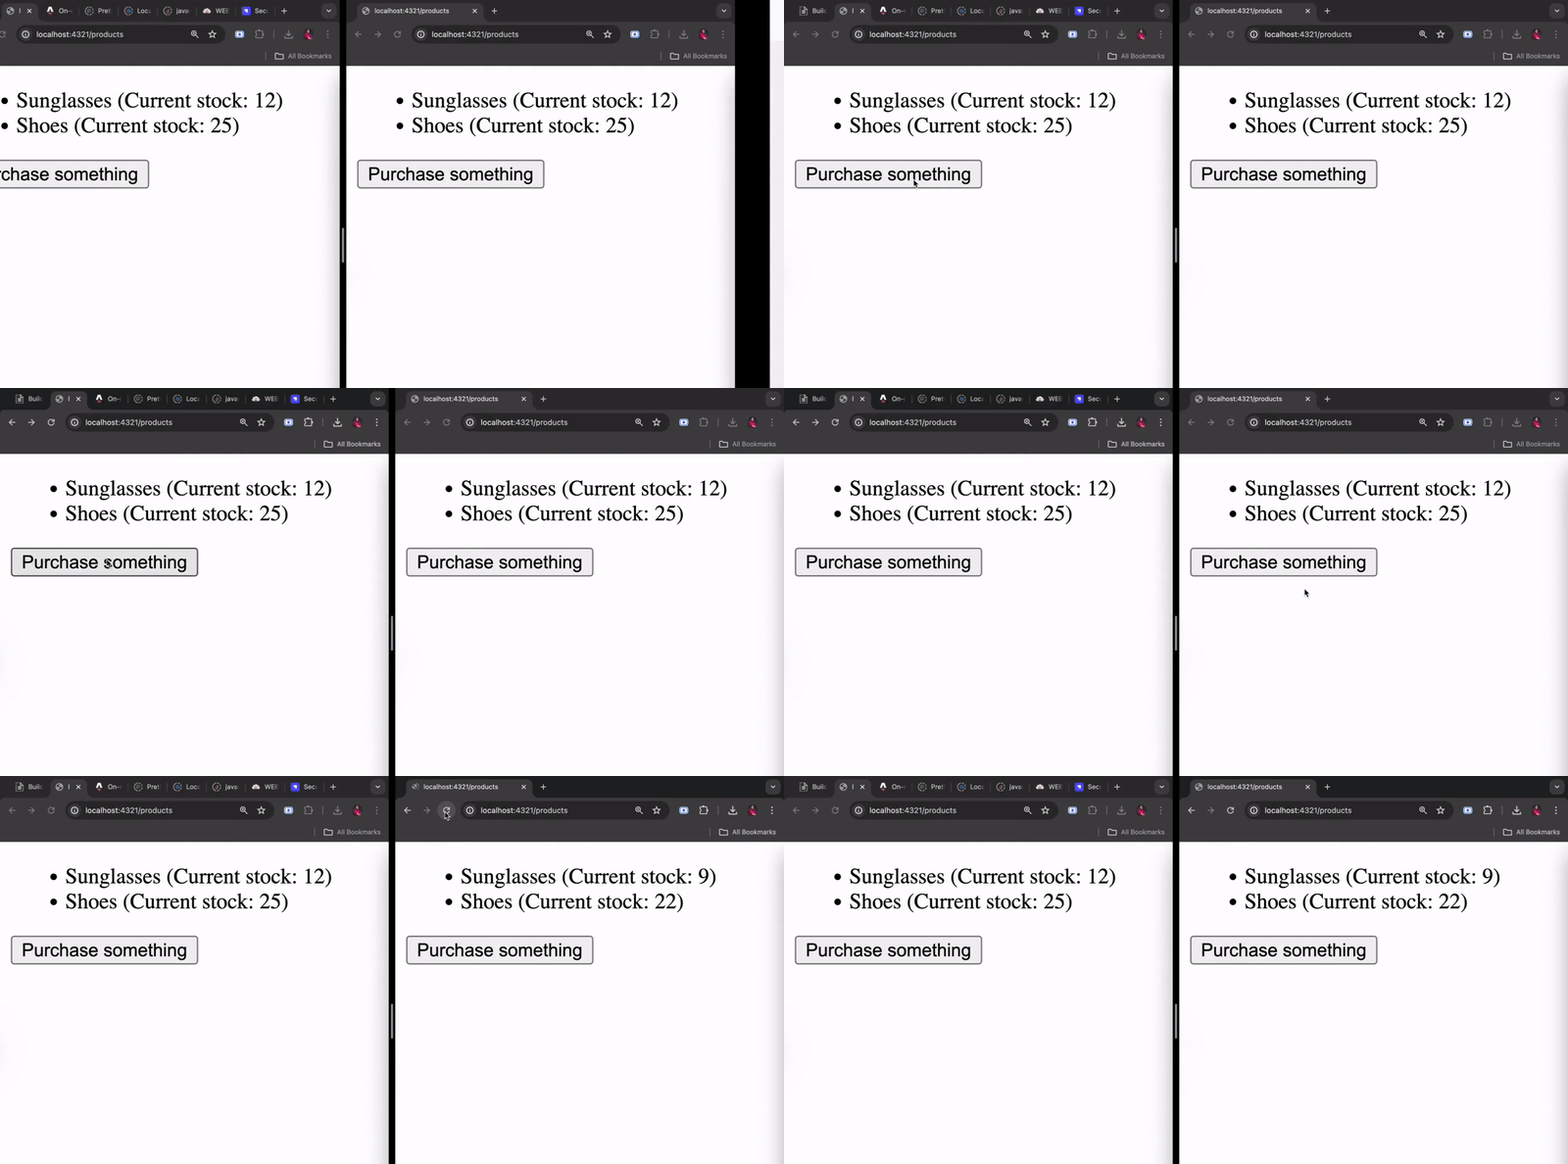
In the demo below, we can see a dynamic change of data in action. In the first window on the left-hand side, a user makes some purchases by clicking the "Purchase something" button about three or four times. When another user refreshes or opens the page in the second window on the right-hand side, they will discover that the data has changed—the current stock of each product has changed!
If this was done in Static Site Generation, this behavior would not be possible because the data that users will see is the same as it was when the page's production build was created.
Pre-rendering
So far, we have switched from Static Site Generation to Server-Side Rendering. However, index.astro, about.astro, and [destination].astro files except products.astro file do not need Server Side Rendering.
How do we tell Astro to do Static Site Rendering for these pages but products.astro which only needs Server Side Rendering? This is possible by adding the code below to these pages:
export const prerender = true;Replace the code inside the index.astro with the following:
---
export const prerender = true;
import Layout from "../layouts/Layout.astro";
const name = "Kate";
---

<Layout>
  <h1>Hello, {name}!</h1>
</Layout>
In the code above, we tell Astro to pre-render the index.astro file. In other words, it should do Static Site Generation. Do this for about.astro and [destination].astro.
Other Features of Astro
There is a lot more to unpack about Astro. It is advisable to look through the Astro documentation.
Some of these features include Content Collections which allows us to build our pages out of Markdown among other things. Other features are View Transitions, Prefetches, etc. Astro also has integrations with popular frameworks like Tailwind CSS. Recently, an SQL database Astro DB, was launched. This database works exclusively with Astro.
Astro also has a concept called Astro Islands. With this concept, you can take any component from any framework, such as React, and add it to Astro by specifying how the component should load.
There are also what are called Client Directives. With these directives, you can control how components are hydrated or displayed on the browser. For example, we can load a component when the browser is idle using client:idle, when you want a component to be visible in different screen sizes using client:media, etc.
Conclusion
In this Astro.js tutorial, we learned about Astro, a popular frontend framework designed for speed and content-based websites.
We also delved into Static Site Generation (SSG) in Astro, Server-Side Rendering (SSR) in Astro, pre-rendering, layouts and components, linking between pages, pre-rendering, making API requests, and so on.
In the Part 2 of this tutorial, which is next, we will explore Strapi CMS, a robust CMS, Strapi installation, Strapi Content type builder, Collection type, enabling API access, Internationalization, Dynamic zones, and more.
See you in Part 2!
Resources
- You can find the GitHub with the complete code for this tutorial here. Make sure to select the branch
part-1.
Video Resources
- Astro Crash Course Part 1: Project overview and introduction
- Astro Crash Course Part 2: Astro 101 introduction to the basics
- Astro Crash Course Part 3: Server-Side Rendering
- Astro Crash Course Part 4: Introduction to Strapi
- Astro Crash Course Part 5: Building the main project
- Astro Crash Course Part 6: Final steps and wrap up
Register For Our Upcoming Stream Event with Ben Holmes from Astro
We are excited to have Ben Holmes from Astro chatting with us about why Astro is awesome and best way to build content-driven websites fast.
Topics
- What's new in Astro
- Content Layer
- Webhooks
Join us to learn more about why Astro can be great choice for your next project.