Introduction
In this tutorial, you will create a Real-time chat application built with React Native and Strapi CMS as the backend.
Strapi is a headless CMS that helps you quickly get your API and content management up and running. React Native is a tool that allows the creation of cross-platform mobile applications using React and JavaScript.
Prerequisites
You will need the following to get started:
- Node.js v18 or later
- A code editor on your computer
- Python
- Prior Knowledge of React-Native
The code for this tutorial is available on my GitHub repository; feel free to clone it to get started.
Setting Up a New Strapi CMS Project
To get started, we'll set up a new Strapi project. Strapi CMS provides you with a command-line interface (CLI) that simplifies the process of creating and managing your projects:
npx create-strapi-app my-chat-backendThe above command will scaffold a new Strapi content management system project and install the required Node.js dependencies. Please ensure that you choose the "quickstart" installation type.
Fill out the forms to create your administrator user account.
Installing Necessary Strapi Dependencies for Real-time Communication
Next, we'll install the strapi-plugin-io and socket.io packages, which we'll use for real-time communication in our chat application. Press CTRL + C (Window or Linux) or CMD + C(Mac) to quit the server and run the commands:
cd my-chat-backend
npm install strapi-plugin-io socket.io
After installation, start the Strapi server with the command:
npm run developInstalling React Native
Create a React Native application with the command below:
npx create-expo-app chat-app --template blank
cd chat-app
This command will create a new React Native application using expo in the chat-app directory. The --template option instructs the expo to install the minimum required libraries.
Installing React Native Dependencies
Now, install the required dependencies for your React Native application.
expo install @react-native-async-storage/async-storage
expo install @react-native-community/masked-view
expo install @react-navigation/native @react-navigation/stack
npm install axios date-fns socket.io-client
Create a Strapi Collection Type
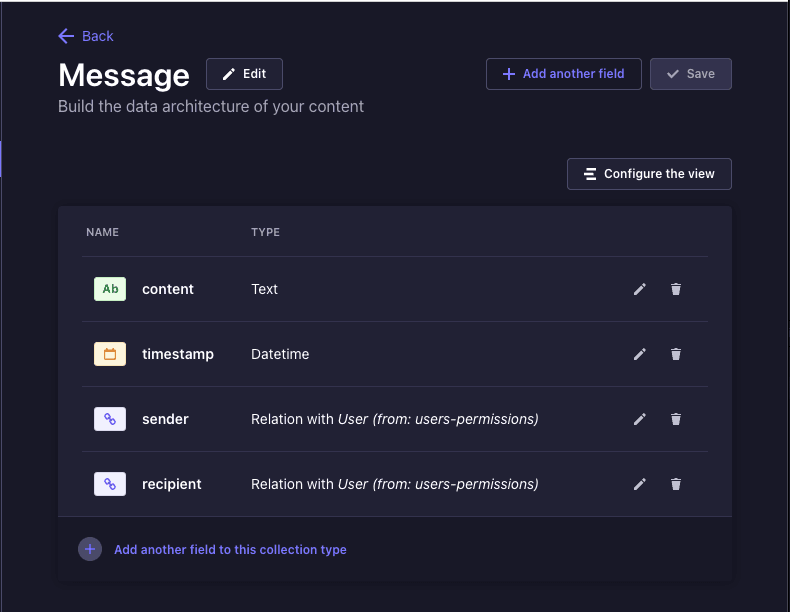
In your Strapi administrator, create a collection called message with the fields content and timestamp of type Long text and DateTime, respectively.
The collection type represents messages that users can send each other, and the content is the actual message the user sent.
Create Relationship in Strapi - User and Messages
We'll create a one-to-many relationship between the User and Message collections to associate messages with their respective senders and recipients.
In the Message collection, add new fields called sender and recipient of type Relation. Set the relation type to 1:N (one-to-many) and select the users-permissions collection as their target. Your Message collection should look like the screenshot below:
Check out this blog post to learn more about relationships in Strapi: Understanding and Using Relations in Strapi.
Configure API Permission in Strapi CMS
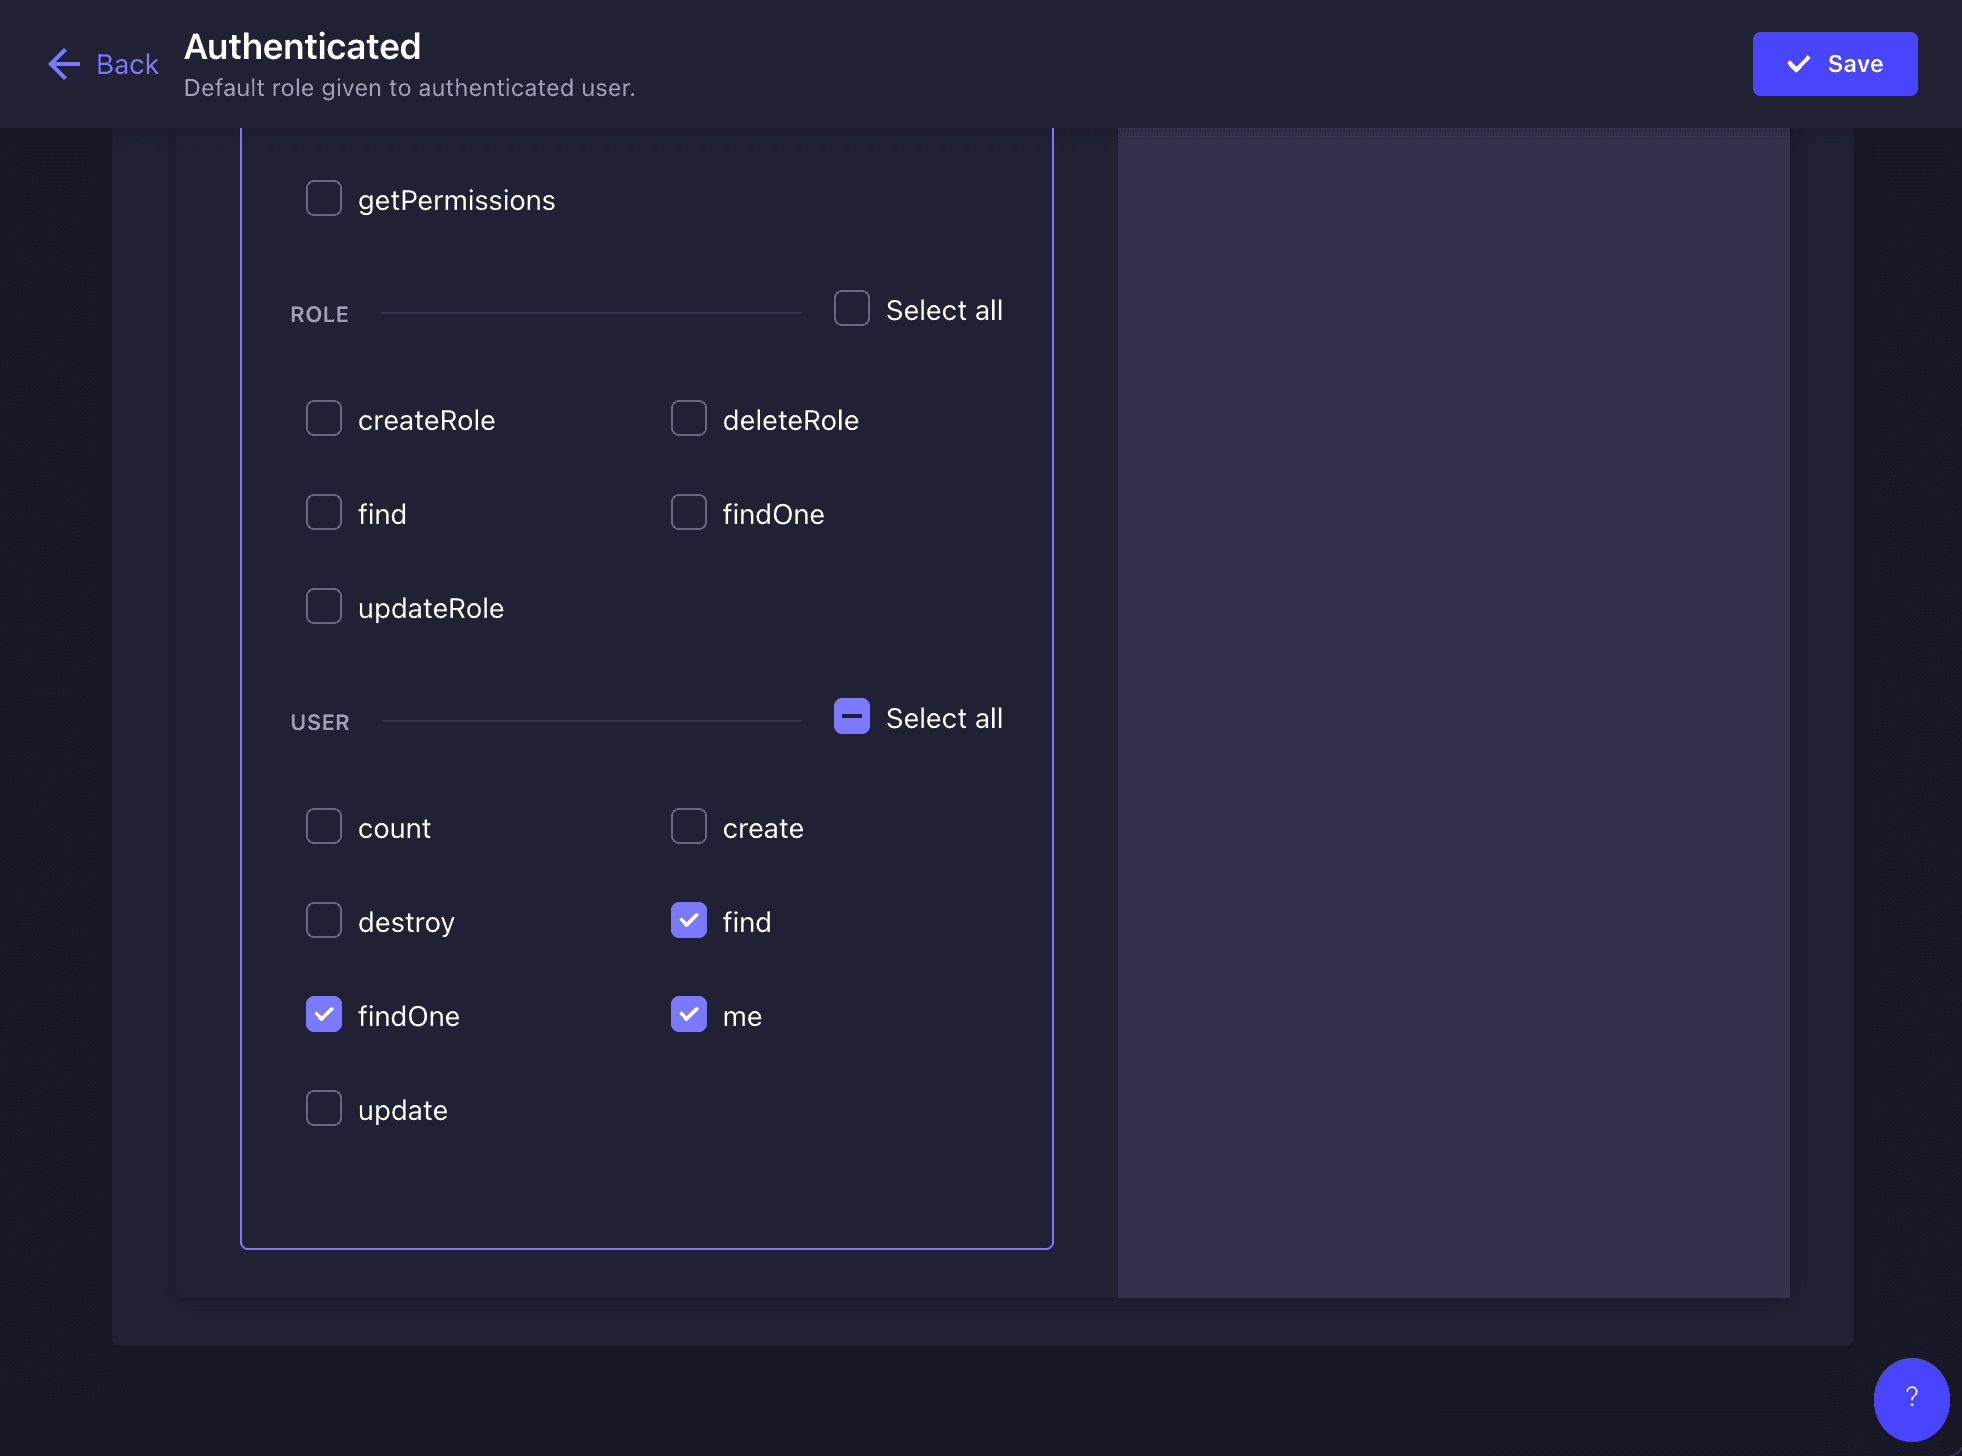
To allow users to read and send messages, as well as see other users chat with, you need to grant the Authenticated role create, find, and findOne access to the Message collection and find access to the User collection. This configuration will ensure that only authenticated (logged in) users can view messages, see other registered users, and send messages. To do this, navigate to Settings > Roles > Authenticated. In Permissions, check the create, find, and findOne boxes for the Message collection and the find box for the User collection.
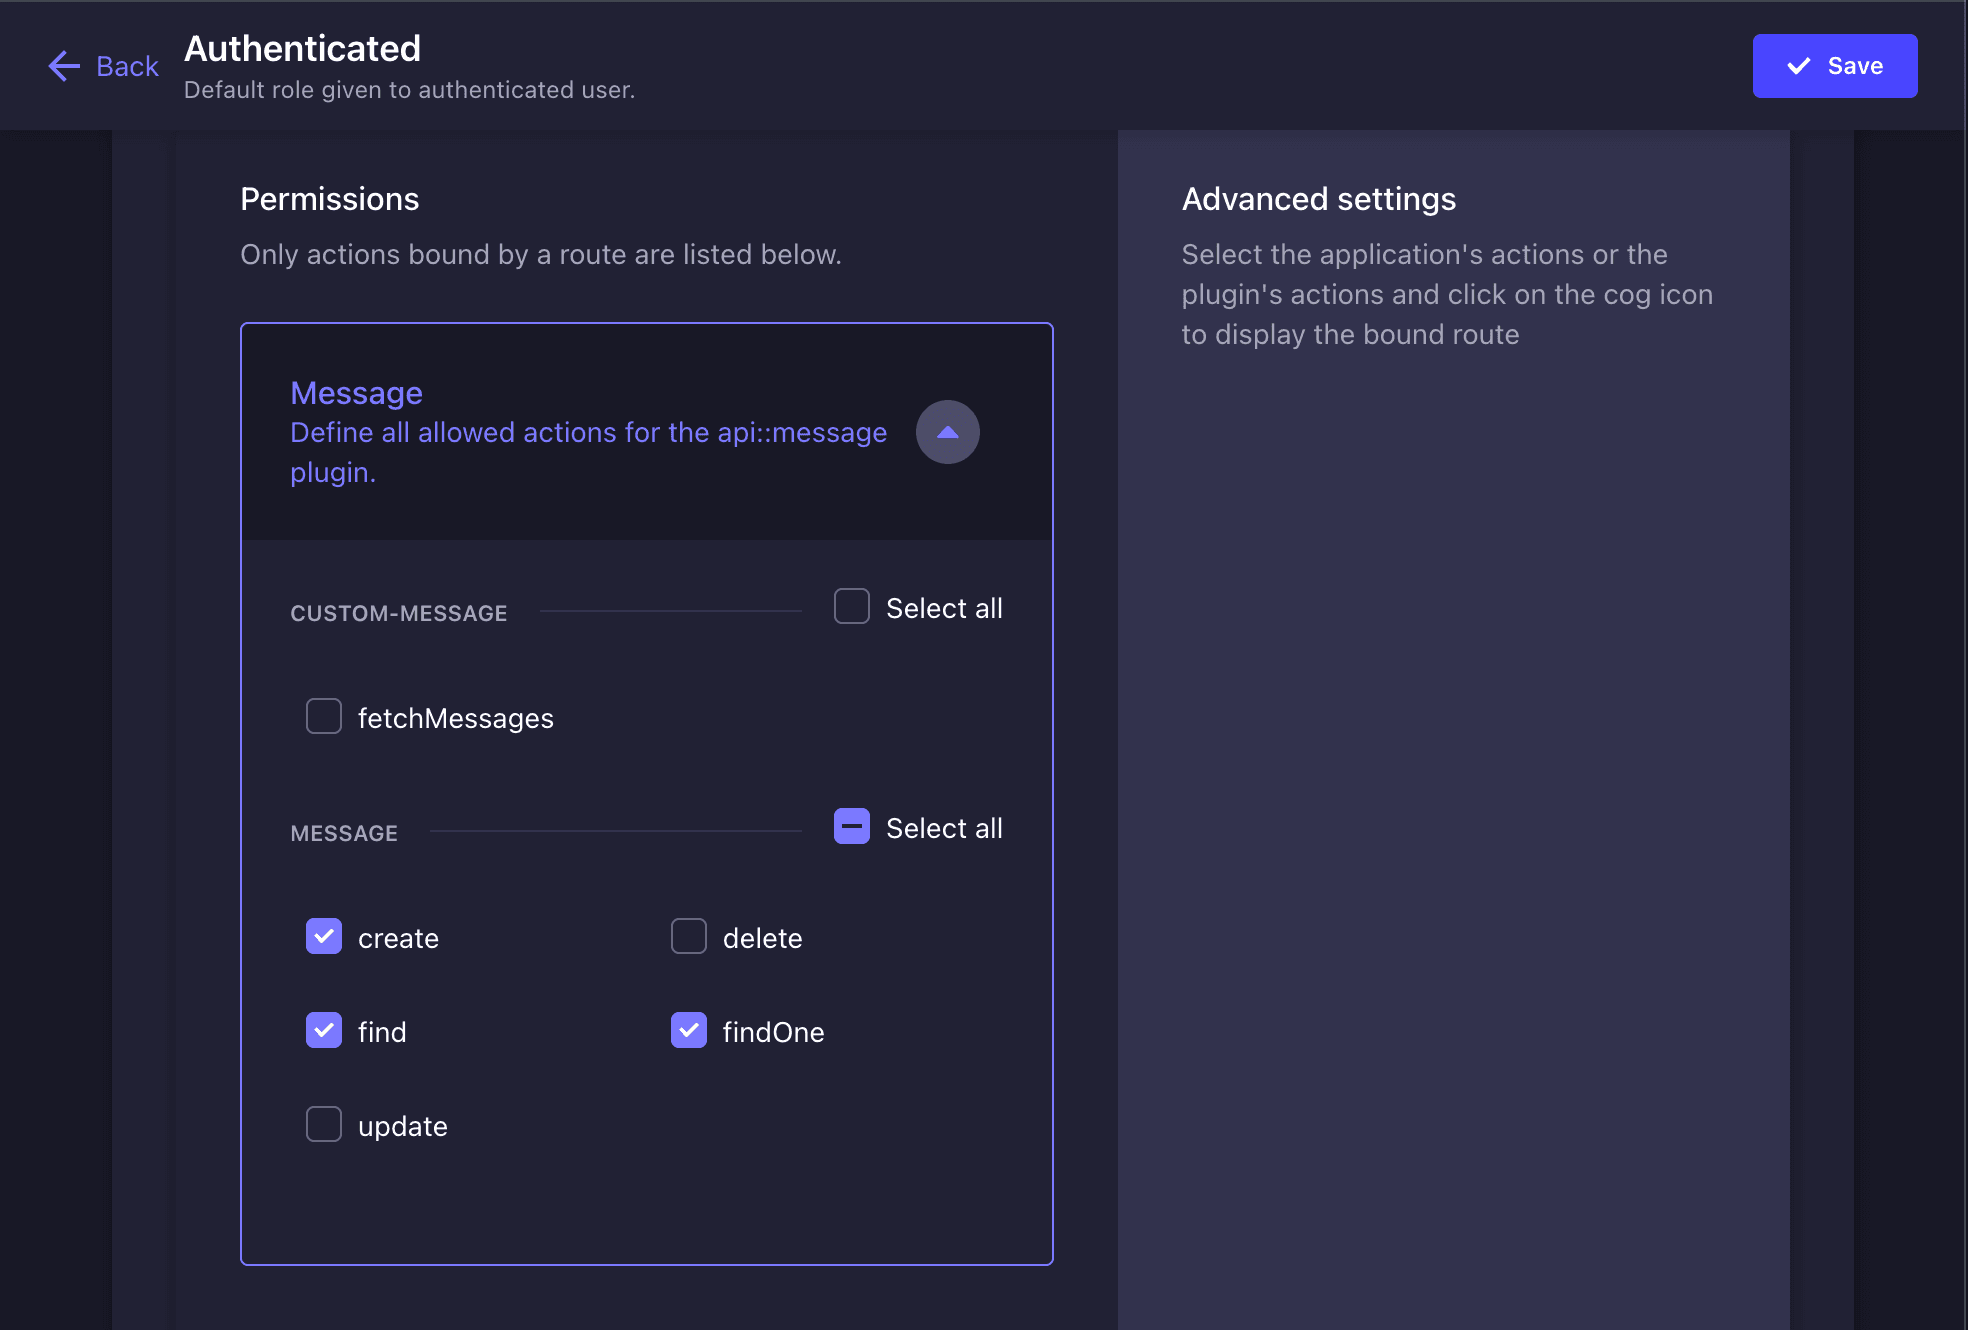
Then scroll down to Users-permission, check the find and findOne boxes in the User tab, and click on the Save button.
Setting up User Authentication in React Native Using Strapi CMS
Strapi provides built-in authentication and authorization features that you can use for your Strapi projects. You can access these endpoints at the following URLs:
- POST
/auth/local/register(for user registration) - POST
/auth/local(for user login) - GET
/users/me(to fetch the current authenticated user) - POST
/auth/logout(for user logout)
Create a new directory called context and a context/AuthContext.js file in your chat-app directory. Add the code snippet below:
import React, { createContext, useContext, useState } from "react";
import { backendBaseUrl } from "../services/WebSocketService";
import AsyncStorage from "@react-native-async-storage/async-storage";

const AuthContext = createContext();

export const AuthProvider = ({ children }) => {
  const [authError, setAuthError] = useState("");
  const [isAuthenticated, setIsAuthenticated] = useState(false);
  const [activeUser, setActiveUser] = useState(null);

  const saveToken = async (token) => {
    try {
      await AsyncStorage.setItem("authToken", token);
    } catch (error) {
      console.error("Error saving token:", error);
    }
  };

  const getToken = async () => {
    try {
      const token = await AsyncStorage.getItem("authToken");
      return token;
    } catch (error) {
      console.error("Error getting token:", error);
      return null;
    }
  };


  const clearToken = async () => {
    try {
      await AsyncStorage.removeItem("authToken");
    } catch (error) {
      console.error("Error clearing token:", error);
    }
  };
  const register = async (username, email, password) => {
    try {
      const response = await fetch(`${backendBaseUrl}/ap/auth/local/register`, {
        method: "POST",
        headers: {
          "Content-Type": "application/json",
        },
        body: JSON.stringify({
          username: username,
          email: email,
          password: password,
        }),
      });
      const responseData = await response.json();
      if (responseData.jwt) {
        return true;
      } else {
        setAuthError("Invalid details");
        return false;
      }
    } catch (error) {
      setAuthError("Error creating user");
      return false;
    }
  };

  const login = async (email, password) => {
    try {
      const response = await fetch(`${backendBaseUrl}/api/auth/local/`, {
        method: "POST",
        headers: {
          "Content-Type": "application/json",
        },
        body: JSON.stringify({
          identifier: email,
          password: password,
        }),
      });
      const responseData = await response.json();
      if (responseData.jwt) {
        setIsAuthenticated(true);
        saveToken(responseData.jwt);
        setActiveUser(responseData.user)
        return true;
      } else {
        setAuthError("Incorrect email or password");
        return false;
      }
    } catch (error) {
      console.log(error);
      setAuthError("Error occurred");
      return false;
    }
  };

  const logout = () => {
    saveToken(null);
    setIsAuthenticated(false);
  };

  return (
    <AuthContext.Provider
      value={{ isAuthenticated, register, login, logout, authError, getToken, clearToken, activeUser }}
    >
      {children}
    </AuthContext.Provider>
  );
};

export const useAuth = () => {
  return useContext(AuthContext);
};
This code creates an authentication context using the context API in React. The AuthContext is created using the createContext() method and the AuthProvider component acts as the provider for the authentication context.
Inside the AuthProvider, we have created the following:
authError: Saves all the authentication errors that may happen during registration or login.isAuthenticated: Specifies whether the user is currently online, that is, whether they are logged in to the application.activeUser: This class contains details about the user who is currently using the application.saveToken: This function saves the authentication token to the device’s local storage using the AsyncStorage.getTokenExtracts the authentication token from the device’s memory storage, which is securely kept in the configurations.clearToken: Logs the user out, which essentially erases the token stored in the device’s database.register: This function sends a POST request to the backend API to register a new user with theusername,emailaddress, andpassword.login: Sends an HTTP POST request to the backend API with the fieldsemailandpasswordfor the user's basic authentication. If the login is successful and a JWT token is received, it setsisAuthenticatedto true. It then saves the token, sets theactiveUser, and returns true; if the token is not received, it sets an authentication error and returns false.logout: Invalidates the authentication token and makesisAuthenticatedvalue equal to false.- Lastly, the
useAuthis created as the counterpart ofAuthContext, which enables other components to import the context easily by usinguseContext(AuthContext).
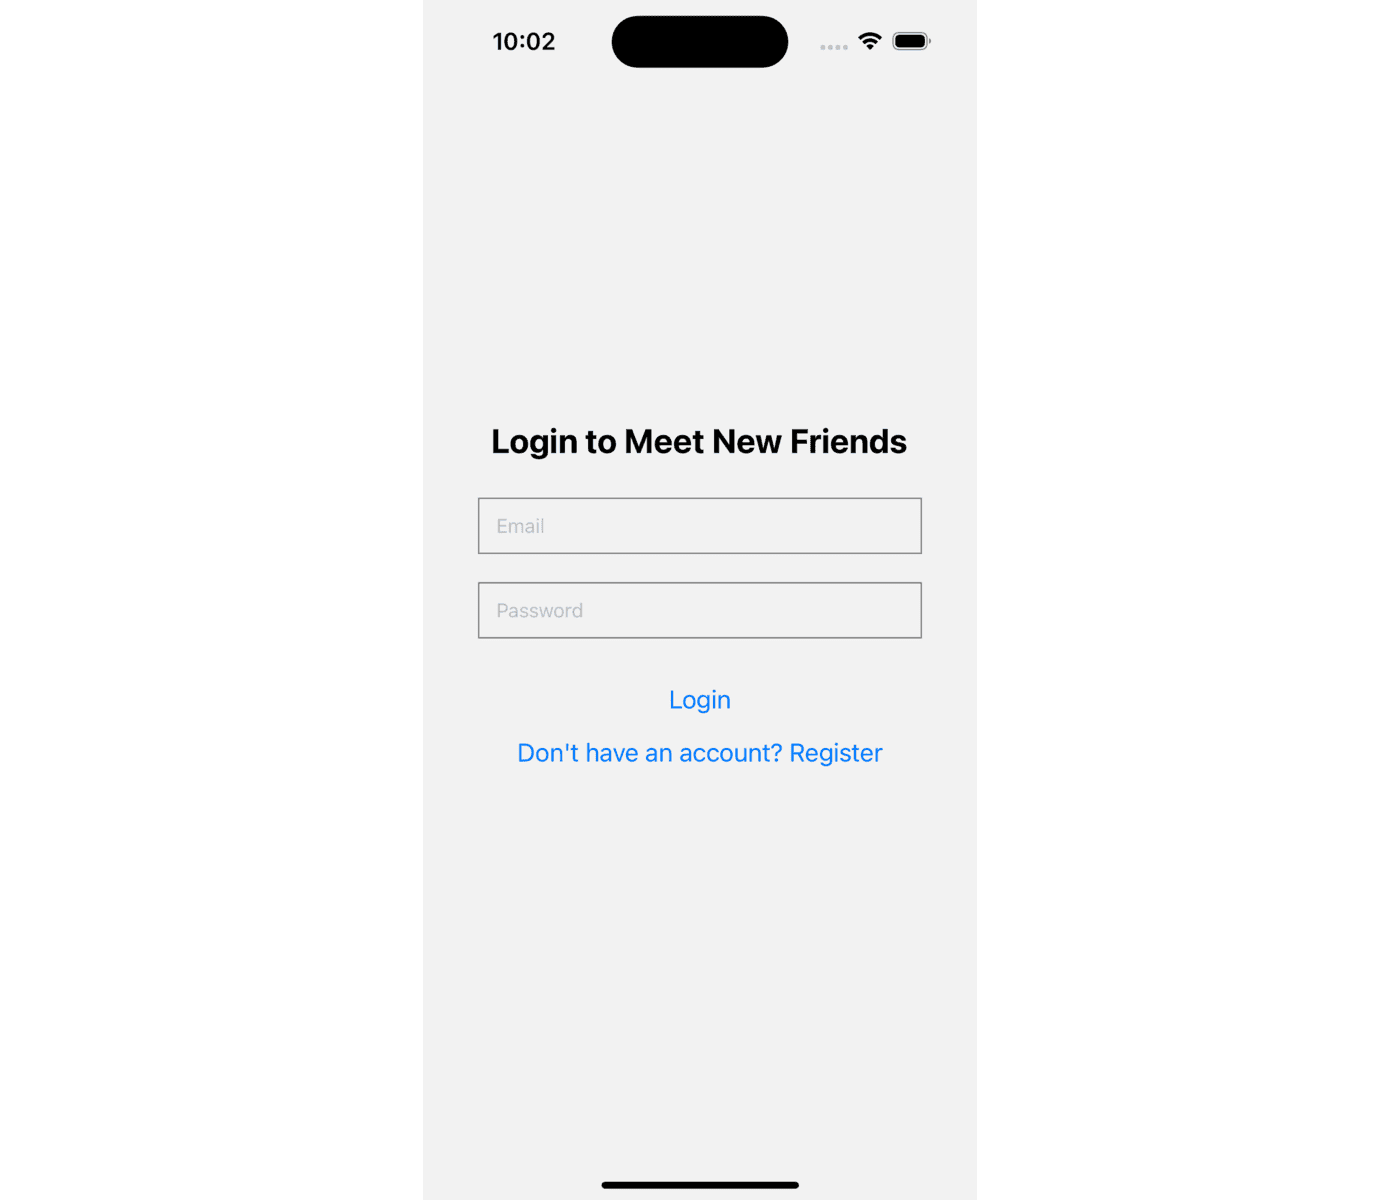
Next, create a screens folder in the chat-app directory. Create LoginScreen.js and RegisterScreen.js files in the 'screens' directory. Add the code snippet to the LoginScreen.js file to allow users to log in to the login function from the AuthContext:
import React, { useState, useEffect } from "react";
import { View, Text, TextInput, Button, StyleSheet } from "react-native";
import { useAuth } from "../context/AuthContext";

const LoginScreen = ({ navigation }) => {
  const { login, authError, isAuthenticated } = useAuth();
  const [email, setEmail] = useState("");
  const [password, setPassword] = useState("");

  useEffect(() => {
    if (isAuthenticated) {
      navigation.navigate("Friends");
    }
  }, [isAuthenticated, navigation]);

  return (
    <View style={styles.container}>
      <Text style={styles.title}>Login to Meet New Friends</Text>
      <TextInput
        style={styles.input}
        placeholder="Email"
        value={email}
        onChangeText={setEmail}
      />
      <TextInput
        style={styles.input}
        placeholder="Password"
        value={password}
        onChangeText={setPassword}
        secureTextEntry
      />
      <Text>{authError}</Text>
      <Button
        title="Login"
        onPress={() => {
          login(email, password);
        }}
      />
      <Button
        styles={styles.loginButton}
        title="Don't have an account? Register"
        onPress={() => navigation.navigate("Register")}
      ></Button>
    </View>
  );
};

const styles = StyleSheet.create({
  container: {
    flex: 1,
    justifyContent: "center",
    alignItems: "center",
  },
  input: {
    width: "80%",
    height: 40,
    borderWidth: 1,
    borderColor: "gray",
    marginVertical: 10,
    paddingHorizontal: 12,
  },
  loginButton: {
    backgroundColor: "#4554",
  },
  title: {
    fontSize: 24,
    fontWeight: "bold",
    marginBottom: 16,
  },
});

export default LoginScreen;
The above code has a button that links to the register screen. We have not created that yet, so the navigation will not work.
Update the App.js file to render the LoginScreen component.
import LoginScreen from "./screens/LoginScreen";

export default function App() {
  return <LoginScreen />;
}
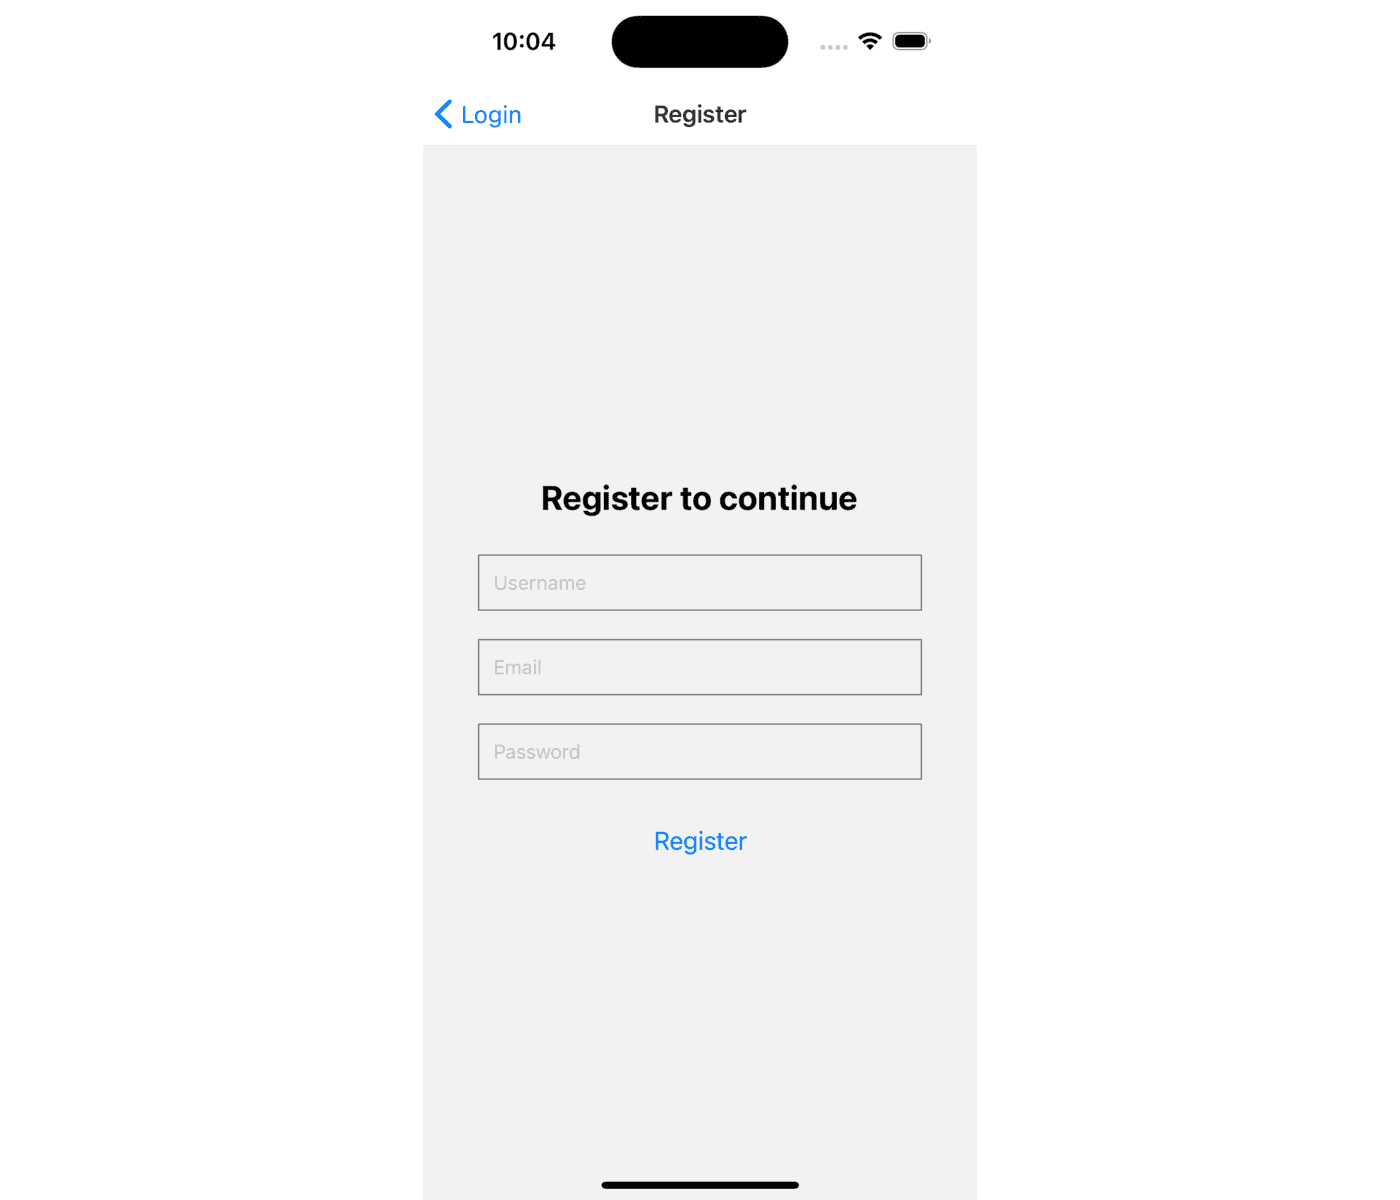
Now add the code snippet below to the RegisterScreen.js file to allow users to log in using the register function from the AuthContext:
import React, { useState, useEffect } from "react";
import { View, Text, TextInput, Button, StyleSheet } from "react-native";
import { useAuth } from "../context/AuthContext";

const RegisterScreen = ({ navigation }) => {
  const [username, setUsername] = useState("");
  const [email, setEmail] = useState("");
  const [password, setPassword] = useState("");
  const { register, authError, isAuthenticated } = useAuth();
  useEffect(() => {
    if (isAuthenticated) {
      navigation.navigate("Chat");
    }
  }, [isAuthenticated, navigation]);

  return (
    <View style={styles.container}>
      <Text style={styles.title}>Register to continue</Text>
      <TextInput
        style={styles.input}
        placeholder="Username"
        value={username}
        onChangeText={setUsername}
      />
      <TextInput
        style={styles.input}
        placeholder="Email"
        value={email}
        onChangeText={setEmail}
      />
      <TextInput
        style={styles.input}
        placeholder="Password"
        value={password}
        onChangeText={setPassword}
        secureTextEntry
      />
      <Text>{authError}</Text>
      <Button
        title="Register"
        onPress={() => {
          if (register(username, email, password)) {
            navigation.navigate("Login");
          }
        }}
      />
    </View>
  );
};

const styles = StyleSheet.create({
  container: {
    flex: 1,
    justifyContent: "center",
    alignItems: "center",
  },
  input: {
    width: "80%",
    height: 40,
    borderWidth: 1,
    borderColor: "gray",
    marginVertical: 10,
    paddingHorizontal: 10,
  },
  title: {
    fontSize: 24,
    fontWeight: "bold",
    marginBottom: 16,
  },
});

export default RegisterScreen;
Next, create a common/Navigation.js file and add the code snippets below to create the app navigation:
import React from "react";
import { NavigationContainer } from "@react-navigation/native";
import { createStackNavigator } from "@react-navigation/stack";

import LoginScreen from "../screens/LoginScreen";
import RegisterScreen from "../screens/RegisterScreen";
import { AuthProvider } from "../context/AuthContext";

const Stack = createStackNavigator();

const Navigation = () => (
  <NavigationContainer>
    <AuthProvider>
      <Stack.Navigator>
        <Stack.Screen
          name="Login"
          component={LoginScreen}
          options={{ headerShown: false }}
        />
        <Stack.Screen name="Register" component={RegisterScreen} />
      </Stack.Navigator>
    </AuthProvider>
  </NavigationContainer>
);

export default Navigation;
This code establishes the basic navigation layout for the application where the LoginScreen is the initial screen and the RegisterScreen is accessible from the LoginScreen. Wraps the navigation stack, making the authentication context available on all the screens through the stack.
Then update the App.js file to render the Navigation component:
import Navigation from "./common/Navigation";
export default function App() {
  return <Navigation />;
}
Now you can navigate to the RegisterScreen and back, log in, and register users.
Integrating Websockets In React Native With Strapi Plugin
The strapi-plugin-io package we installed earlier provides an easy way to integrate WebSockets with our Strapi application. To use it, open the ./config/plugin.js file and configure it by replacing the code inside with the following code:
module.exports = () => ({
    io: {
        enabled: true,
        config: {
            contentTypes: ['api::message.message'],
        },
    },
});
With the above configuration, the strapi-plugin-io plugin will listen for all supported events on the Message content type.
Creating The Active Friends Screen
Create a new file in the screens folder named FriendsScreen.js, to list the active users so they can chat with one another.
import React, { useEffect, useState } from "react";
import {
  View,
  Text,
  TouchableOpacity,
  FlatList,
  SafeAreaView,
  StyleSheet,
} from "react-native";
import { useNavigation } from "@react-navigation/native";
import { backendBaseUrl } from "../services/WebSocketService";
import { useAuth } from "../context/AuthContext";

const FriendsScreen = () => {
  const navigation = useNavigation();
  const [users, setUsers] = useState([]);
  const { isAuthenticated, activeUser, getToken } = useAuth();

  useEffect(() => {
    if (!isAuthenticated) {
      navigation.navigate("Login");
    }
  }, [isAuthenticated, navigation]);

  const fetchUsers = async () => {
    const token = await getToken();
    try {
      const response = await fetch(
        `${backendBaseUrl}/api/users?filters[id][$ne]=${activeUser.id}`,
        {
          headers: {
            Authorization: `Bearer ${token}`,
            "Content-Type": "application/json",
          },
        }
      );
      if (!response.ok) {
        throw new Error(`HTTP error! status: ${response.status}`);
      }
      const usersData = await response.json();
      setUsers(usersData);
    } catch (error) {
      console.error("Error fetching users:", error);
    }
  };

  useEffect(() => {
    if (activeUser) {
      fetchUsers();
    }
  }, [activeUser]);

  const handleFriendPress = (friendId) => {
    navigation.navigate("Chat", { friendId });
  };

  const renderFriendItem = ({ item }) => {
    return (
      <TouchableOpacity onPress={() => handleFriendPress(item.id)}>
        <View style={{ padding: 16 }}>
          <Text>{item.username}</Text>
        </View>
      </TouchableOpacity>
    );
  };

  return (
    <SafeAreaView style={styles.container}>
      <View style={styles.content}>
        <Text style={styles.title}>Friend Lists</Text>
        <FlatList
          data={users}
          renderItem={renderFriendItem}
          keyExtractor={(item) => item.id.toString()}
          contentContainerStyle={styles.flatList}
        />
      </View>
    </SafeAreaView>
  );
};

const styles = StyleSheet.create({
  container: {
    flex: 1,
    backgroundColor: "#fff",
  },
  content: {
    flex: 1,
    margin: 16,
  },
  title: {
    fontSize: 24,
    fontWeight: "bold",
    marginBottom: 16,
  },
  flatList: {
    flexGrow: 1,
  },
});

export default FriendsScreen;
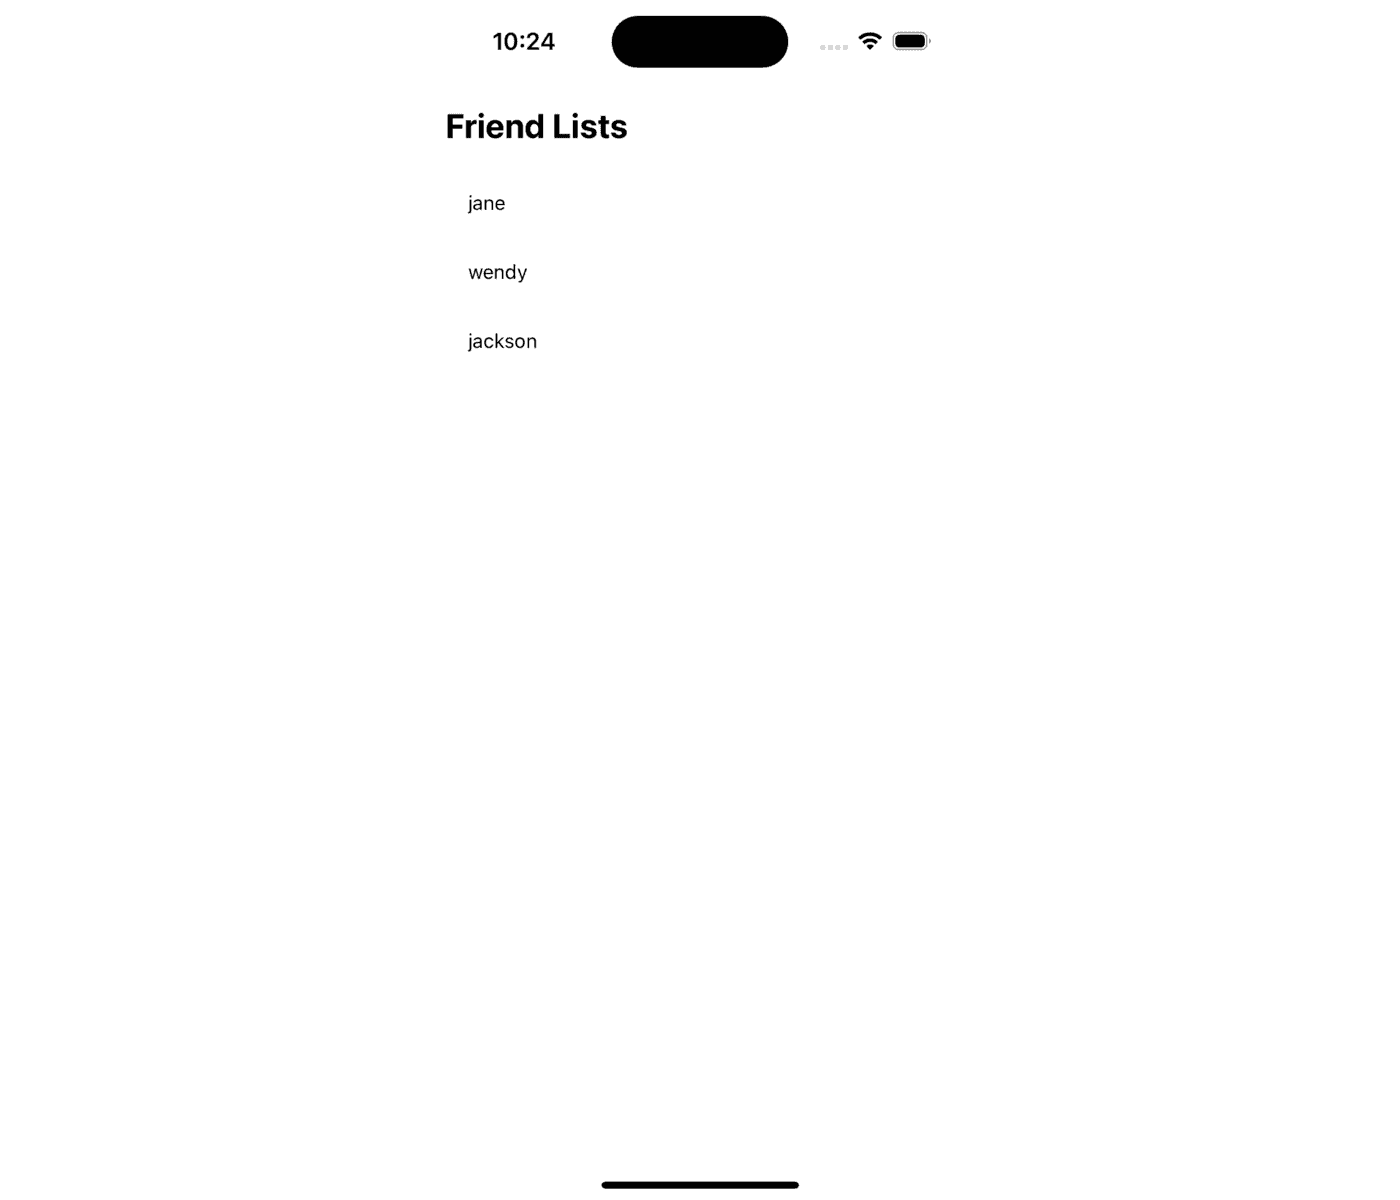
The above FriendsScreen component is a protected screen, so we check to see if the user has logged in using the isAuthenticated variable. Then we send a GET request to the /api/users endpoint in the fetchUsers function to get all the users, excluding those currently logged in, and list them in the FlatList component. For each of the users, we added a navigation.navigate("Chat") to allow users to navigate to the chat screen(We have not created this screen yet) in the handleFriendPress function.
Then, update the Navigation.js to add the FriendsScreen screen to the navigation stack.
import React from "react";
import { NavigationContainer } from "@react-navigation/native";
import { createStackNavigator } from "@react-navigation/stack";

import LoginScreen from "../screens/LoginScreen";
import RegisterScreen from "../screens/RegisterScreen";
import { AuthProvider } from "../context/AuthContext";
import FriendsScreen from "../screens/FriendsScreen";

const Stack = createStackNavigator();

const Navigation = () => (
  <NavigationContainer>
    <AuthProvider>
      <Stack.Navigator>
        <Stack.Screen
          name="Friends"
          component={FriendsScreen}
          options={{ headerShown: false }}
        />
        <Stack.Screen
          name="Login"
          component={LoginScreen}
          options={{ headerShown: false }}
        />
        <Stack.Screen name="Register" component={RegisterScreen} />
        <Stack.Screen
          name="Chat"
          component={ChatScreen}
        />
      </Stack.Navigator>
    </AuthProvider>
  </NavigationContainer>
);

export default Navigation;
You will be navigated to the friend's screen when you log in.
Creating the Chat Screen
To allow users to chat with each other by sending and receiving messages, create a new file named ChatScreen.js in the screens directory. First, fetch all the messages once the screen loads so users can see their previous conversations and listen to new incoming messages.
import React, { useState, useEffect } from "react";
import {
  View,
  TextInput,
  FlatList,
  Text,
  StyleSheet,
  TouchableOpacity,
  SafeAreaView,
  ScrollView,
} from "react-native";
import { WebSocketService } from "../services/WebSocketService";
import { format } from "date-fns";
import { backendBaseUrl } from "../services/WebSocketService";
import { useAuth } from "../context/AuthContext";
import { useRoute } from "@react-navigation/native";

const ChatScreen = ({ navigation }) => {
  const [messages, setMessages] = useState([]);
  const [messageInput, setMessageInput] = useState("");
  const { isAuthenticated, activeUser, getToken } = useAuth();
  const route = useRoute();
  const { friendId } = route.params;

  useEffect(() => {
    if (!isAuthenticated) {
      navigation.navigate("Login");
    }
  }, [isAuthenticated, navigation]);

  useEffect(() => {
    let socket;

    const connectWebSocket = async () => {
      const token = await getToken();
      if (token) {
        socket = WebSocketService(token);

        socket.on("connect", () => {
          console.log("Connected to WebSocket");
        });

        socket.on("message:create", (message) => {
          setMessages((prevMessages) => [...prevMessages, message.data]);
        });
      }
    };

    fetchMessages();
    connectWebSocket();

    return () => {
      if (socket) {
        socket.off("message:create");
        socket.disconnect();
      }
    };
  }, []);

  const fetchMessages = async () => {
    const token = await getToken();
    try {
      const response = await fetch(
        `${backendBaseUrl}/api/messages?populate=*&filters[$or][0][sender][id][$eq]=${friendId}&filters[$or][0][recipient][id][$eq]=${activeUser.id}&filters[$or][1][sender][id][$eq]=${activeUser.id}&filters[$or][1][recipient][id][$eq]=${friendId}`,
        {
          headers: {
            Authorization: `Bearer ${token}`,
            "Content-Type": "application/json",
          },
        }
      );
      const responseData = await response.json();
      setMessages(responseData.data);
    } catch (error) {
      console.error("Error fetching messages:", error);
    }
  };

  return (
    <SafeAreaView style={styles.container}>
       <ScrollView style={styles.messageContainer}>
        {messages.map((item, index) => (
          <View
            key={item.id.toString()}
            style={[
              styles.message,
              item?.attributes?.sender?.data?.id === activeUser.id
                ? styles.sentMessage
                : styles.receivedMessage,
            ]}
          >
            <Text style={styles.messageText}>{item.attributes.content}</Text>
            <Text style={styles.timestamp}>{item.attributes.timestamp}</Text>
          </View>
        ))}
      </ScrollView>
      <View style={styles.inputContainer}>
        <TextInput
          style={styles.input}
          value={messageInput}
          onChangeText={(text) => {
            setMessageInput(text);
          }}
          placeholder="Type a message..."
        />
        <TouchableOpacity style={styles.sendButton}>
          <Text style={styles.sendButtonText}>Send</Text>
        </TouchableOpacity>
      </View>
    </SafeAreaView>
  );
};

const styles = StyleSheet.create({
  container: {
    flex: 1,
    backgroundColor: "#f2f2f2",
  },
  messageContainer: {
    flex: 1,
    paddingHorizontal: 16,
    paddingTop: 16,
  },
  message: {
    backgroundColor: "#fff",
    borderRadius: 16,
    padding: 12,
    marginVertical: 8,
    maxWidth: "80%",
  },
  sentMessage: {
    alignSelf: "flex-end",
    backgroundColor: "#0084ff",
    color: "#fff",
  },
  receivedMessage: {
    alignSelf: "flex-start",
  },
  messageText: {
    fontSize: 16,
    lineHeight: 22,
  },
  timestamp: {
    fontSize: 12,
    color: "#666",
    marginTop: 4,
  },
  inputContainer: {
    flexDirection: "row",
    alignItems: "center",
    backgroundColor: "#fff",
    paddingHorizontal: 16,
    paddingVertical: 8,
  },
  input: {
    flex: 1,
    fontSize: 16,
    paddingVertical: 8,
    color: "#333",
  },
  sendButton: {
    backgroundColor: "#0084ff",
    borderRadius: 16,
    paddingHorizontal: 16,
    paddingVertical: 8,
    marginLeft: 8,
  },
  sendButtonText: {
    color: "#fff",
    fontSize: 16,
  },
});

export default ChatScreen;
In the above code, we first check if the user is authenticated and take them back to the login screen if they are not. Then, we defined a fetchMessages function that filters all the messages between the active user(the user logged in) and the user they clicked to chat with. We then make a call to the function in the useEffect hook to fetch the messages once this component mounts. We listen to the create event when a socket is connected to allow users to receive new messages in real time. So with the help of the strapi-plugin-io plugin, we can listen to any event in the Message collection, like when someone creates a new message, the recipient gets it immediately.
Next, update the ChatScreen code to add a function for users to send a new message.
import React, { useState, useEffect } from "react";
import {
  View,
  TextInput,
  FlatList,
  Text,
  StyleSheet,
  TouchableOpacity,
  SafeAreaView,
  ScrollView,
} from "react-native";
import { WebSocketService } from "../services/WebSocketService";
import { format } from "date-fns";
import { backendBaseUrl } from "../services/WebSocketService";
import { useAuth } from "../context/AuthContext";
import { useRoute } from "@react-navigation/native";

const ChatScreen = ({ navigation }) => {
  const [messages, setMessages] = useState([]);
  const [messageInput, setMessageInput] = useState("");
  const { isAuthenticated, activeUser } = useAuth();
  const route = useRoute();
  const { friendId } = route.params;

   // ... previous code goes here

   const sendMessage = async () => {
    if (messageInput.trim() === "") return;
    const newMessage = {
      data: {
        content: messageInput,
        sender: activeUser.id,
        recipient: friendId,
        timestamp: formattedDate(),
      },
    };

    try {
      const token = await getToken();
      await fetch(`${backendBaseUrl}/api/messages?populate=*`, {
        method: "POST",
        headers: {
          Authorization: `Bearer ${token}`,
          "Content-Type": "application/json",
        },
        body: JSON.stringify(newMessage),
      });

      setMessageInput("");
    } catch (error) {
      console.error("Error sending messages:", error);
    }
  };

  const formattedDate = () => {
    const currentDate = new Date();
    return format(currentDate, "yyyy-MM-dd'T'HH:mm:ss.SSS'Z'");
  };

  return (
    <SafeAreaView style={styles.container}>
       <ScrollView style={styles.messageContainer}>
        {messages.map((item, index) => (
          <View
            key={item.id.toString()}
            style={[
              styles.message,
              item?.attributes?.sender?.data?.id === activeUser.id
                ? styles.sentMessage
                : styles.receivedMessage,
            ]}
          >
            <Text style={styles.messageText}>{item.attributes.content}</Text>
            <Text style={styles.timestamp}>{item.attributes.timestamp}</Text>
          </View>
        ))}
      </ScrollView>
      <View style={styles.inputContainer}>
        <TextInput
          style={styles.input}
          value={messageInput}
          onChangeText={(text) => {
            setMessageInput(text);
          }}
          placeholder="Type a message..."
        />
        <TouchableOpacity style={styles.sendButton} onPress={sendMessage}>
          <Text style={styles.sendButtonText}>Send</Text>
        </TouchableOpacity>
      </View>
    </SafeAreaView>
  );
};

//... styles goes here

export default ChatScreen;
Here, we added a sendMessage function that sends a POST request to our Strapi backend to create a new message. Once successful, the strapi-plugin-io library picks up the event, triggers the creation of events, and adds a new message to the array of messages between the users(the sender and recipient).
For the socket connection to work, we need to set up a socket connection between our React Native app and Strapi backend using the socket.io-client package we installed earlier. Create a services folder in the chat-app folder and create a WebSocketService.js.
Add the code snippet below:
import io from "socket.io-client";
import { Platform } from "react-native";

export const backendBaseUrl =
  Platform.OS === "android" ? "http://10.0.2.2:1337" : "http://localhost:1337";

export const WebSocketService = (token) => {
  const socket = io(backendBaseUrl, {
    auth: {
      token: token,
    },
  });
  return socket;
};
The above establishes a WebSocket connection from our React Native app to our backend server. It uses the user's authorization token to give users access to the Message collection and considers the different ways to access localhost on Android emulators and iOS. We can access localhost on Android emulators at http://10.0.2.2:1337 and iPhone, Mac, and Web emulators at http://localhost:1337.
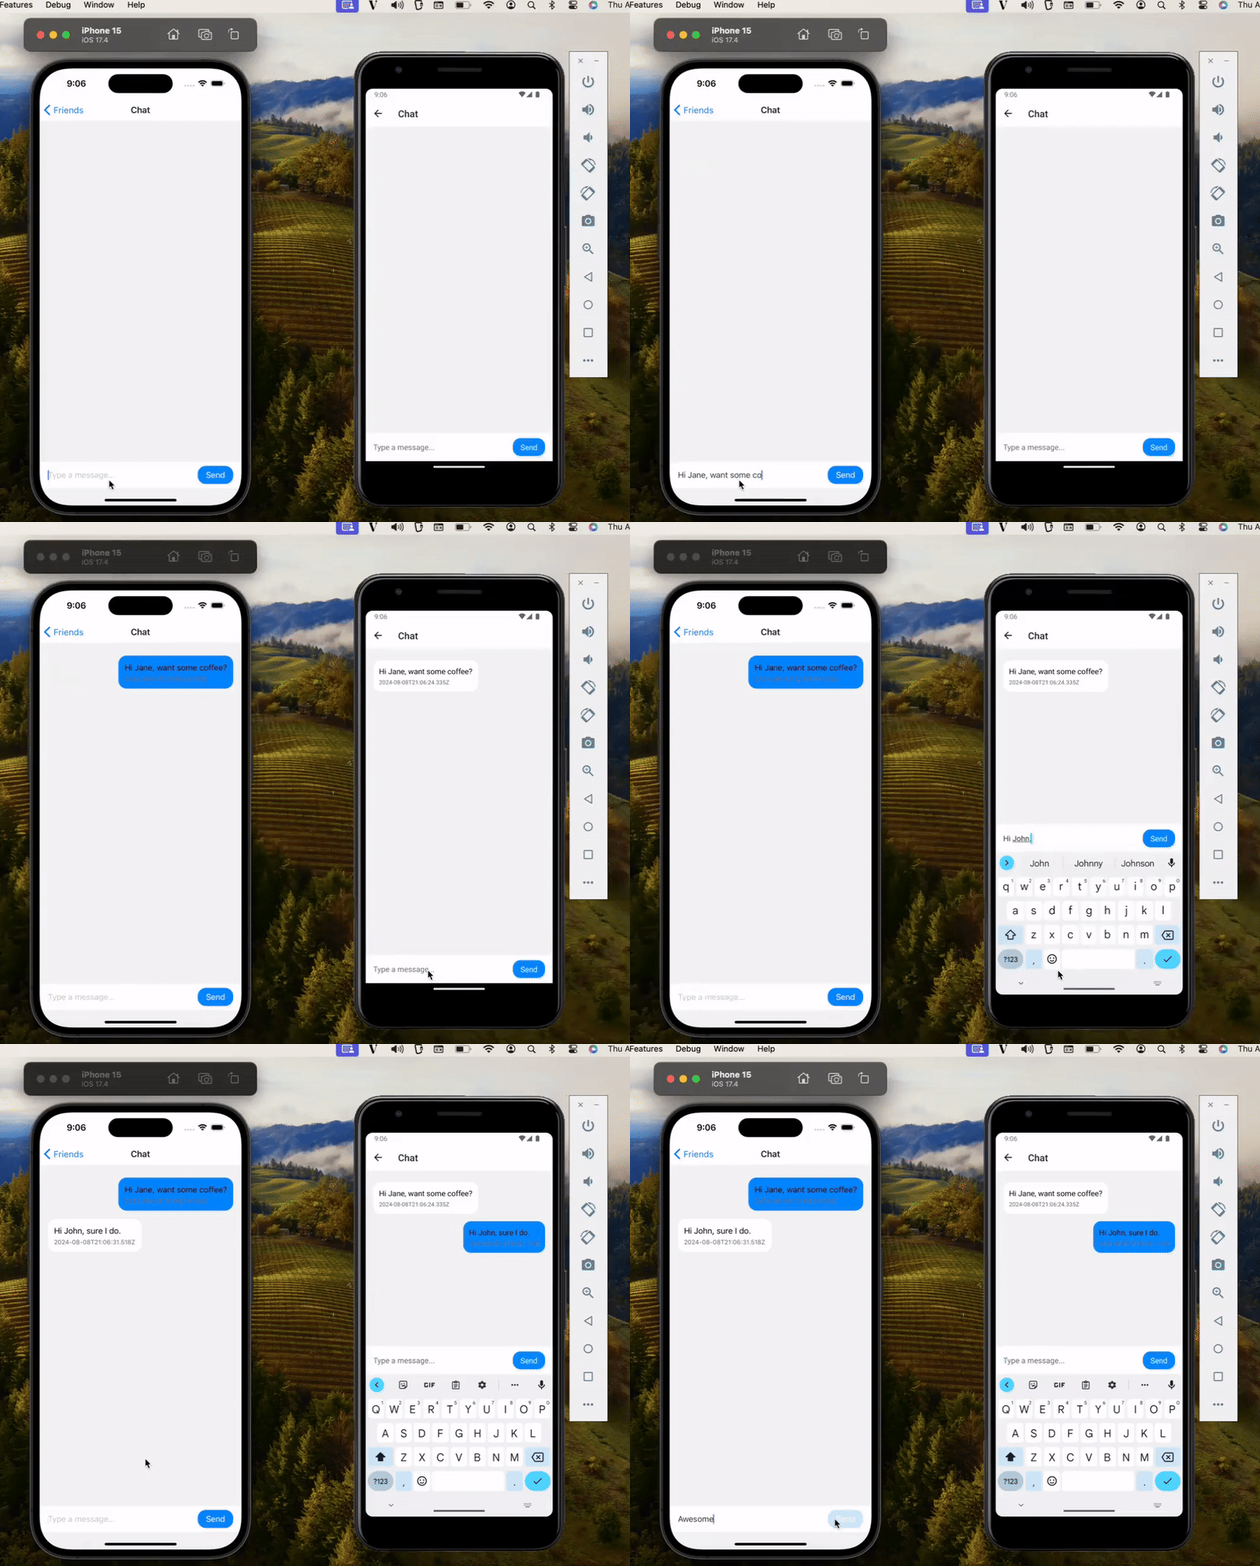
Now refresh your application, click on the user, and start chatting.
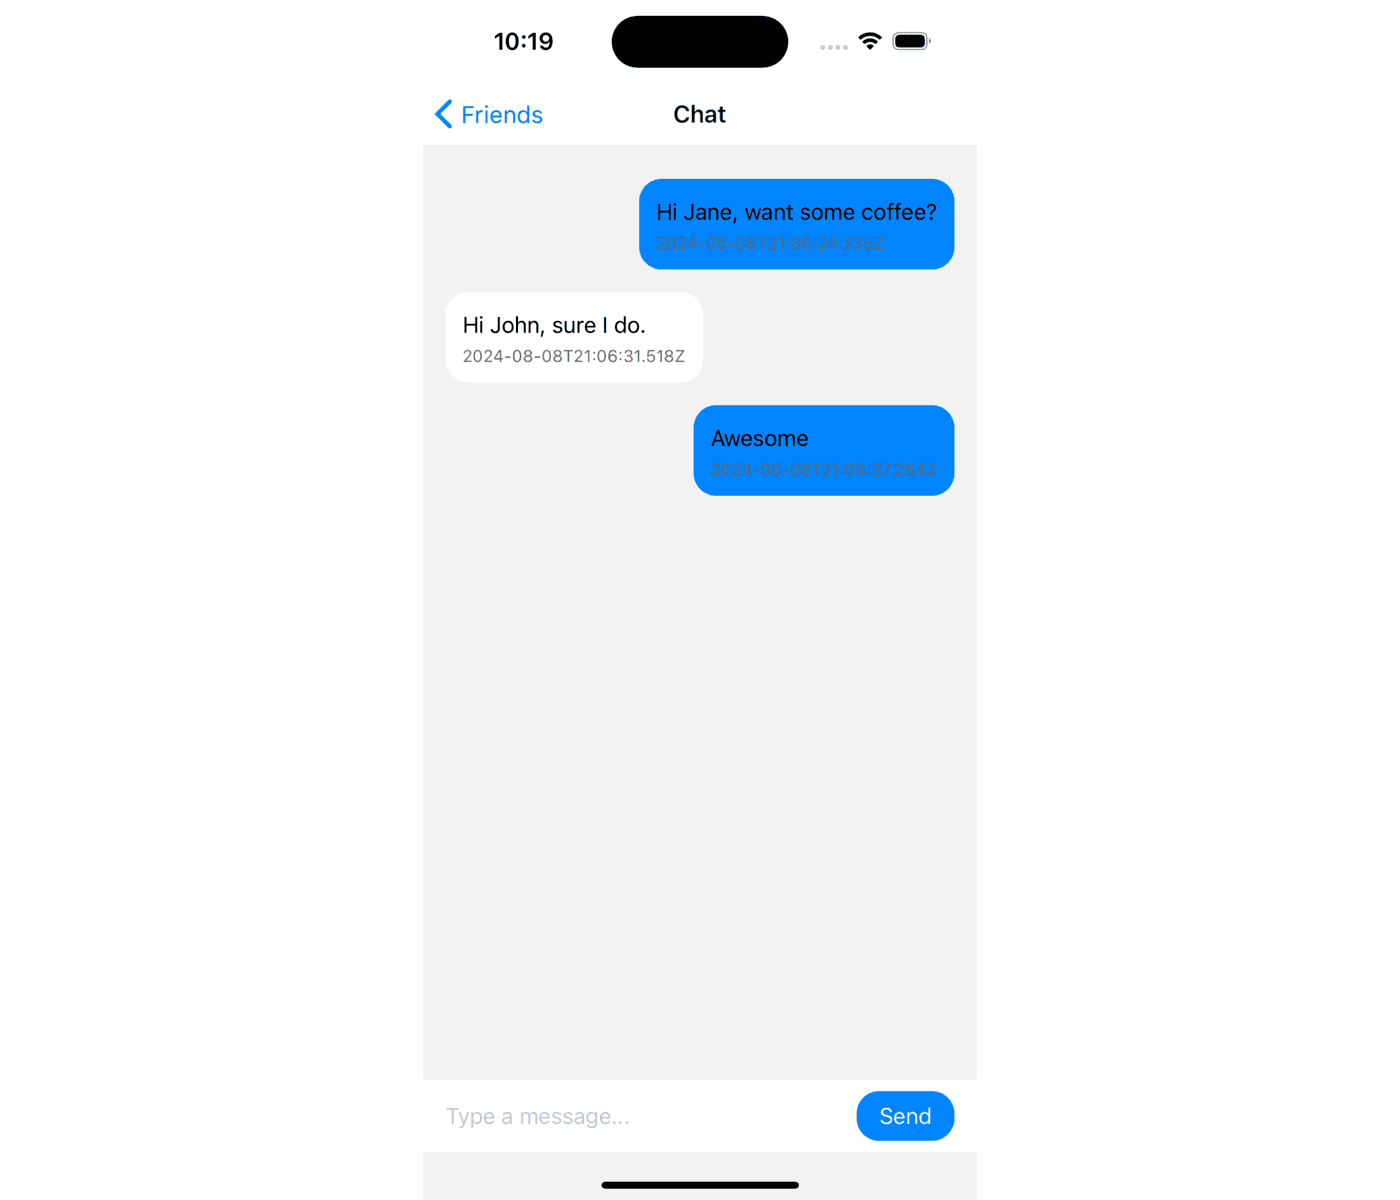
Finished App
Here is a demo of what our app looks like.
Conclusion
In this article, we explored building a Real-Time chat application with Strapi and React Native. We learned how to create a collection in Strapi and implement authentication using the Strapi built-in JWT authentication. We then built out the chatting application using socket.io with the help of the strapi-plugin-io plugin.
Now that you know this, how would you use Strapi in your next React Native project? Perhaps you can enhance the application by adding features like Push notifications, Image messages, and User profiles.
With the help of the extensibility, flexibility, and real-time capabilities of Strapi along with plugins like strapi-plugin-io, you can create applications that are not just limited to simple chatting. Strapi’s strong backend, coupled with the high-performance, cross-platform UI of React Native, makes this stack ideal for creating new-generation, real-time mobile apps.