Introduction
Why You Need a Knowledge Base
In today's world, you can get information about almost anything online. As a product developer, you want to control the quality of your product's information, and the best way to do this is by creating a Knowledge Base. This is a place where users can seek information regarding your project.
What We’ll Build
In this article, you will learn how to create a Knowledge Base using React Native and Strapi 5, as well as how to create a search functionality using AI.
Prerequisites
- Basic knowledge of React Native
- Node.js
- Visual studio code
- Basic Knowledge of Strapi - get started here!
- Knowledge of LangChain
- Basic knowledge of Python
Application Architecture
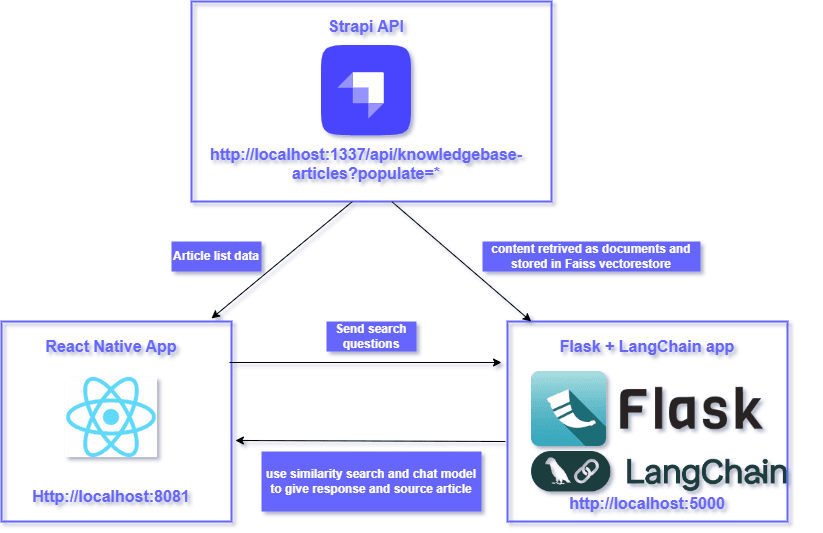
Given that we want to create an application that spans multiple applications, we should ideally have an architecture to guide us when building the application.
So, we have to decouple all the applications that ultimately make up our application and also point out how they communicate.
Here is an overview of the application's architecture:
Strapi 5 API
This application will use Strapi's REST API to expose the Data stored by the user utilizing Strapi CMS. In our case, we will be using local development, but you can easily exchange the endpoints to suit your requirements.
Once a user publishes entries to Strapi, it creates custom APIs and exposes the items via it's API. This API will serve our React Native application with Article data published by the user, and which in turn serves filtered and transfomed data to Flask + LangChain application.
React Native App
We will use React Native to create the frontend application. React Native is a framework used to develop cross-platform mobile applications.
The Knowledge Base app needs to render Strapi's API data on its user interface using React Native.
Flask and LangChain App
The Knowledge Base app uses LangChain, which is a framework to develop applications powered by Large Language Models (LLMs) to retrieve data from Strapi and transform the data before it is stored in vector stores.
A vector store is a database that can store vectors (fixed-length lists of numbers) along with other data items.
The Knowledge Base app also retrieves data from the user's input on the React Native App and uses similarity search and the chat model to give responses and refer to original sources.
Flask is used to add routing to LangChain and makes it possible for the other applications to communicate with LangChain reliably and fast.
Setting Up Strapi 5 Backend
Install Strapi 5
To start creating your Strapi 5 application using NPM, open your terminal and add the following code:
npx create-strapi@latest

# 'npx' runs a command from an npm package
# 'create-strapi' is the Strapi package
# '@latest' indicates that the latest version of Strapi is used
#  note that the --quick-start flag has been deprecated in Strapi5
During installation process, you will have the following prompts:
| Prompt | Choose option | Explanation |
|---|---|---|
| do you want to use the default database | Yes | initializing the app with a sqlite database. |
| start with an example structure & data | Yes | this will pre-populate your app with content-types data. |
| install dependencies with npm | Yes | installs all dependencies. |
| Please log in or sign up. | Skip | not deploying to cloud. development stage. |
When the installation is done, you can start up a Strapi 5 development server using the following npm command:
npm run developStrapi will also redirect you to a browser sign-in page as an admin:
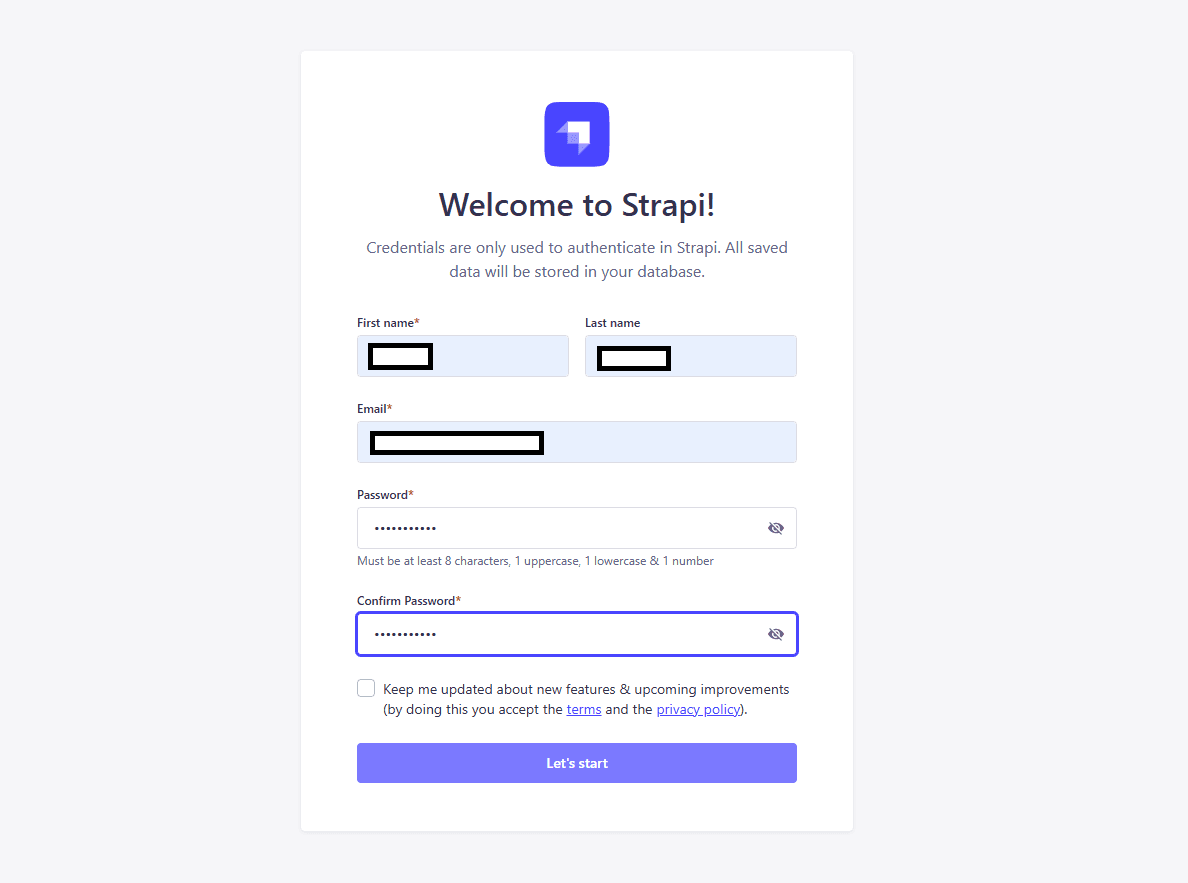
After logging in, follow the next steps to set up your backend.
Creating Article Content-type
Strapi 5's admin panel offers sample data structures if you agreed to the "start with an example structure and data" prompt we set previously and we will use these provided collections to build our application.
You can learn how to create custom content types using Strapi 5's admin content-type builder.
These content types or any custom collections you create automatically get a default api endpoint.
NOTE : During Strapi installation we said Yes to "start with an example structure & data". This means we have already automatically created the Article content type.
Publish Article Entries
Since we created our app with the example data, you should be able to navigate to your Article collection and see the data that was created for us.
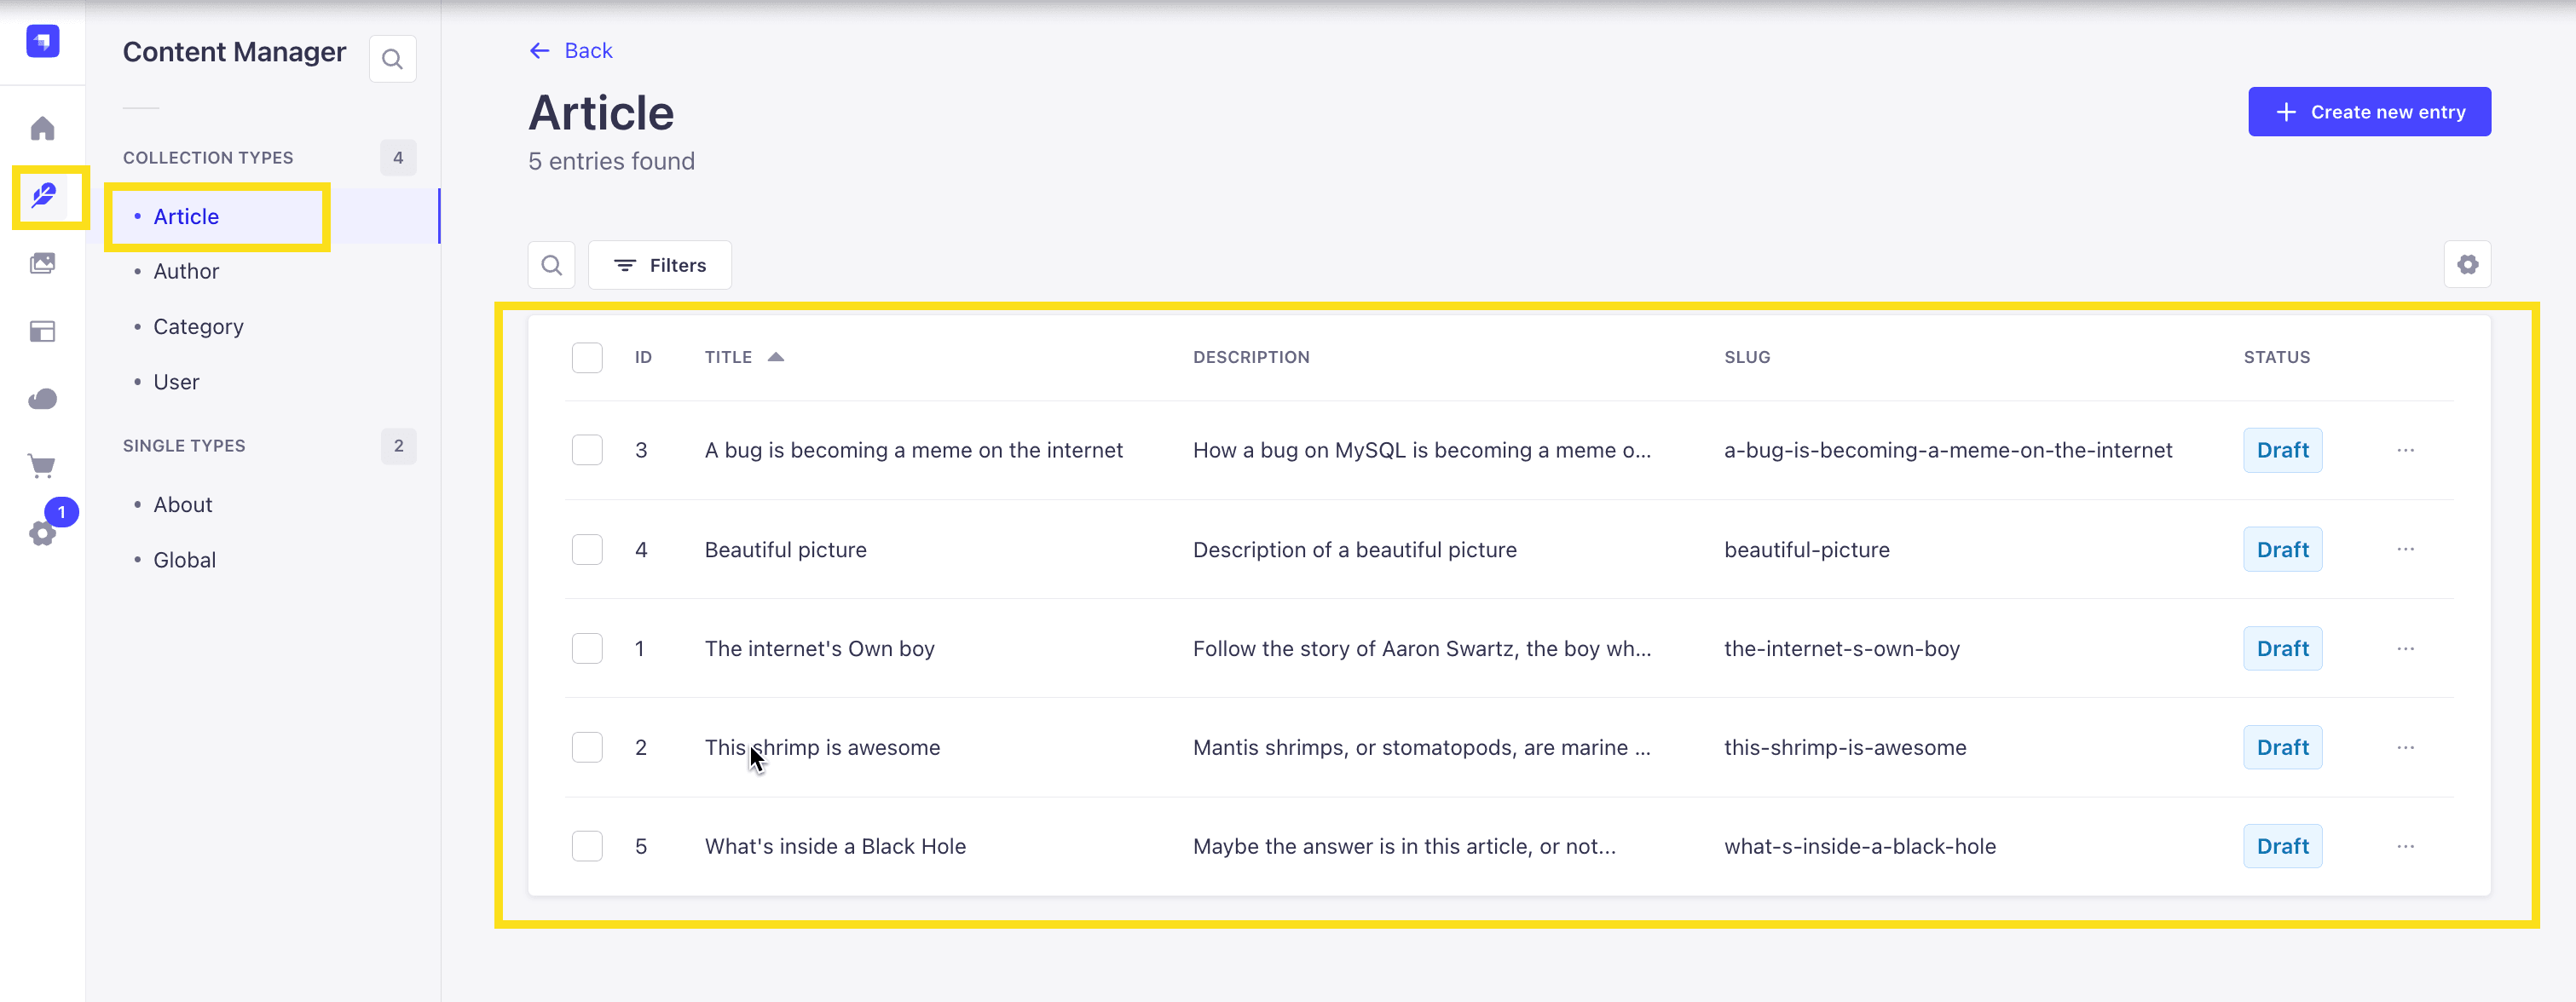
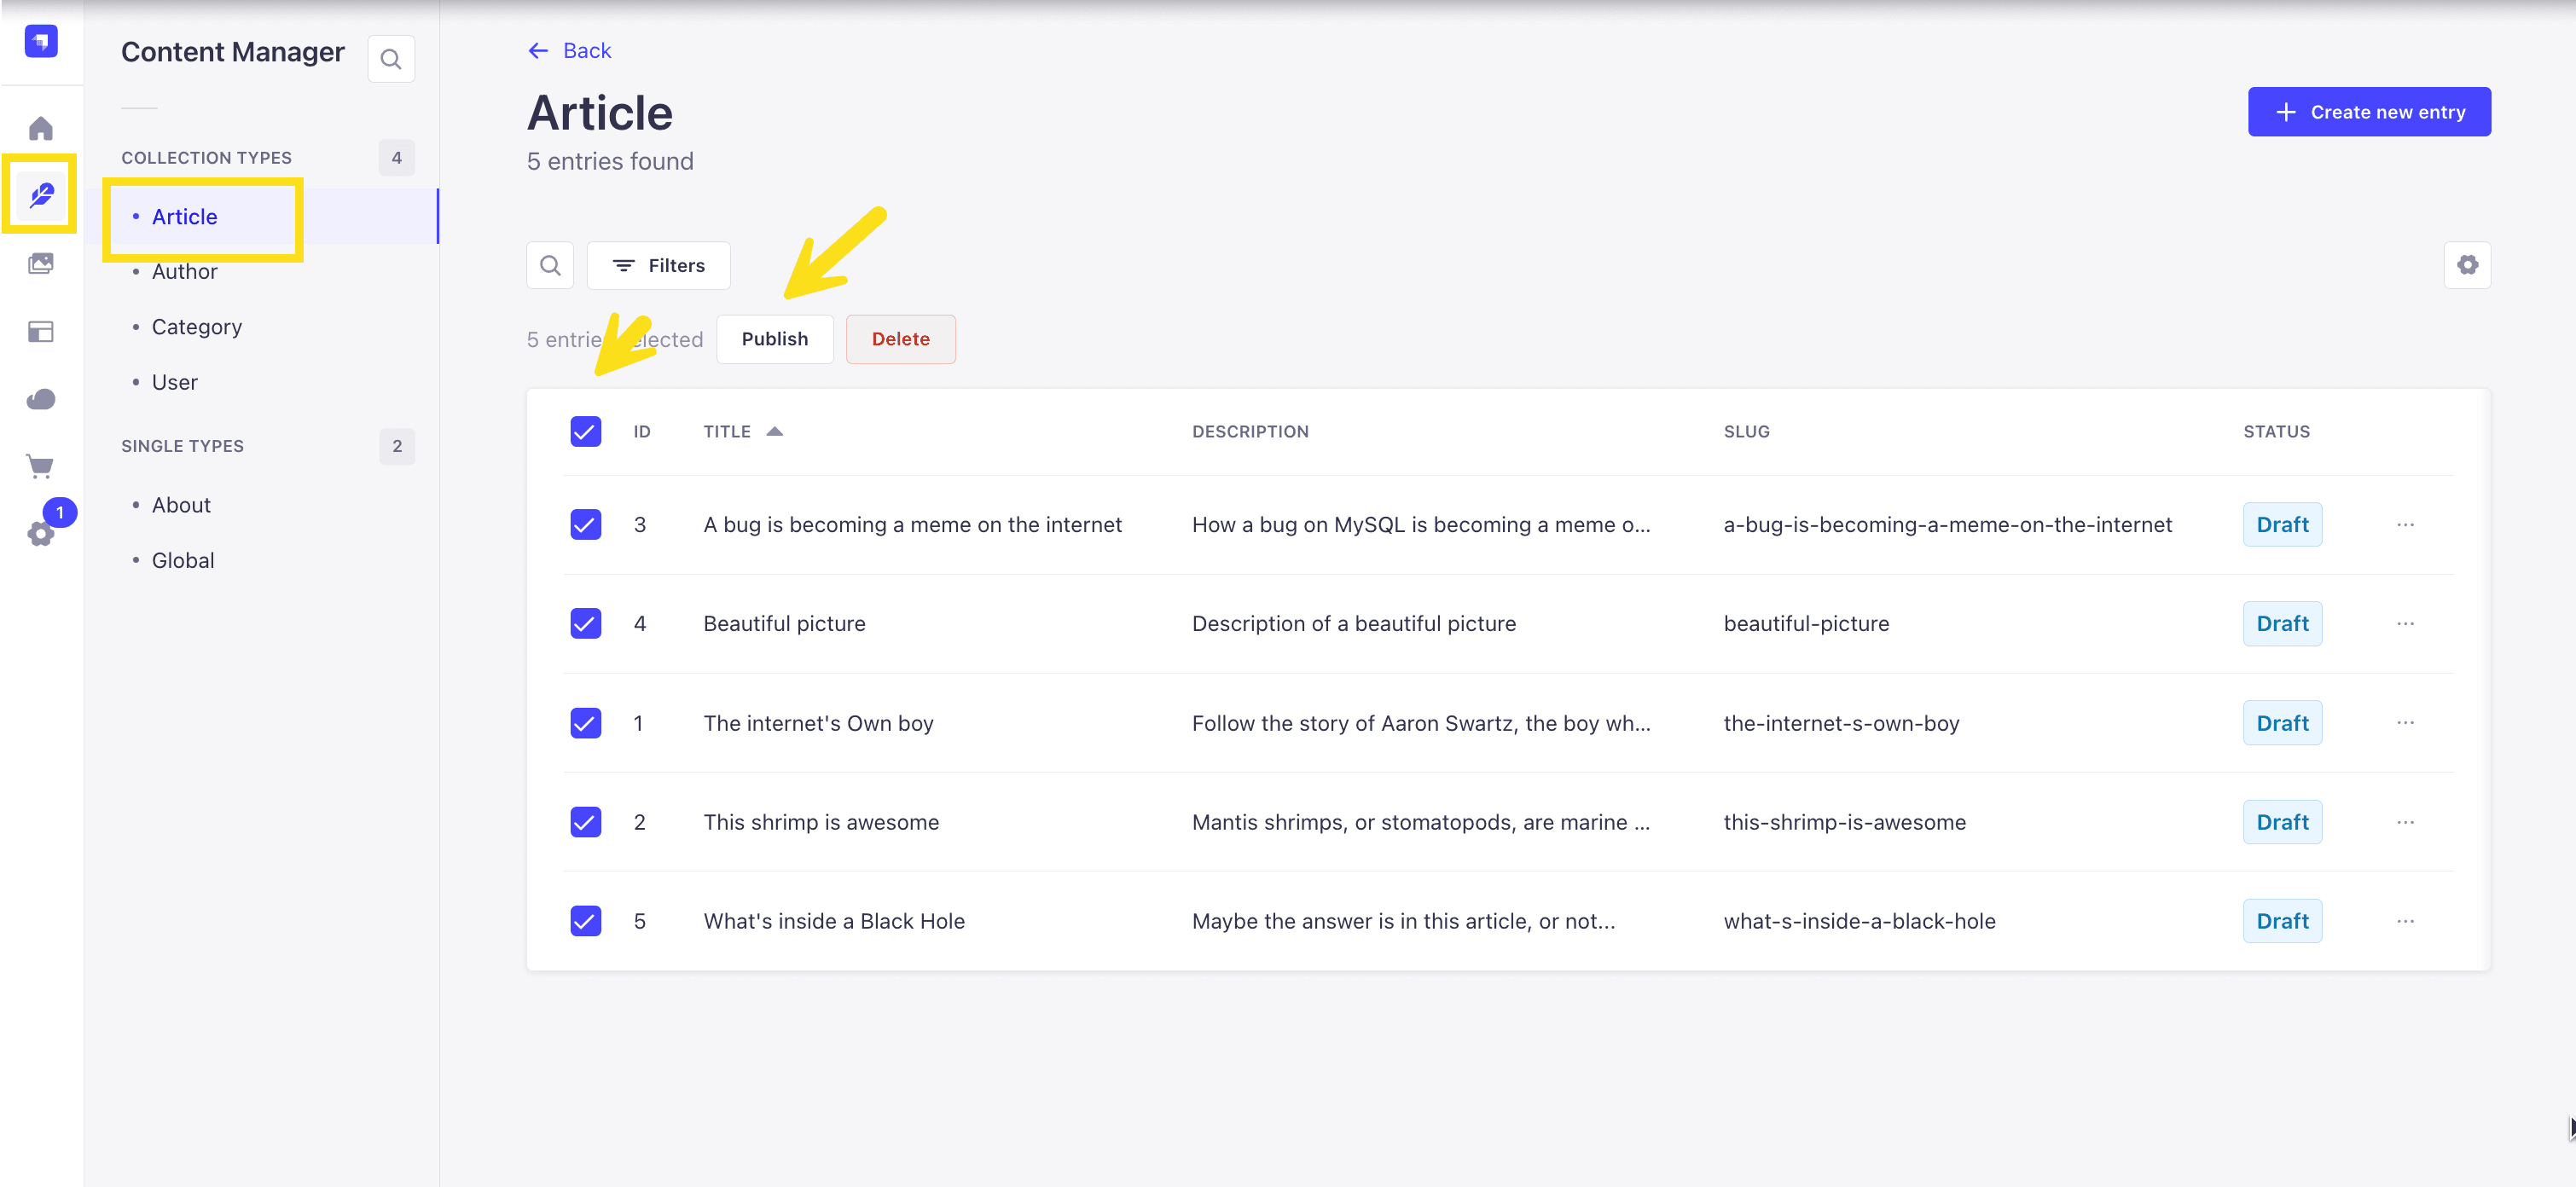
Now, let's make sure that all of the data is published. If not, you can select all items via the checkbox and then click the Publish button.
Generate Strapi API Token for Authentication
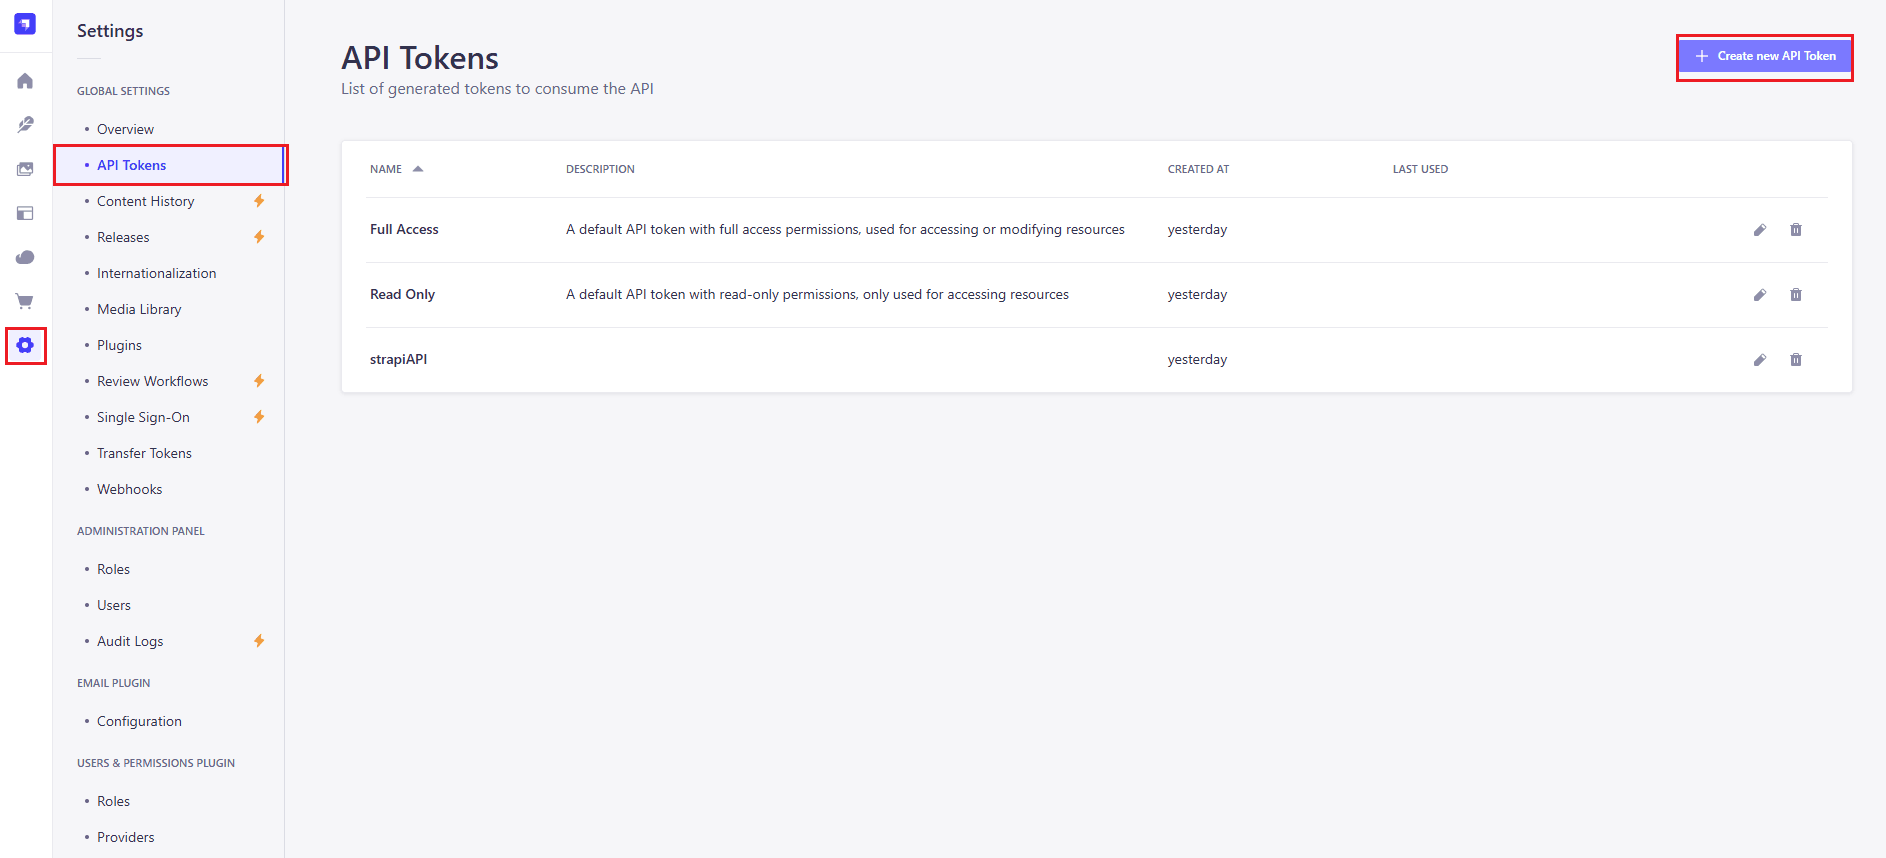
Navigate to Settings on the sidebar, click on API tokens on the settings menu, and click on the Add new API Token button:
Strapi API tokens allow executing a request on REST API or GraphQL API endpoints as an authenticated user.
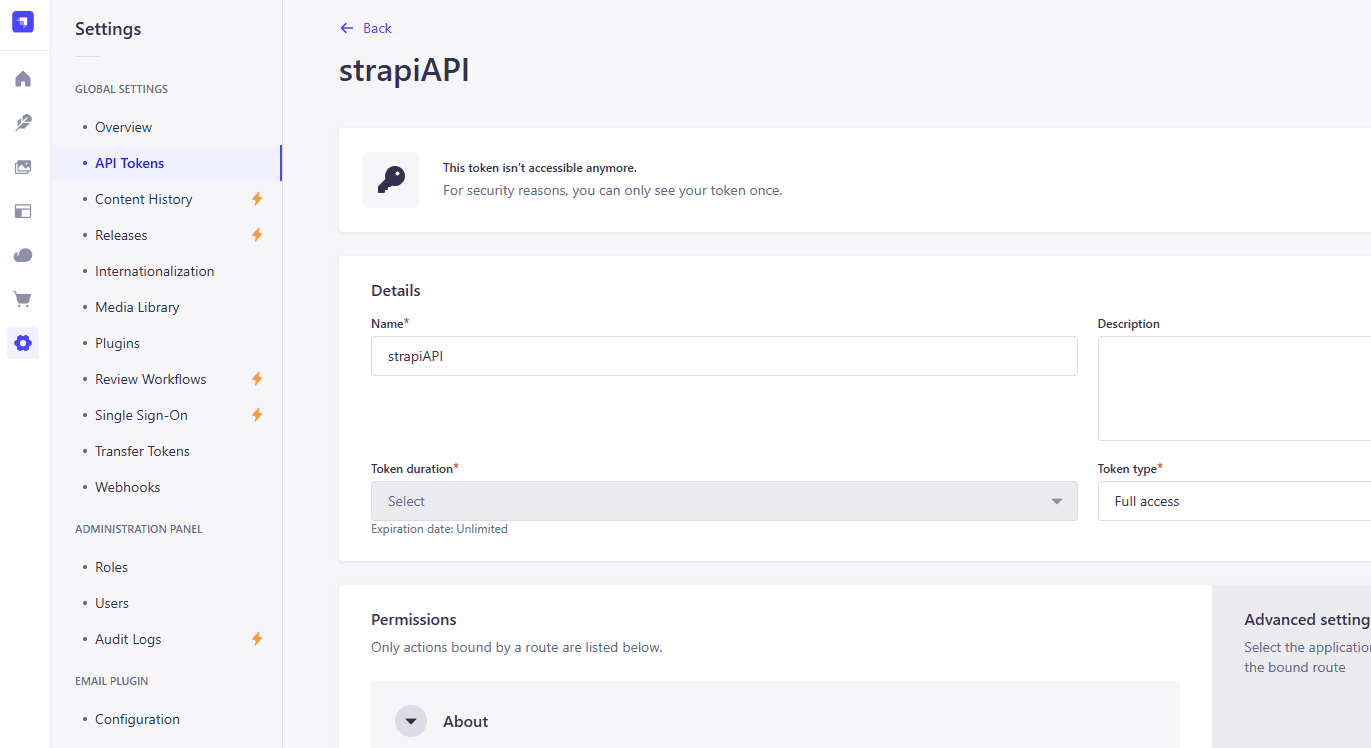
This will lead you to a page where you can add your API name, duration, and type:
Building the React Native Frontend
In this section, you will setup an environment for the React Native application and build the application following the next steps.
Step 1: Create a React Native Application
Start by creating your React Native application. Create a new folder outside your Strapi root folder and run the following command to create a new React Native application:
npx create-expo-app kb-react-native --template blankAfter that, install the following dependencies on your application's root folder in order to run the application on your web browser:
- React-DOM: This is a React package that serves as a bridge between React Native components and the DOM (Document Object Model), and you can install it using the following npm command:
npx expo install react-dom react-native-web @expo/metro-runtime- React-navigation/native and stack: This manages the application's navigation, and you can install it using the following npm command:
npm install @react-navigation/native @react-navigation/stack- Axios: This package is used to make API requests using the HTTP/HTTPS protocol. you can install it using the following npm command:
npm install axios- React Native Modal: This is an extension of the original React Native's Modal.
npm i react-native-modalStep 2: Run the React Native Application
After the installation process above, run the following command to run your application:
npx expo startThis will open a page on http://localhost/8081 by default.
Step 3: Creating the Main API File
Now that you have confirmed your expo React Native application is running, it's time to do some editing.
First, create a file named api.js in the root folder or React Native application to handle your API calls:
import axios from 'axios';

const API_URL = 'http://localhost:1337/api';
const API_KEY = '<your strapi api>';

const headers = {
    Authorization: `Bearer ${API_KEY}`,
};

// Fetch all articles
const getArticles = async () => {
    try {
        const response = await axios.get(`${API_URL}/articles?populate=*`, { headers });
        return response.data.data; // Direct access to flattened data
    } catch (error) {
        console.error('Error fetching articles:', error);
        throw error;
    }
};

// Fetch all authors
const getAuthors = async () => {
    try {
        const response = await axios.get(`${API_URL}/authors?populate=*`, { headers });
        return response.data.data;
    } catch (error) {
        console.error('Error fetching authors:', error);
        throw error;
    }
};

// Fetch all categories
const getCategories = async () => {
    try {
        const response = await axios.get(`${API_URL}/categories?populate=*`, { headers });
        return response.data.data;
    } catch (error) {
        console.error('Error fetching categories:', error);
        throw error;
    }
};

// Fetch a specific article by ID
const getArticleById = async (id) => {
    try {
        const response = await axios.get(`${API_URL}/articles/${id}?populate=*`, { headers });
        return response.data.data;
    } catch (error) {
        console.error(`Error fetching article with ID ${id}:`, error);
        throw error;
    }
};

// Fetch a specific author by ID
const getAuthorById = async (id) => {
    try {
        const response = await axios.get(`${API_URL}/authors/${id}?populate=*`, { headers });
        return response.data.data;
    } catch (error) {
        console.error(`Error fetching author with ID ${id}:`, error);
        throw error;
    }
};

// Fetch a specific category by ID
const getCategoryById = async (id) => {
    try {
        const response = await axios.get(`${API_URL}/categories/${id}?populate=*`, { headers });
        return response.data.data;
    } catch (error) {
        console.error(`Error fetching category with ID ${id}:`, error);
        throw error;
    }
};

export { getArticles, getAuthors, getCategories, getArticleById, getAuthorById, getCategoryById };
The code above is resposible for making the main API request from Strapi API. It uses Axios to make the request and returns the getArticles function which contains the API's response.
Step 4: Create Components
Now, we have to create components that we will use as guides or templates to manage the individual application component's state, data flow, and user interface.
Article Card Component
In your root folder, create a folder named components . Inside the new folder components, create a file article_card.js and add the following code:
// ./components/full_article.js

import React, { useState } from 'react';
import { View, Text, StyleSheet, Image, Pressable } from 'react-native';
import { useNavigation } from '@react-navigation/native';

const ArticleCard = ({ article }) => {
    const navigation = useNavigation();
    const API_URL = 'http://localhost:1337';
    console.log(article);
    return (
        <View style={styles.card}>

            <Pressable onPress={() => navigation.navigate('FullArticle', { article:article })}>
                <Text style={styles.title}>{article.title}</Text>
                    <Image
                        source={{ uri: API_URL + article.cover.formats.thumbnail.url }}
                        style={styles.cover}
                    />

                <Text style={styles.summary}>{article.description}</Text>
            </Pressable>
        </View>
    );
};

const styles = StyleSheet.create({
    card: {
        padding: 20,
        flexGrow: 1,
        margin: 10,
        backgroundColor: '#fff',
        borderRadius: 10,
        shadowColor: '#000',
        shadowOffset: {
            width: 0,
            height: 2,
        },
        shadowOpacity: 0.25,
        shadowRadius: 3.84,
        elevation: 5,
        width: '40%',
        alignSelf:'center'

    },
    title: {
        fontSize: 18,
        fontWeight: 'bold',
        width: '90%',
        textAlign:'center'
    },
    summary:{
        fontSize: 14,
        width: '90%',
        padding:10,
        textAlign:'center'
    },

    cover: {
        width: 250,
        height:150,
        backgroundColor:'black',
        alignSelf:'center',
        margin:10

    }

});

export default ArticleCard;
The code above provides a structure for the article's clickable modal, which shows users the article's important attributes and summary before they opt to open the full article.
Full Article Component
Create another file named full_article.js inside the components folder and add the following code:
// ./components/full_article.js

import React from 'react';
import { View, Text, ScrollView, StyleSheet, Image } from 'react-native';

const FullArticle = ({ route }) => {
    const { article } = route.params;
    const API_URL = 'http://localhost:1337';

    if (!article) {
        return (
            <View style={styles.container}>
                <Text>Article details not available.</Text>
            </View>
        );
    }

    const title = article.title;
    const cover = article.cover;
    const body = article.blocks[0].body;
    const description = article.description;

    return (
        <ScrollView contentContainerStyle={styles.container}>
             <Text style={styles.title}>{title}</Text>
            <Image
                        source={{ uri: API_URL + cover.url }}
                        style={styles.cover}
                    />

            <Text style={styles.description}>{description}</Text>

            <Text>{body}</Text>
        </ScrollView>
    );
};

const styles = StyleSheet.create({
    container: {
        flexGrow: 1,
        backgroundColor: '#fff',
        padding: 15,
        width:'65%',
        textAlign:'center',
        alignSelf:'center',
        height:1500,
    },
    title: {
        fontSize: 44,
        fontWeight: 'bold',
        marginBottom: 16,
        textAlign:'center'
    },
    description:{
        fontSize: 16,

        margin: 16,
        textAlign:'center'
    },
    cover: {
        width: '90%',
        height:500,
        borderRadius: 8,
        marginBottom: 16,
        textAlign:'center',
        alignSelf:'center'
    },
    heading1: {
        fontSize: 22,
        fontWeight: 'bold',
        marginBottom: 8,
    },
    heading2: {
        fontSize: 20,
        fontWeight: 'bold',
        marginBottom: 8,
    },
    heading3: {
        fontSize: 18,
        fontWeight: 'bold',
        marginBottom: 8,
    },
    heading4: {
        fontSize: 16,
        fontWeight: 'bold',
        marginBottom: 8,
    },
    heading5: {
        fontSize: 14,
        fontWeight: 'bold',
        marginBottom: 8,
    },
    heading6: {
        fontSize: 12,
        fontWeight: 'bold',
        marginBottom: 8,
    },
    body: {
        fontSize: 16,
        lineHeight: 24,
        marginBottom: 10,
    },
    list: {
        marginBottom: 10,
    },
    listItem: {
        fontSize: 16,
        lineHeight: 24,
        marginLeft: 20,
    },
});

export default FullArticle;
The code above creates a FullArticle component which will render the full article for the user. This component is triggered wwhen the user clicking on the article modal from the ArticleCard component.
This trigger is accompanied by the route parameter, which passes the selected article's data.
Step 4: Creating React Native screens
After creating the components, you need to create the screens for your application.
By default, React Native references its app.js file for the App's screens. So, navigate to the app.js file of your React Native application folder and add the following code:
// ./app.js

import React, { useEffect, useState } from 'react';
import { Button, View, FlatList, StyleSheet, ScrollView } from 'react-native';
import { NavigationContainer } from '@react-navigation/native';
import { createStackNavigator } from '@react-navigation/stack';
import { getArticles } from './api';
import ArticleCard from './components/article_card';
import FullArticle from './components/full_article';
import Modal from "react-native-modal";
import Searchbox from './components/search_box';

const Stack = createStackNavigator();

const ArticleList = () => {
    const [articles, setArticles] = useState([]);
    const [isModalVisible, setModalVisible] = useState(false);

    const toggleModal = () => {
      setModalVisible(!isModalVisible);
    };

    useEffect(() => {
        const fetchArticles = async () => {
            try {
                const data = await getArticles();
                setArticles(data);
                console.log(data);
                console.log('reloaded');
            } catch (error) {
                console.error('Error fetching articles:', error);
            }
        };

        fetchArticles();
    }, []);

    return (
        <ScrollView style={styles.container}>
                <Button title="search the knowledgebase" onPress={toggleModal} style={styles.btn}  />
                <Modal isVisible={isModalVisible} hasBackdrop={true} backdropColor='white' backdropOpacity={0.94}>
                <View style={{ flex: 1 }}>
                    <Searchbox article={articles} />

                    <Button title="close" onPress={toggleModal} />
                </View>
                </Modal>
                <FlatList
                    data={articles}
                    renderItem={({ item }) => <ArticleCard article={item} />}
                    keyExtractor={(item) => item.id.toString()}
                />
        </ScrollView>
    );
};

export default function App() {
    return (
        <NavigationContainer>
            <Stack.Navigator initialRouteName="ArticleList">
                <Stack.Screen name="ArticleList" component={ArticleList} options={{ title: 'Articles' }} />
                <Stack.Screen name="FullArticle" component={FullArticle} options={{ title: 'Full article'}} />
            </Stack.Navigator>
        </NavigationContainer>
    );
}

const styles = StyleSheet.create({
    container: {
        flexGrow: 1,
        backgroundColor: '#fff',
        paddingTop: 50,
        minHeight:1700
    },
    btn:{
      margin:20,
      width: 200
    }
});
The above code creates two screens for your application using createStackNavigator().
The first screen is the ArticleList screen, which will render a list of the articles. The second screen is the FullArticle screen to render an entire article.
Great work! You have covered the core of your front-end code. Next, we have to implement the search functionality and its corresponding UI.
Creating the Search Functionality With its UI
In this section, you use AI to search your Knowledge Base. You will use LangChain as the AI tool and Python to interact with your LLM model.
The LLM model will use Facebook AI Similarity Search (FAISS) as the vector store. Lastly, you will create a UI component for this functionality in your React Native application.
Creating Python Code to Fetch and Convert Content from Strapi Backend
For your Python code, you have to ensure you have the following installed or install them using pip in your project folder:
pip install Flask[async]
pip install faiss-cpu
pip install flask-cors
pip install langchain_cohere
pip install langchain_community
Here is what we installed:
- Flask is a micro web framework written in Python.
- faiss-cpu: A library for efficient similarity search and clustering of dense vectors.
- flask-cors: A Flask extension simplifying CORS support.
- langchain-cohere: This package contains the LangChain integrations for Cohere.
- langchain-community: LangChain Community contains third-party integrations that implement the base interfaces defined in LangChain Core, making them ready-to-use in any LangChain application.
After installing all the requirements, create a Python file named llm_backend.py in your project root folder and add the following code:
NOTE: We are using an example Cohere API key in the code below. Do get yours using the Cohere docs.
from flask import Flask, request, jsonify
from dotenv import load_dotenv
import os
from flask_cors import CORS
import requests
from langchain.indexes import VectorstoreIndexCreator
from langchain_community.docstore.document import Document
from langchain_community.utilities import ApifyWrapper
from langchain_cohere import CohereEmbeddings, CohereRagRetriever, ChatCohere
from langchain_text_splitters import CharacterTextSplitter
from langchain_community.vectorstores import FAISS
from langchain_community.document_loaders import TextLoader
from langchain_core.messages import HumanMessage, SystemMessage

load_dotenv()

app = Flask(__name__)
CORS(app)  # Allow CORS for all routes
# Load environment variables
cohere_api_key = os.getenv('COHERE_API_KEY')
API_KEY = '67434e2309b53788868178aff01bec9a28a074336bf567c33ef3b0eaf30bf53fa57623c6c0cc288ac7cc8d79a89e834caddce879559e28fb55fa0da02357814c69fcaadfae4db91d48595ea6cc548fb3da27aed85693bda1b3c0ce667b1747cabd1c4ad8f716b64789527b945672cdec8b5c455908541cd2583769a48279af61'
# Check if environment variables are loaded properly
if not cohere_api_key:
    raise ValueError("COHERE_API_KEY environment variable not set.")

# Initialize Apify client wrapper (if needed)
# apify = ApifyWrapper()

# Function to fetch articles from API endpoint and map to Document objects
def fetch_articles_and_map_to_documents():
    try:
        api_url = 'http://localhost:1337/api/articles?populate=*'
        headers = {'Authorization': f'Bearer {API_KEY}'}

        # Fetch data from API endpoint
        response = requests.get(api_url, headers=headers)
        data = response.json().get('data', [])

        # Map data to Document objects
        documents = []
        for item in data:
            document = Document(
                page_content=format_content(item.get('body', [])),
                metadata={"source": item.get('title', '')}
            )
            documents.append(document)

        return documents

    except Exception as e:
        print('Error fetching articles from API endpoint:', e)
        raise

# Function to format content from API response
def format_content(content):
    # Customize as per your content structure
    formatted_content = []
    for item in content:
        if item.get('type') == 'paragraph':
            formatted_content.append(item.get('children')[0].get('text'))
        elif item.get('type') == 'list':
            # Handle list formatting if needed
            pass
        # Add more conditions as per your content structure

    return '\n\n'.join(formatted_content)

# Define the embedding function using Cohere
embedding_function = CohereEmbeddings(cohere_api_key=cohere_api_key)

# Route to handle RAG QA queries
@app.route('/rag-qa', methods=['POST'])
async def rag_qa():
    data = request.get_json()
    user_query = data['question']
    chat_llm = ChatCohere(model="command-r")
    print(user_query)
    try:
        # Fetch articles from API endpoint and map to Document objects
        print("fetchting documents")
        documents = fetch_articles_and_map_to_documents()
        print("got the documents")

        print("Faissing documents")
        try:
            db = FAISS.from_documents(documents, embedding_function)
            print("similarity search")
            docs = db.similarity_search(user_query)
            # Query the vector store index for relevant documents
            results = docs[0].page_content

            results_metadata = docs[0].metadata['source']

            messages = [
                SystemMessage(content=f'please keep the response very short. {results}'),
                HumanMessage(content=user_query),
            ]
            llm_response = chat_llm.invoke(messages)
            print(f'llm_response: {llm_response}')
            print(results_metadata)
        except Exception as e:
            print(e)


        results = results[:200]
        return jsonify({'response': llm_response.content, 'metadata_title': results_metadata})

    except Exception as e:
        return jsonify({'error': str(e)}), 500

if __name__ == '__main__':
    app.run(debug=True)
The code above contains the following:
fetch_articles_and_map_to_documents(): This function fetches articles from the Strapi API endpointhttp://localhost:1337/api/articles?populate=*and maps the response data to the Document object.format_content(): This function takes the response data from Strapi and formats.- A route
'/rag-qa'that will handlePOSTrequests containing queries.
In summary, the code above uses LangChain to store Strapi's data in a vector store as documents and responds to the user's question by using a similarity search against the vector store.
Environment Variables
Ensure you have a .env file with the following values:
LANGCHAIN_TRACING_V2=true
LANGCHAIN_API_KEY= ""
OPENAPI_API_KEY=""
COHERE_API_KEY=""
Obtain your keys using the resources below:
Run Python Code
Once done, use the following code to run your Python application:
python llm_backend.pyCreate React Native Search Box UI
Create a React native component to handle the search UI.
To do this, create a file named search_box.js inside your components folder and add the following code:
import React, { useState, useEffect } from 'react';
import { View, Text, TextInput, Button, StyleSheet, FlatList, ScrollView } from 'react-native';
import axios from 'axios';
import ArticleCard from './article_card';

const API_URL = 'http://localhost:5000'; // Replace with your Flask server URL

const Searchbox = ({article}) => {
  const [question, setQuestion] = useState('');
  const [response, setResponse] = useState('');
  const [sourceTitle, setSourceTitle] = useState('');

  const handleQuery = async () => {
    try {
      const response = await axios.post(`${API_URL}/rag-qa`, { question: question,});
      console.log(response.data);
      setResponse(response.data.response);
      setSourceTitle(response.data.metadata_title);
      console.log(sourceTitle)
    } catch (error) {
      console.error('Error querying Cohere RAG QA:', error.message);
      setResponse('Error querying Cohere RAG QA');
    }
  };

  return (
    <View style={styles.container}>
      <Text style={styles.title}>Search with AI</Text>
      <TextInput
        style={styles.input}
        placeholder="Enter your question"
        value={question}
        onChangeText={text => setQuestion(text)}
      />
      <Button title="Ask" onPress={handleQuery} />


      {response ? (
        <View style={styles.responseContainer}>
          <Text style={styles.responseTitle}>AI Response:</Text>
          <Text style={styles.responseText}>{response}</Text>
          <Text style={styles.articlesTitle}>Source Articles:</Text>
          <FlatList
                data={article.filter(article => article.title === sourceTitle)}
                renderItem={({ item }) => <ArticleCard article={item} />}
                keyExtractor={(item) => item.id.toString()}
            />
        </View>
      ) : null}


    </View>
  );
};

const styles = StyleSheet.create({
  container: {
    flexGrow: 1,
    justifyContent: 'center',
    padding: 20,
    alignItems: 'center',
    fontSize:10
  },
  title: {
    fontSize: 24,
    fontWeight: 'bold',
    marginBottom: 20,
  },
  input: {
    borderWidth: 1,
    borderColor: '#ccc',
    padding: 10,
    marginBottom: 10,
    width: '100%',
  },
  articlesTitle: {
    fontSize: 18,
    fontWeight: 'bold',
    marginTop: 20,
    marginBottom: 10,
  },
  articleItem: {
    padding: 10,
    borderWidth: 1,
    borderColor: '#ccc',
    marginBottom: 10,
    width: '100%',
  },
  responseContainer: {
    marginTop: 20,
    alignItems: 'center',

  },
  responseTitle: {
    fontWeight: 'bold',
    marginBottom: 10,
  },
  responseText: {
    fontSize: 16,
  },
});

export default Searchbox;
The code above does the following:
- It takes the user's question using the TextInput
onChangeTextevent handler. - Using the
axios.post()method, it sends the question as a paramter or query to the Python LLM's server route we created in the previous section using flask. - It then returns the AI answer as well as the related article.
This is a demo of how the application works:
GitHub Source Code
- React Native application: https://github.com/leviOnNet/strapi5ReactNative
- Strapi 5 application: https://github.com/leviOnNet/strapi5Kb
- Python Ai search application: https://github.com/leviOnNet/Strapi5PythonAi
Conclusion
Well done for making it to the end of this tutorial. As you can see from the results above, Strapi enables you create API endpoints that you can integrate into any technology of yours. In this case, we integrated Strapi with React Native and LangChain seamlessly.
We created a Knowledge Base application that first renders the main screen which is a list of articles created on the Strapi backend. A user can click on the article card which opens the full article or click on the search button which will enable the user to query the LLM's vector store.
The search function returns the LLMs response along with the related article card for the user to open if they wish to dive deeper.
Learn more about using Strapi with React Native in this integration guide.
Thanks for reading!