
Tutorial updated by Fredrick Emmanuel and Paul Bratslavsky
What we are building:

This tutorial is part of the « Cooking a Deliveroo clone with Next.js (React), GraphQL, Strapi and Stripe » tutorial series.
Table of contents
- 🏗️ Setup (part 1)
- 🏠 Restaurants (part 2) - Current
- 🍔 Dishes (part 3)
- 🔐 Authentication (part 4)
- 🛒 Shopping Cart (part 5)
- 💵 Order and Checkout (part 6)
- 🚀 Bonus: Deploy (part 7)
Note: The source code is available on GitHub here.
🏠 Restaurants list
First of all, the list of restaurants needs to be displayed in our web app. Of course, this list is going to be managed through our API.
Define Content Type
A Content-Type also called a model, is a type of data. The Straps API includes by default, the user Content Type. Right now a restaurant Content Type is needed, so the new Content Type is going to be, as you already guessed, restaurant (Content-Types are always singular).
Here are the required steps:
- Navigate to the Content Type Builder in the sidebar (http://localhost:1337/admin/plugins/content-type-builder).
- Click on
+ Create new collection type. - Set
restaurantas the Display name.
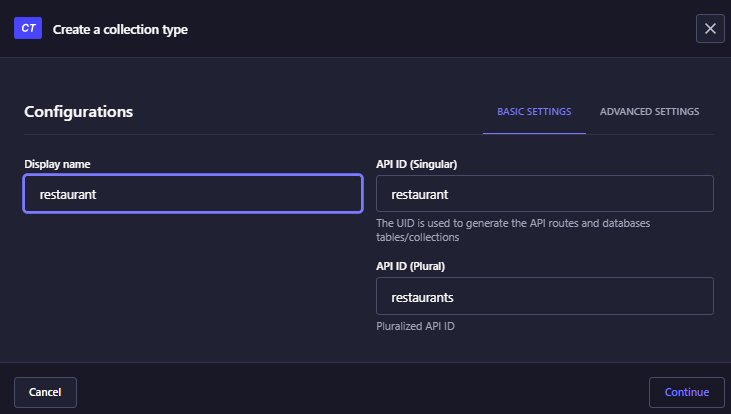
- Click on
Continueand create the followings fields:Textcalledname.- Click on Add another field, select
Rich Textand name itdescription. - Create another field with type
Mediaand nameimage.
- Click on Finish
- Click on Save, the server should restart automatically.

At this point, your server should have automatically restarted and a new link Restaurants appears in the left menu.
Add some entries
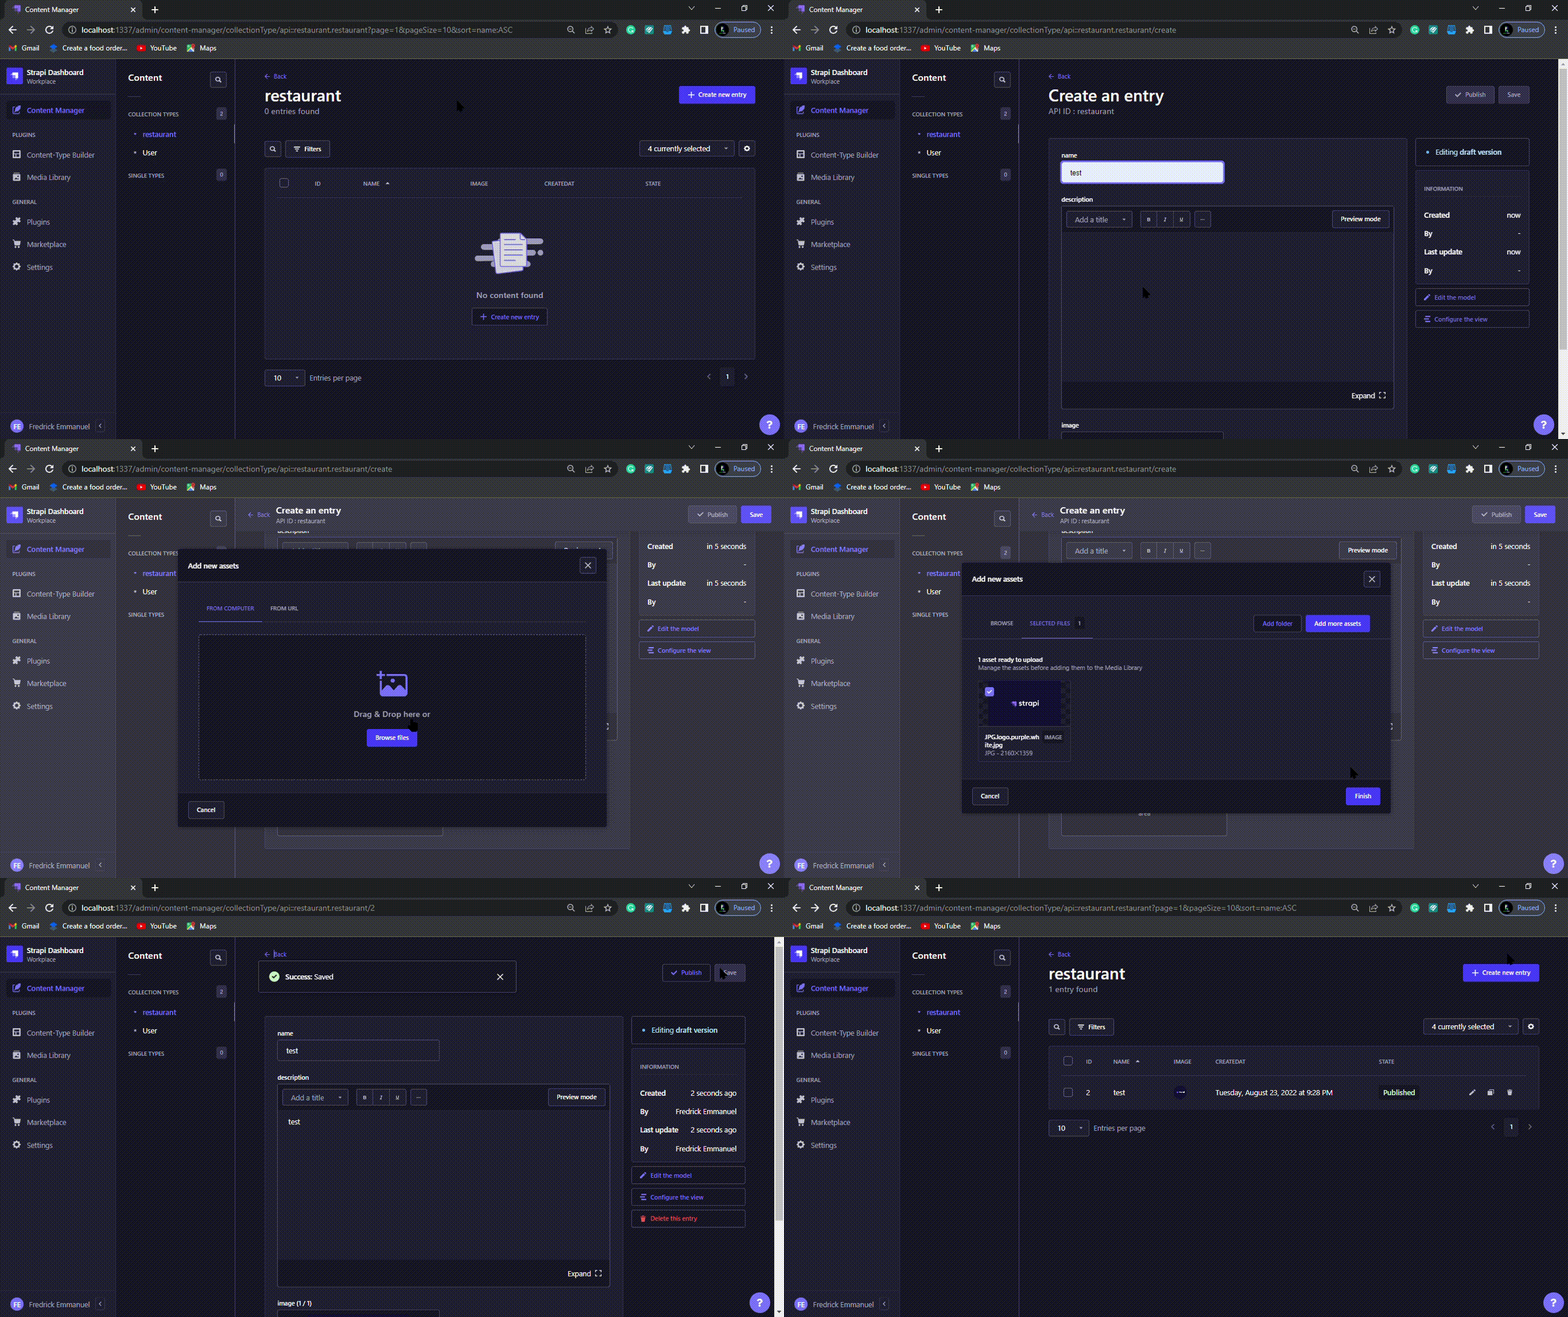
Well done! You created your first Content Type. The next step is to add some restaurants to your database. To do so, click on Content Manager then click on Restaurant in the left menu (http://localhost:1337/admin/content-manager/collectionType/api::restaurant.restaurant).
You are now in the Content Manager plugin: an auto-generated user interface that let you see and edit entries.
Create a restaurant:
- Click on
Create New Entry. - Give it a name, a description and select an image.
- Save it.
- Publish it.
Create as many restaurants as you would like to see in your apps.
Allow access
Having the items in the database is great. Being able to request them from an API is even better. As you already know, Strapi's mission is to create API (I have got a super secret anecdote for you: its name is coming from Bootstrap your API 😮).
When you were creating your restaurant Content-Type, Strapi created on the backend, a few sets of files in api/restaurant. These files include the logic to expose a fully customizable CRUD API. The find route is available at http://localhost:1337/api/restaurants. Visiting this URL will send a 403 forbidden error, as seen in the output below.
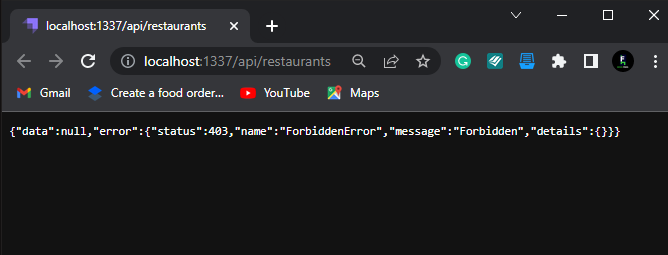
This is normal (Strapi APIs are secured by design). Don't worry, making this route accessible is super intuitive.
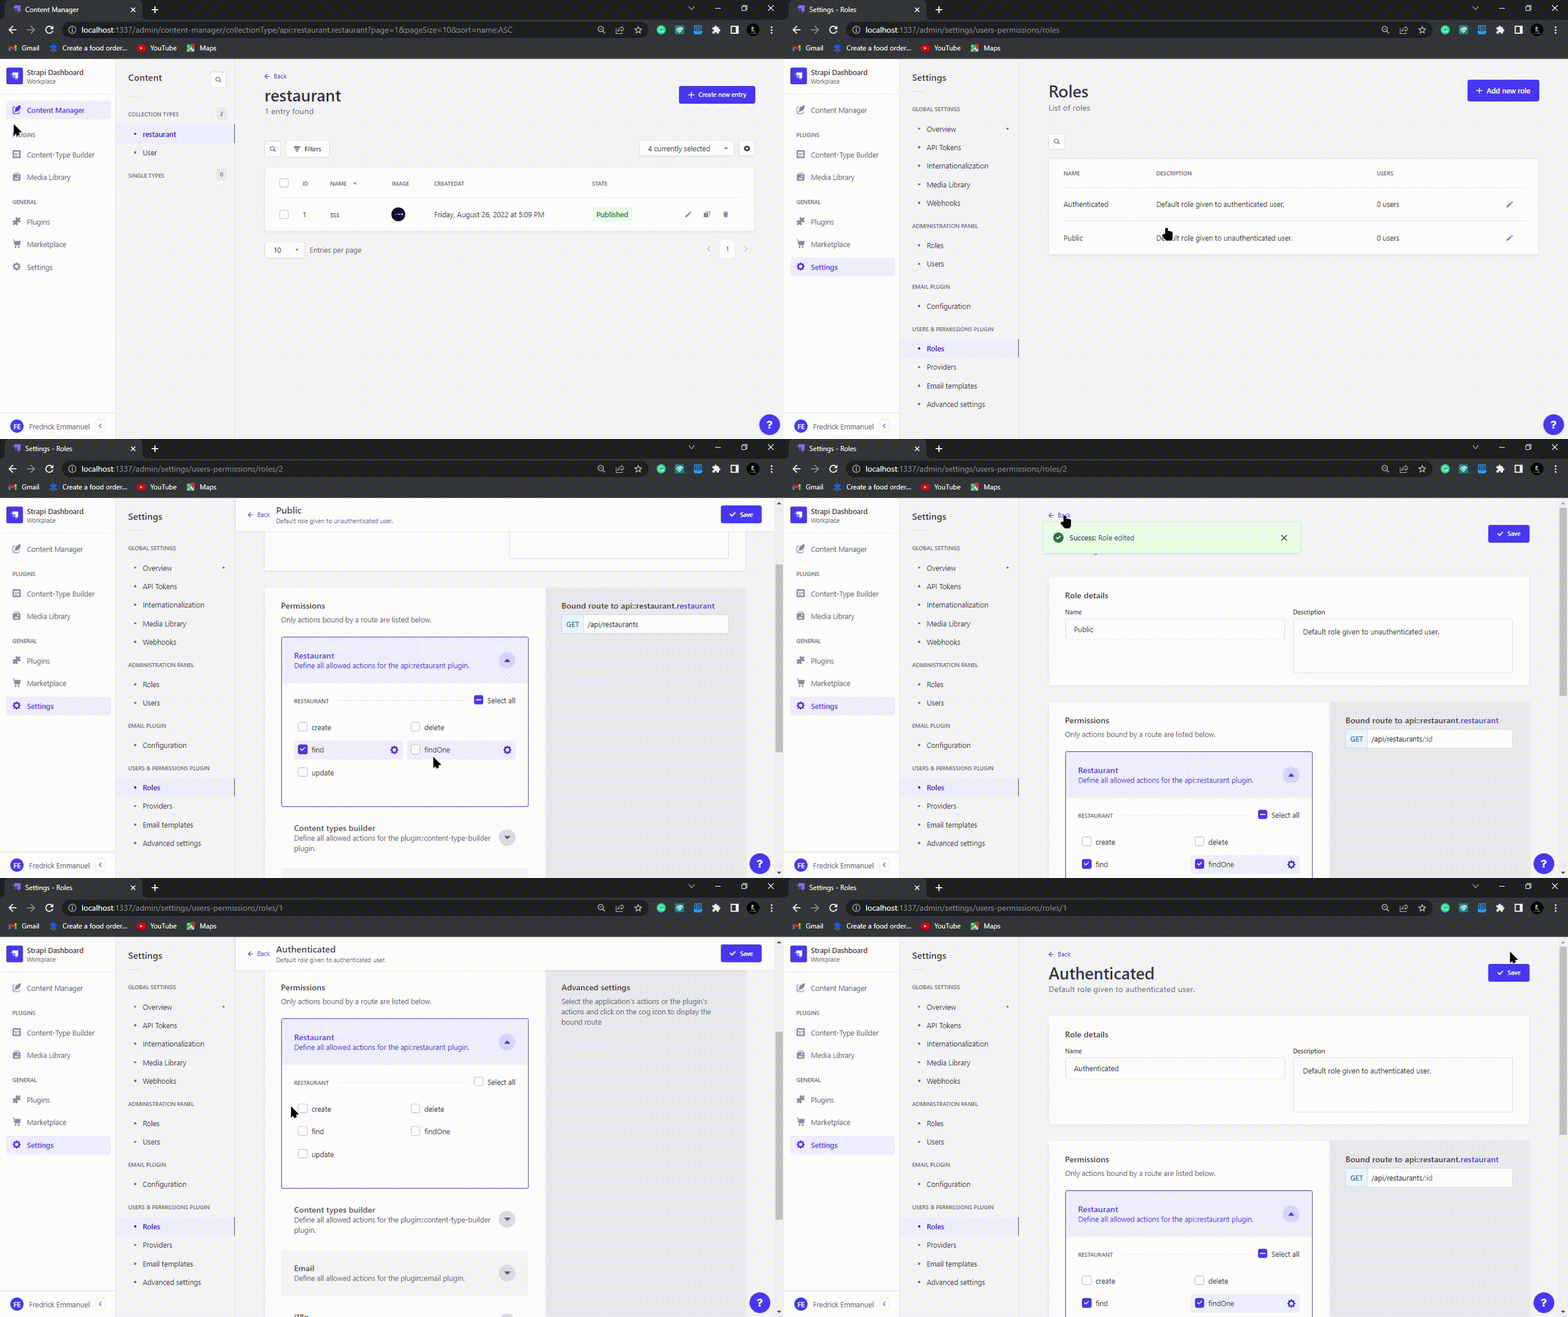
- Navigate to Settings then Roles & Permissions.
- Click on the
Publicrole. - Tick the
findandfindonecheckboxes in theRestaurantsection. - Do the same for
Authenticated - Save.
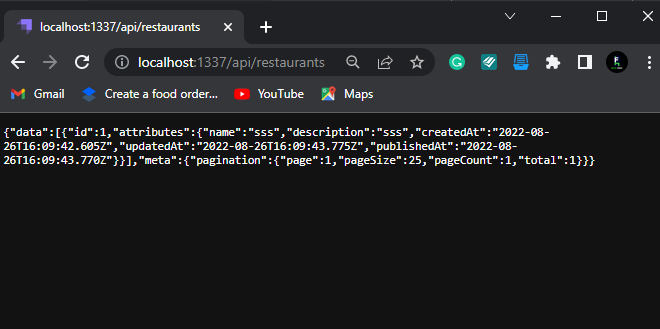
Now go back to http://localhost:1337/api/restaurants: at this point, you should be able to see your list of restaurants as shown in the output below.
Enabling GraphQL
By default, APIs generated with Strapi are REST endpoints. The endpoints can easily be integrated into GraphQL endpoints using the integrated GraphQL plugin.
- To get started with GraphQL with Strapi, Open your strapiapp folder in your terminal and run the command below to install GraphQL.
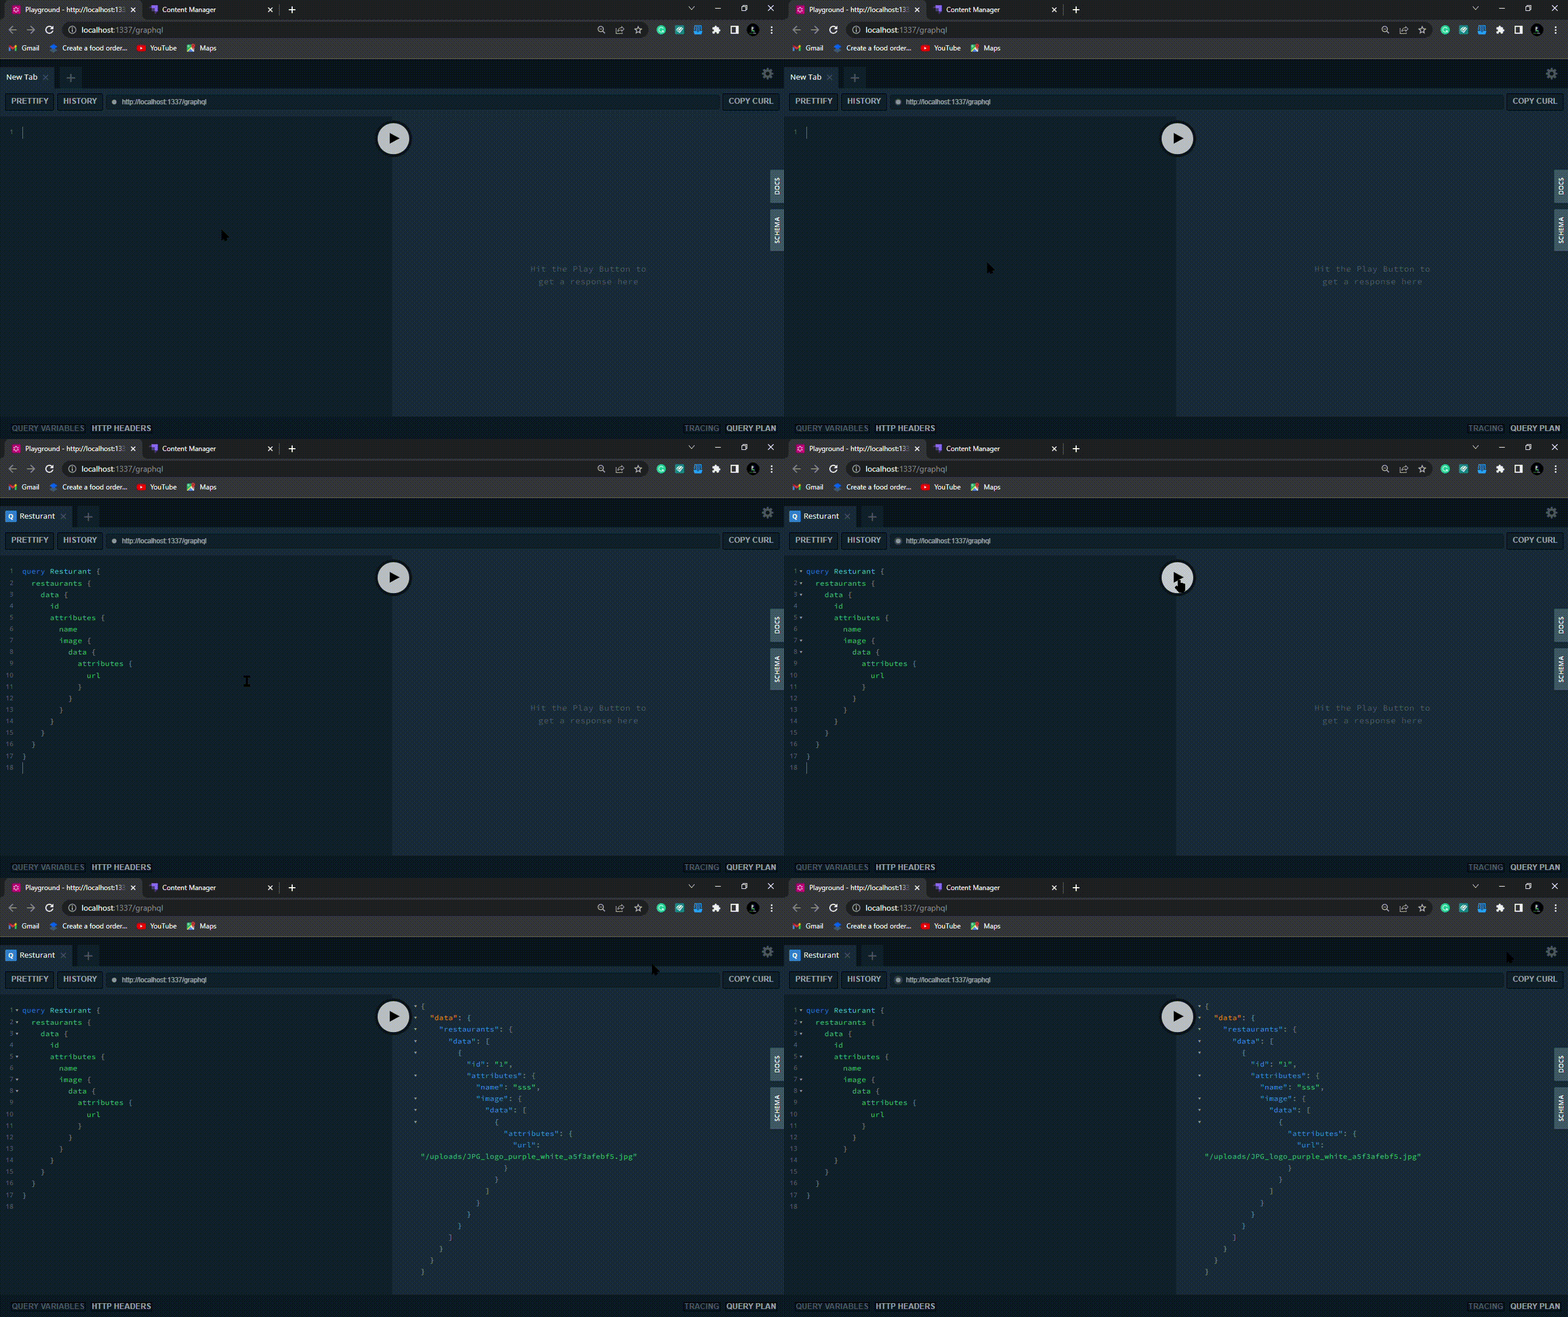
npm install @strapi/plugin-graphqlMake sure to restart your strapi server if it does not auto restart. Restart your server, go to http://localhost:1337/graphql and try this query:
    query Restaurant {
      restaurants {
        data {
          id
          attributes {
            name
            image {
              data {
                attributes {
                  url
                }
              }
            }
          }
        }
      }
    }
You should get an output similar to the one below.
Display restaurants
It looks like you are going in the right direction. What if these restaurants are displayed in our Next app?

Install Apollo in the frontend of our application, navigate to the /frontend folder in a terminal window and type the following:
npm install @apollo/client graphqlWe can implement our apollo client directly within the _app.js file by replacing it with the following code.
import { ApolloClient, ApolloProvider, InMemoryCache } from "@apollo/client";
import "@/styles/globals.css";
import Layout from "@/components/Layout";

const API_URL = process.env.STRAPI_URL || "http://127.0.0.1:1337";

export const client = new ApolloClient({
  uri: `${API_URL}/graphql`,
  cache: new InMemoryCache(),
  defaultOptions: {
    mutate: {
      errorPolicy: "all",
    },
    query: {
      errorPolicy: "all",
    },
  },
});

export default function App({ Component, pageProps }) {
  return (
    <ApolloProvider client={client}>
      <Layout>
        <Component {...pageProps} />
      </Layout>
    </ApolloProvider>
  );
}
Open the components folder and create a file named RestaurantList.jsx and add the following code.
Path: frontend/components/RestaurantList.jsx
import { gql, useQuery } from "@apollo/client";
import Link from "next/link";
import Image from "next/image";
import Loader from "./Loader";

const QUERY = gql`
  {
    restaurants {
      data {
        id
        attributes {
          name
          description
          image {
            data {
              attributes {
                url
              }
            }
          }
        }
      }
    }
  }
`;

function RestaurantCard({ data }) {
  return (
    <div className="w-full md:w-1/2 lg:w-1/3 p-4">
      <div className="h-full bg-gray-100 rounded-2xl">
        <Image
          className="w-full rounded-2xl"
          height={300}
          width={300}
          src={`${process.env.STRAPI_URL || "http://localhost:1337"}${
            data.attributes.image.data[0].attributes.url
          }`}
          alt=""
        />
        <div className="p-8">
          <h3 className="mb-3 font-heading text-xl text-gray-900 hover:text-gray-700 group-hover:underline font-black">
            {data.attributes.name}
          </h3>
          <p className="text-sm text-gray-500 font-bold">
            {data.attributes.description}
          </p>
          <div className="flex flex-wrap md:justify-center -m-2">
            <div className="w-full md:w-auto p-2 my-6">
              <Link
                className="block w-full px-12 py-3.5 text-lg text-center text-white font-bold bg-gray-900 hover:bg-gray-800 focus:ring-4 focus:ring-gray-600 rounded-full"
                href={`/restaurant/${data.id}`}
              >
                View
              </Link>
            </div>
          </div>
        </div>
      </div>
    </div>
  );
}

function RestaurantList(props) {
  const { loading, error, data } = useQuery(QUERY);

  if (error) return "Error loading restaurants";
  if (loading) return <Loader />;

  if (data.restaurants.data && data.restaurants.data.length) {
    const searchQuery = data.restaurants.data.filter((query) =>
      query.attributes.name.toLowerCase().includes(props.query.toLowerCase())
    );

    if (searchQuery.length != 0) {
      return (
        <div className="py-16 px-8 bg-white rounded-3xl">
          <div className="max-w-7xl mx-auto">
            <div className="flex flex-wrap -m-4 mb-6">
              {searchQuery.map((res) => {
                return <RestaurantCard key={res.id} data={res} />;
              })}
            </div>
          </div>
        </div>
      );
    } else {
      return <h1>No Restaurants Found</h1>;
    }
  }
  return <h5>Add Restaurants</h5>;
}
export default RestaurantList;
We have to make one more change in the next.config.js file in order to make our images show up when using next js Image component.
Let's replace it with the following code.
Path: frontend/next.config.js
/** @type {import('next').NextConfig} */
const nextConfig = {
  reactStrictMode: true,
  images: {
    remotePatterns: [
      {
        protocol: "http",
        hostname: "localhost",
        port: "1337",
        pathname: "/uploads/**",
      },
    ],
  },
};

module.exports = nextConfig;
You will have to stop and restart your frontend project before the changes take place.
Now let's replace /pages/index.js file with the code below to display the Restaurant list and a search bar to filter the restaurants.
Path: frontend/pages/index.js
import { useState } from "react";
import RestaurantList from "@/components/RestaurantList";
import Head from "next/head";

export default function Home() {
  const [query, setQuery] = useState("");
  return (
    <>
      <Head>
        <title>Create Next App</title>
        <meta name="description" content="Generated by create next app" />
        <meta name="viewport" content="width=device-width, initial-scale=1" />
        <link rel="icon" href="/favicon.ico" />
      </Head>
      <main className="mx-auto container m-6">
        <div className="mb-6">
          <input
            className="appearance-none block w-full p-3 leading-5 text-coolGray-900 border border-coolGray-200 rounded-lg shadow-md placeholder-coolGray-400 focus:outline-none focus:ring-2 focus:ring-green-500 focus:ring-opacity-50"
            type="text"
            placeholder="Search restaurants"
            onChange={(e) => setQuery(e.target.value)}
          />
        </div>
        <RestaurantList query={query} />
      </main>
    </>
  );
}
Don't forget to create our Loader component.
In components folder create a Loader.jsx file and add the following code:
export default function Loader() {
  return (
    <div className="absolute inset-0 flex items-center justify-center z-50  bg-opacity-40 bg-green-500">
    <div role="status">
      <svg
        aria-hidden="true"
        className="inline w-8 h-8 mr-2 text-gray-200 animate-spin dark:text-gray-600 fill-green-400"
        viewBox="0 0 100 101"
        fill="none"
        xmlns="http://www.w3.org/2000/svg"
      >
        <path
          d="M100 50.5908C100 78.2051 77.6142 100.591 50 100.591C22.3858 100.591 0 78.2051 0 50.5908C0 22.9766 22.3858 0.59082 50 0.59082C77.6142 0.59082 100 22.9766 100 50.5908ZM9.08144 50.5908C9.08144 73.1895 27.4013 91.5094 50 91.5094C72.5987 91.5094 90.9186 73.1895 90.9186 50.5908C90.9186 27.9921 72.5987 9.67226 50 9.67226C27.4013 9.67226 9.08144 27.9921 9.08144 50.5908Z"
          fill="currentColor"
        />
        <path
          d="M93.9676 39.0409C96.393 38.4038 97.8624 35.9116 97.0079 33.5539C95.2932 28.8227 92.871 24.3692 89.8167 20.348C85.8452 15.1192 80.8826 10.7238 75.2124 7.41289C69.5422 4.10194 63.2754 1.94025 56.7698 1.05124C51.7666 0.367541 46.6976 0.446843 41.7345 1.27873C39.2613 1.69328 37.813 4.19778 38.4501 6.62326C39.0873 9.04874 41.5694 10.4717 44.0505 10.1071C47.8511 9.54855 51.7191 9.52689 55.5402 10.0491C60.8642 10.7766 65.9928 12.5457 70.6331 15.2552C75.2735 17.9648 79.3347 21.5619 82.5849 25.841C84.9175 28.9121 86.7997 32.2913 88.1811 35.8758C89.083 38.2158 91.5421 39.6781 93.9676 39.0409Z"
          fill="currentFill"
        />
      </svg>
      <span className="sr-only">Loading...</span>
    </div>
  </div>
  )
}
Now you should see the list of restaurants on the page that are filterable!
Add more restaurants using Strapi Content Manager, the more the merrier.
Well done! 🍔 In the next section, you will learn how to display the list of dishes: https://strapi.io/blog/nextjs-react-hooks-strapi-dishes-3