Tutorial updated by Fredrick Emmanuel and Paul Bratslavsky
This tutorial is part of the « Cooking a Deliveroo clone with Next.js (React), GraphQL, Strapi and Stripe » tutorial series. Table of contents
- 🏗️ Setup (part 1)
- 🏠 Restaurants (part 2)
- 🍔 Dishes (part 3)
- 🔐 Authentication (part 4) - Current
- 🛒 Shopping Cart (part 5)
- 💵 Order and Checkout (part 6)
- 🚀 Bonus: Deploy (part 7)
Note: The source code is available on GitHub here
🔐 Authentication
For authentication calls, we will use our GraphQL endpoint to register new users and login to existing users.
Strapi will return a JWT token and a user object, the former can be used to verify transactions on the server while the user object will display the username in the header bar.
The Strapi documentation on authentication can be found here: Strapi Auth
Since we are going to be using GraphQL this is the documentation we will use.
Authentication with Next requires some additional consideration outside of a normal client-side authentication system because you have to be mindful of whether the code is being rendered on the client or the server.
We are going to keep in simple and handle it with cookie-js npm library that will store our user data.
Than we can use the jwt token that we store to revalidate out login user.
Strapi's built-in JWT authentication will be used in this tutorial. This will allow you to easily register, manage, login, and check users' status in our application.
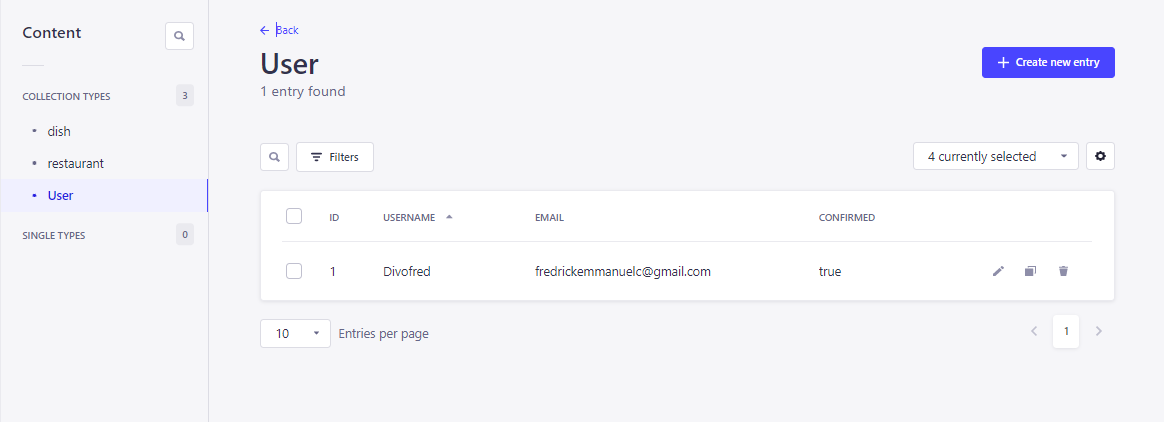
Your backend admin panel will provide a GUI for user management out of the box to view, edit, activate, and delete users if needed.
User Content-Type in Strapi
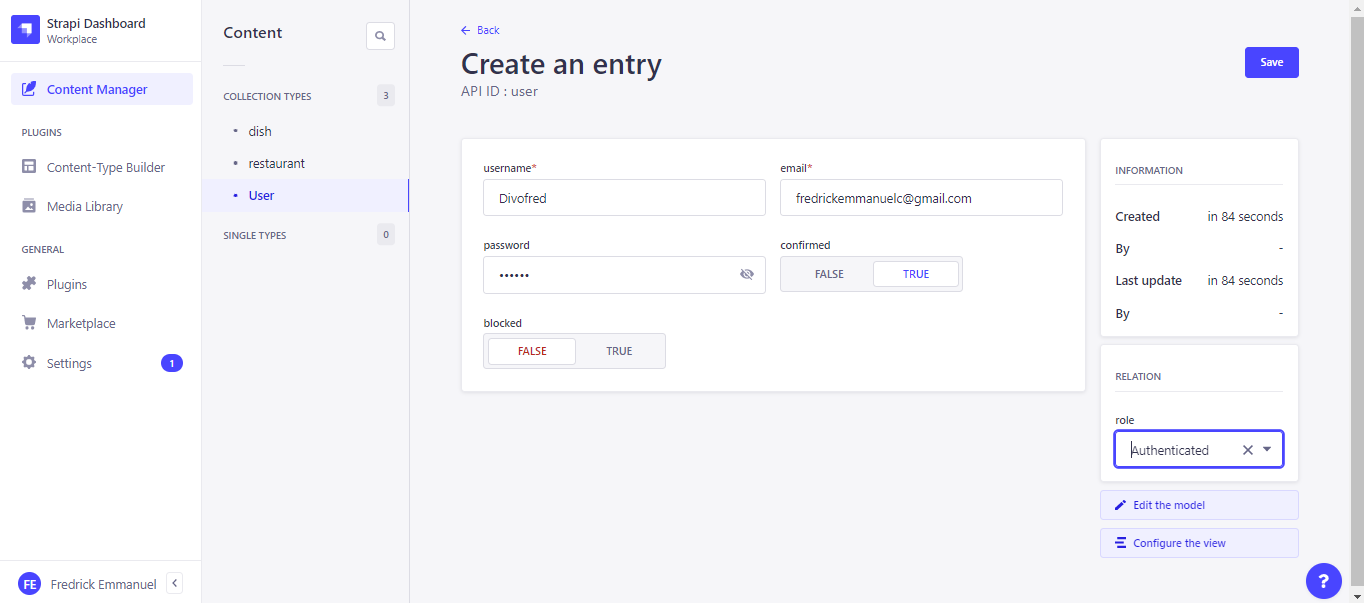 The premise of the JWT system is, a request will be sent to our GraphQL endpoint with a username, email, and password to register a new user.
  mutation {
    register(input: { username: "username", email: "email", password: "password" }) {
      jwt
      user {
        username
        email
      }
    }
  }
This will return a user object and a JWT token in the user object will be stored in a cookie on the user's browser.
The same thing for logging in as a user with an email/password will return the same user object and JWT token if successful.
  mutation {
    login(input: { identifier: "email", password: "password" }) {
      jwt
    }
  }
We can use the me query with a JWT as an authorization header to revalidate the user if logged in. We can store the returned user data in a global context to share throughout the application.
Before creating the login and register forms, let's set up our global context and install js-cookies package.
To store our token we will use a package named js-cookie using the code, Cookie.set(cookie).
Our token management will happen client-side only, however, your application could be developed differently in the real world.
Open the frontend directory in your terminal and install the following package:
npm install js-cookieReact Context
To store the user object, you will need to create a global context state inside of the application.
The context in React allows you to prevent prop-drilling multiple levels down and lets you grab and use the context state locally from a component.
This is a powerful construct in React, and definitely worth reading more info here: React Context.
Now, create a file named AppContext.js in the context folder. This file will store our user context.
import { useState, createContext, useContext, useEffect } from "react";
import Cookie from "js-cookie";
import { gql } from "@apollo/client";
import { client } from "@/pages/_app.js";

const AppContext = createContext();

export const AppProvider = ({ children }) => {
  const [user, setUser] = useState(null);

  useEffect(() => {
    const fetchData = async () => {
      const userData = await getUser();
      setUser(userData);
    };
    fetchData();
  }, []);

  return (
    <AppContext.Provider
      value={{
        user,
        setUser,
      }}
    >
      {children}
    </AppContext.Provider>
  );
};

const getUser = async () => {
  const token = Cookie.get("token");
  if (!token) return null;
  const { data } = await client.query({
    query: gql`
      query {
        me {
          id
          email
          username
        }
      }
    `,
    context: {
      headers: {
        Authorization: `Bearer ${token}`,
      },
    },
  });
  return data.me;
};

export const useAppContext = () => {
  const context = useContext(AppContext);
  if (context === undefined)
    throw new Error("useAppContext must be used within an AppProvider");
  return context;
};
Now let's replace our code found the _app.js file include our AppContext provider.
import { ApolloClient, ApolloProvider, InMemoryCache } from "@apollo/client";
import { AppProvider } from "@/context/AppContext";
import "@/styles/globals.css";
import Layout from "@/components/Layout";

const API_URL = process.env.STRAPI_URL || "http://localhost:1337";

export const client = new ApolloClient({
  uri: `${API_URL}/graphql`,
  cache: new InMemoryCache(),
  defaultOptions: {
    mutate: {
      errorPolicy: "all",
    },
    query: {
      errorPolicy: "all",
    },
  },
});

export default function App({ Component, pageProps }) {
  return (
    <ApolloProvider client={client}>
      <AppProvider>
        <Layout>
          <Component {...pageProps} />
        </Layout>
      </AppProvider>
    </ApolloProvider>
  );
}
Then update your header navbar as well in the Layout.jsx to display our username and a logout button if a user is signed in:
import { useRouter } from "next/router";
import { useAppContext } from "@/context/AppContext";
import Cookie from "js-cookie";

import Head from "next/head";
import Link from "next/link";

function Navigation() {
  const { user, setUser } = useAppContext();
  const router = useRouter();

  function handleLogout() {
    setUser(null);
    Cookie.remove("token");
    router.push("/");
  }

  return (
    <header className="bg-green-800">
      <nav className="flex justify-between p-6 px-4">
        <div className="flex justify-between items-center w-full mx-16">
          <div className="xl:w-1/3">
            <Link
              className="block text-2xl max-w-max text-white font-medium"
              href="/"
            >
              Food Order App
            </Link>
          </div>

          <div className="xl:block xl:w-1/3">
            <div className="flex items-center justify-end">
              <Link
                className="text-gray-50  hover:text-yellow-200 font-bold"
                href="/"
              >
                Home
              </Link>

              <div className="hxl:block">
                {user ? (
                  <div className="flex items-center justify-end">
                    <span className="inline-block py-2 px-4 mr-2 leading-5 text-gray-50  hover:text-gray-100 bg-transparent font-medium rounded-md">
                      {user.username}
                    </span>
                    <button
                      className="inline-block py-2 px-4 text-sm leading-5 text-green-50 bg-green-500 hover:bg-green-600 font-medium focus:ring-2 focus:ring-green-500 focus:ring-opacity-50 rounded-md"
                      onClick={handleLogout}
                    >
                      Log Out
                    </button>
                  </div>
                ) : (
                  <div className="flex items-center justify-end">
                    <Link
                      className="inline-block py-2 px-4 mr-2 leading-5 text-gray-50  hover:text-yellow-200 font-bold bg-transparent rounded-md"
                      href="/login"
                    >
                      Log In
                    </Link>
                    <Link
                      className="inline-block py-2 px-4 text-sm leading-5 text-green-50 bg-green-600 hover:bg-green-700 font-medium focus:ring-2 focus:ring-green-500 focus:ring-opacity-50 rounded-md"
                      href="/register"
                    >
                      Sign Up
                    </Link>
                  </div>
                )}
              </div>
            </div>
          </div>
        </div>
      </nav>
    </header>
  );
}

export default function Layout(props) {
  const title = "Welcome to Next JS";

  return (
    <div>
      <Head>
        <title>{title}</title>
        <meta charSet="utf-8" />
        <meta name="viewport" content="initial-scale=1.0, width=device-width" />
      </Head>
      <Navigation />
      <div className="container mx-auto px-4">{props.children}</div>
    </div>
  );
}
Before we can test everything we need to add our signin and register logic. So first inside the components folder let's create a file called Form.jsx and add the following code.
import React from "react";

export default function Form({
  title,
  buttonText,
  formData,
  setFormData,
  callback,
  error,
}) {
  return (
    <section className="py-24 md:py-32 bg-white">
      <div className="container px-4 mx-auto">
        <div className="max-w-sm mx-auto">
          <div className="mb-6 text-center">
            <h3 className="mb-4 text-2xl md:text-3xl font-bold">{title}</h3>
          </div>
          <form onSubmit={callback}>
            <div className="mb-6">
              <label
                className="block mb-2 text-coolGray-800 font-medium"
                htmlFor="email"
              >
                Email
              </label>
              <input
                id="email"
                className="appearance-none block w-full p-3 leading-5 text-gray-900 border border-gray-200 rounded-lg shadow-md placeholder-text-gray-400 focus:outline-none focus:ring-2 focus:ring-green-500 focus:ring-opacity-50"
                type="email"
                name="email"
                placeholder="Enter your email"
                value={formData.email}
                onChange={(e) =>
                  setFormData({ ...formData, email: e.target.value })
                }
              />
            </div>
            <div className="mb-4">
              <label
                className="block mb-2 text-coolGray-800 font-medium"
                htmlFor="password"
              >
                Password
              </label>
              <input
                id="password"
                className="appearance-none block w-full p-3 leading-5 text-gray-900 border border-gray-200 rounded-lg shadow-md placeholder-text-gray-400 focus:outline-none focus:ring-2 focus:ring-green-500 focus:ring-opacity-50"
                type="password"
                name="password"
                placeholder="************"
                value={formData.password}
                onChange={(e) =>
                  setFormData({ ...formData, password: e.target.value })
                }
              />
            </div>
            {error && (
              <div className="text-center my-4 text-red-600">
                Error: {error.message}
              </div>
            )}
            <button
              className="inline-block py-3 px-7 mb-6 w-full text-base text-green-50 font-medium text-center leading-6 bg-green-500 hover:bg-green-600 focus:ring-2 focus:ring-green-500 focus:ring-opacity-50 rounded-md shadow-sm"
              type="submit"
            >
              {buttonText}
            </button>
          </form>
        </div>
      </div>
    </section>
  );
}
Register
Now lets add the logic to handle our registration.
Add the following code inside the /frontend/pages/register.js file.
import { useState } from "react";
import { useRouter } from "next/router";
import { useAppContext } from "@/context/AppContext";
import { gql, useMutation } from "@apollo/client";
import Cookie from "js-cookie";

import Form from "@/components/Form";
import Loader from "@/components/Loader";

const REGISTER_MUTATION = gql`
  mutation Register($username: String!, $email: String!, $password: String!) {
    register(
      input: { username: $username, email: $email, password: $password }
    ) {
      jwt
      user {
        username
        email
      }
    }
  }
`;

export default function RegisterRoute() {
  const { setUser } = useAppContext();
  const router = useRouter();

  const [formData, setFormData] = useState({ email: "", password: "" });
  const [registerMutation, { loading, error }] = useMutation(REGISTER_MUTATION);

  const handleRegister = async () => {
    const { email, password } = formData;
    const { data } = await registerMutation({
      variables: { username: email, email: email, password },
    });
    if (data?.register.user) {
      setUser(data.register.user);
      router.push("/");
      Cookie.set("token", data.register.jwt);
    }
  };

  if (loading) return <Loader />;

  return (
    <Form
      title="Sign Up"
      buttonText="Sign Up"
      formData={formData}
      setFormData={setFormData}
      callback={handleRegister}
      error={error}
    />
  );
}
You should get an output similar to the one shown below;

Login
Similar to the sign-up page, the sign-in page will use a token to log the user in and set the cookie.
Path: frontend/pages/login.js
import { useState } from "react";
import { useRouter } from "next/router";
import { useAppContext } from "@/context/AppContext";
import { gql, useMutation } from "@apollo/client";
import Cookie from "js-cookie";

import Form from "@/components/Form";
import Loader from "@/components/Loader";

const LOGIN_MUTATION = gql`
  mutation Login($identifier: String!, $password: String!) {
    login(input: { identifier: $identifier, password: $password }) {
      jwt
      user {
        username
        email
      }
    }
  }
`;

export default function LoginRoute() {
  const { setUser } = useAppContext();
  const router = useRouter();

  const [formData, setFormData] = useState({ email: "", password: "" });
  const [loginMutation, { loading, error }] = useMutation(LOGIN_MUTATION);

  const handleLogin = async () => {
    const { email, password } = formData;
    const { data } = await loginMutation({
      variables: { identifier: email, password },
    });
    if (data?.login.user) {
      setUser(data.login.user);
      Cookie.set("token", data.login.jwt);
      router.push("/");
    }
  };

  if (loading) return <Loader />;

  return (
    <Form
      title="Login"
      buttonText="Login"
      formData={formData}
      setFormData={setFormData}
      callback={handleLogin}
      error={error}
    />
  );
}
You should get an output similar to the one shown below;

Your user registration, login, and logout should be set correctly!

🛒 In the next section, you will learn how to create a full-featured shopping cart: https://strapi.io/blog/nextjs-react-hooks-strapi-shopping-cart-5