Introduction
The introduction of Paywalls for blogs and articles has been a gamechanger for the writing industry. Companies like Medium have attracted millions of writers who would love to be paid for their writing. Readers too have learnt to appreciate great premium content from their favorite writers. This provides a need to integrate paywalls to your blogs to attract writers and readers and also make money.
This article will guide you on how to create and manage your blog through Strapi CMS and Vue.js frontend for a seamless reader and writer experience. You will also integrate a paywall using Paystack, a popular African payment gateway.
Prerequisites
To follow through this tutorial, you need to have the following:
- Node.Js version
>=18.x.xand<=20.x.xinstalled in your machine - Basic understanding of JavaScript and Vue.js,
- A Paystack account with live or test keys.
Set Up Strapi 5
Install Strapi 5 using npx:
npx create-strapi@latest my-blog --quickstartThis command creates a new Strapi project that is kept in the myblog directory.
The --quickstart flag is used as a convenient way to quickly create a new Strapi project with minimal configuration. It uses SQLite as the default database and applies default settings to the project.
Navigate to the project directory, myblog, using the command below:
cd my-blogStart the Strapi server:
npm run developNote: If you use the
--quickstartflag during installation, you don't need to manually start the server as it is run automatically.
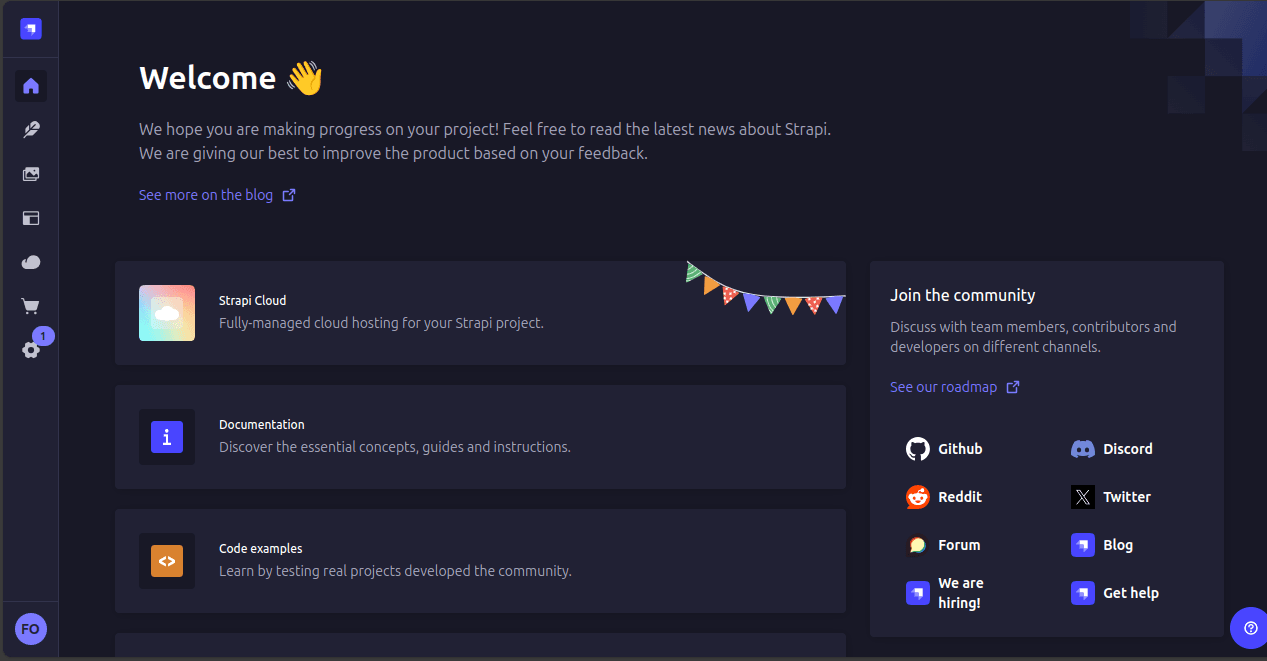
After Strapi is running, navigate to Strapi's default admin URL http://localhost:1337/admin/. Sign up using your personal details to access the dashboard.
Create a Blog Collection Type in Strapi
To do this, navigate to Content-Type-Builder. Under Collection Types, click Create new collection type.
This prompts you to name your collection. Name it Blog.
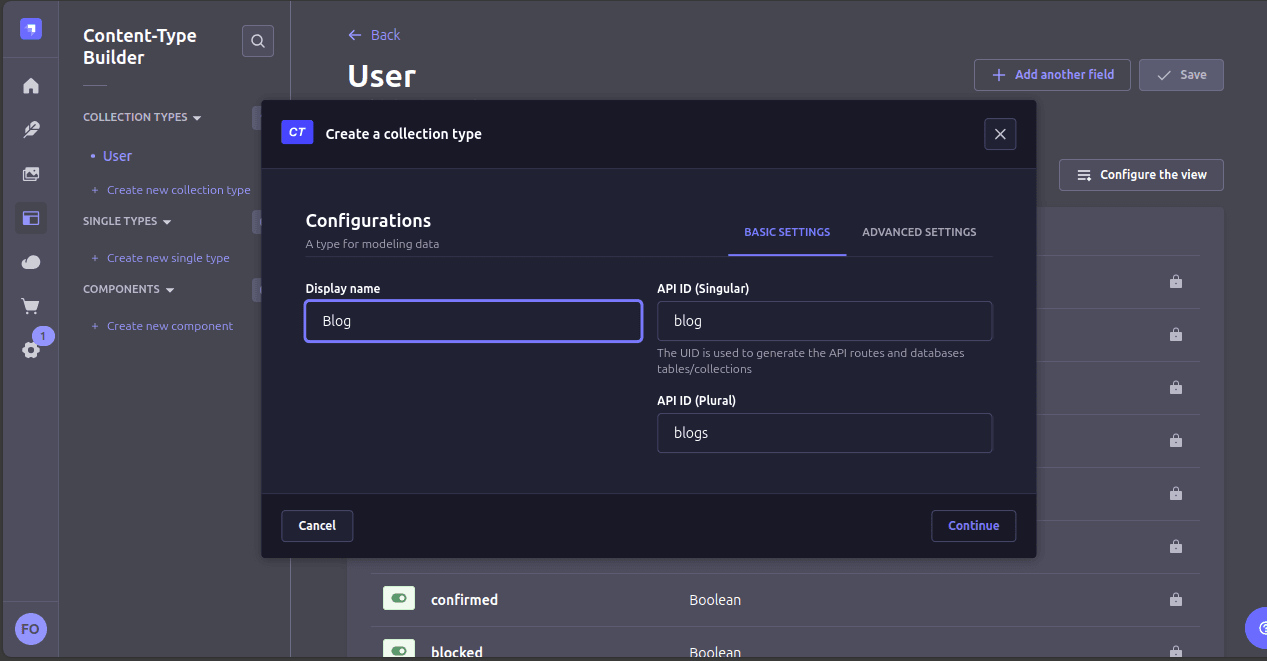
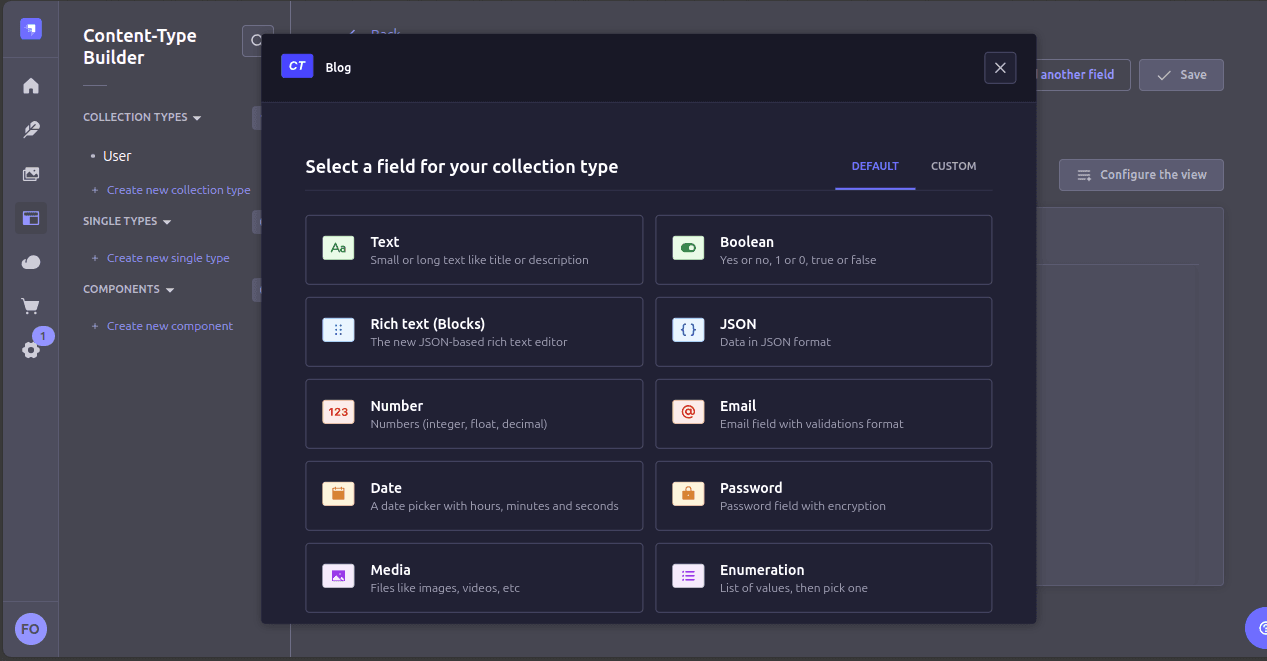
Add the following fields:
Title(Text)Content(Rich Text)Is_Paid(Boolean)Caption(Media - Single Media)
It should look like this before saving:
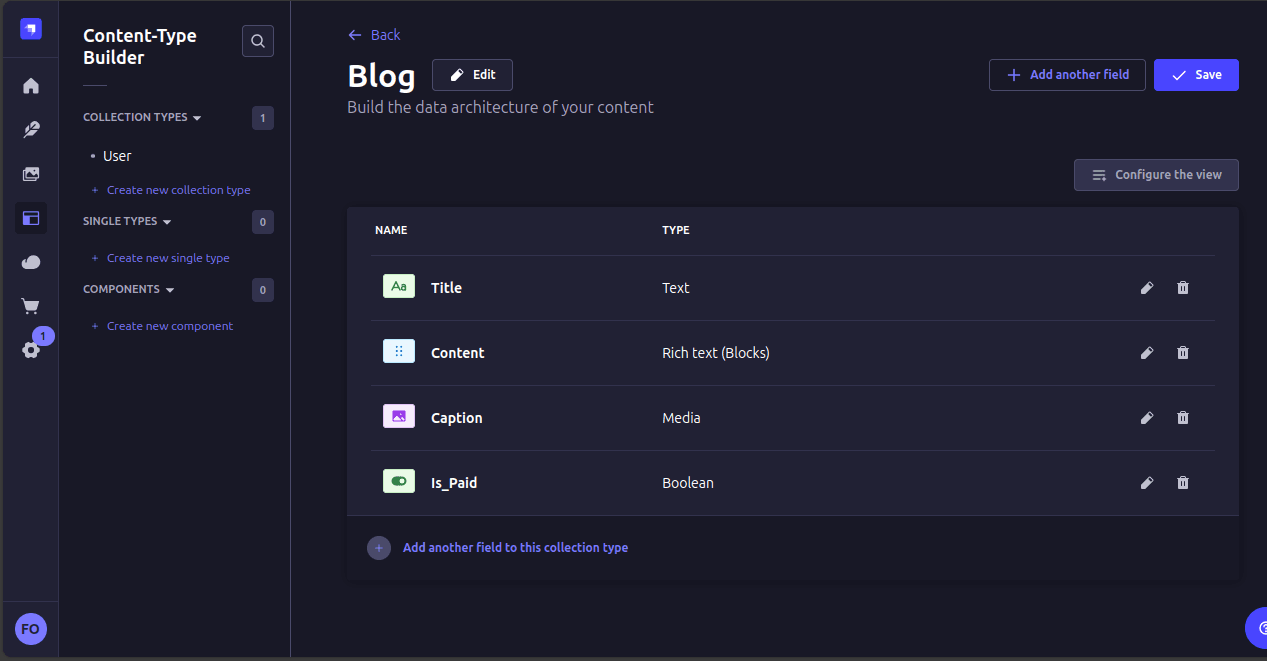
After saving the fields, create a few blog post entries with some of them with Is_Paid set as true.
Create a Vue.js Application
If you haven't already, install Vue CLI:
npm install -g @vue/cliCreate a new Vue application:
vue create blog-frontendSince you'll be using Vue 3, make sure to select Vue 3 during installation.
Navigate to the project directory:
cd blog-frontendTest the installation by running the server:
npm run serveSet Up Paystack with Vue.js
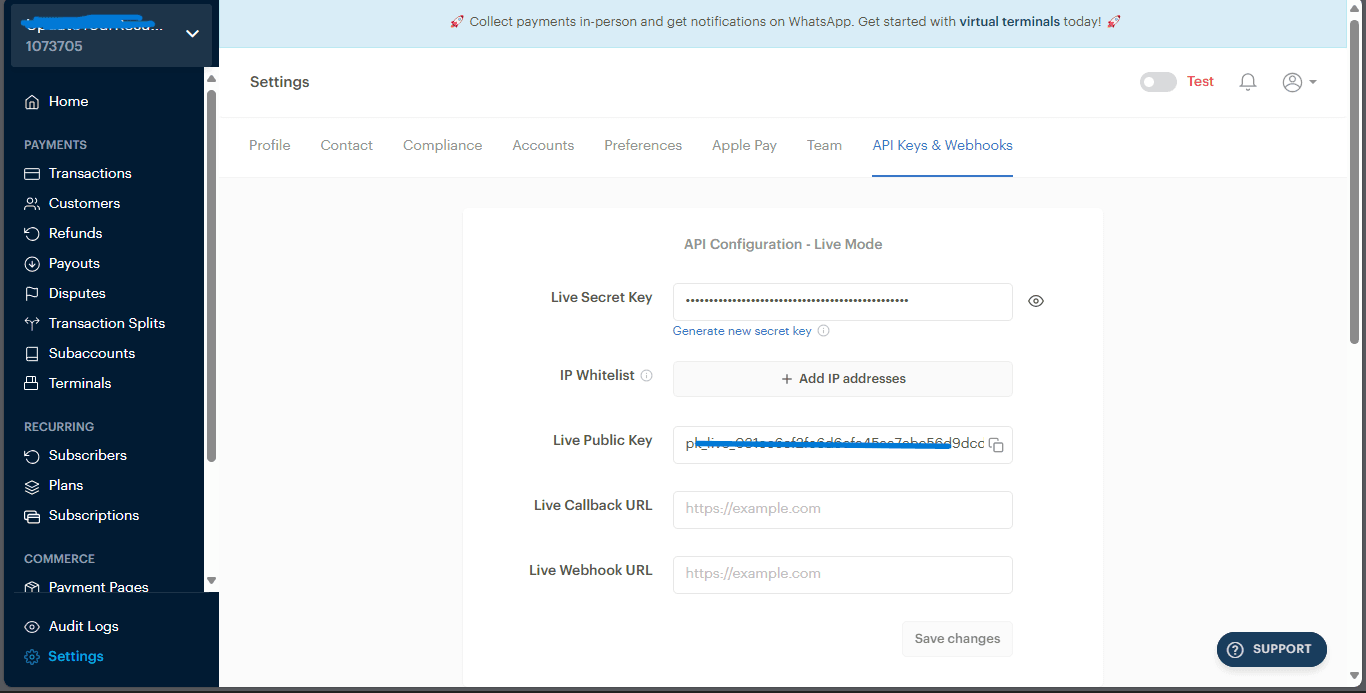
After Paystack login, From the Dashboard, navigate to Settings > API Keys & Webhooks to get your public and secret keys. Copy and save them later when we will perform Paystack intregration into your blog app.
Paystack Integration with Vue.js
Install the necessary libraries.
First, install the required libraries:
npm install vue-paystack axios @paystack/inline-js vue-router@4This command installs the necessary libraries for integrating Paystack payments into a Vue.js application using Strapi:
- vue-paystack: Provides Vue components and utilities for Paystack integration.
- axios: A popular HTTP client library for making requests to Strapi.
- @paystack/inline-js: The Paystack Inline JavaScript library for handling payment transactions.
- vue-router@4: A routing library for Vue.js applications
Inside the public/index.html file, add the @paystack/inline-js script within the head tag:
<script src="https://js.paystack.co/v1/inline.js"></script>Create a Paystack Component
Create a new file called PaystackButton.vue in your src/components directory and add the code below:
<template>
  <div>
    <button @click="payWithPaystack" :disabled="!email">Pay Now</button>
  </div>
</template>

<script setup>
import { onMounted } from 'vue'

const props = defineProps({
  email: {
    type: String,
    required: true
  },
  amount: {
    type: Number,
    required: true
  },
  reference: {
    type: String,
    required: true
  }
})

const emit = defineEmits(['payment-success', 'payment-closed'])

let PaystackPop

onMounted(() => {
  PaystackPop = window.PaystackPop
})

const payWithPaystack = () => {
  if (PaystackPop) {
    const handler = PaystackPop.setup({
      key: 'YOUR_PAYSTACK_PUBLIC_KEY', // Replace with your actual public key
      email: props.email,
      amount: props.amount * 100, // Amount is in USD
      currency: 'USD', // set currency to USD
      ref: props.reference,
      callback: (response) => {
        emit('payment-success', response)
      },
      onClose: () => {
        emit('payment-closed')
      }
    })
    handler.openIframe()
  } else {
    console.error('PaystackPop not loaded')
  }
}
</script>
This component provides a user-friendly way to initiate Paystack payments within your Vue application. It handles setting up payment details, success/closure events, and integrates with the external Paystack library for processing transactions.
After successful Paystack login, replace YOUR_PAYSTACK_PUBLIC_KEY with your actual Paystack public key.
Create a Blog List Component
In the src/components directory, create a BlogList.vue file component and update it to include the Read More button to access blog details:
<template>
  <div>
    <h1>Blog Posts</h1>
    <div v-if="loading">Loading...</div>
    <div v-else-if="error">{{ error }}</div>
    <div v-else>
      <div v-for="blog in blogs" :key="blog.documentId" class="blog-preview">
        <h2>{{ blog.Title }}</h2>
        <p v-if="blog.Content">
          {{ getContentPreview(blog.Content) }}
        </p>
        <router-link :to="{ name: 'BlogDetail', params: { id: blog.documentId } }" class="read-more">
          Read More
        </router-link>
      </div>
    </div>
  </div>
</template>

<script setup>
import { ref, onMounted } from 'vue'
import api from '../api'

const blogs = ref([])
const loading = ref(true)
const error = ref(null)

const fetchBlogs = async () => {
  try {
    loading.value = true
    const response = await api.get('/blogs')
    blogs.value = response.data.data
  } catch (err) {
    console.error('Error fetching blogs:', err)
    error.value = 'An error occurred while fetching blogs. Please try again later.'
  } finally {
    loading.value = false
  }
}

const getContentPreview = (content) => {
  if (typeof content === 'string') {
    return content.substring(0, 100) + '...'
  } else if (content && content.length > 0) {
    // Assuming the rich text field returns an array of blocks
    return content[0].children
      .map(child => child.text)
      .join(' ')
      .substring(0, 100) + '...'
  }
  return 'No content available'
}

onMounted(() => {
  fetchBlogs()
})
</script>

<style scoped>
.blog-preview {
  margin-bottom: 30px;
  border-bottom: 1px solid #eee;
  padding-bottom: 20px;
}

.blog-preview h2 {
  margin-bottom: 10px;
}

.read-more {
  display: inline-block;
  margin-top: 10px;
  color: #42b983;
  text-decoration: none;
  font-weight: bold;
}
</style>- This component fetches data from an API endpoint (
/blogs) and displays a list of blog posts with informative loading and error states. - It uses Vue's reactivity to update the UI based on the fetched data and error state.
- It provides a way to navigate to individual blog post detail pages using Vue Router.
- It employs a function
getContentPreviewto display a preview of the blog post content, handling different content formats (string or rich text). - The scoped styles customize the appearance of the blog post list and the "Read More" link.
Create a Blog Detail component
In the src/components directory, create a BlogDetails.vue file component and update it to include the Paystack pay button before accessing blog details for paid content:
<template>
  <div>
    <div v-if="loading">Loading...</div>
    <div v-else-if="error">{{ error }}</div>
    <div v-else-if="blog">
      <h1>{{ blog.Title }}</h1>
      <img v-if="blog.Caption && blog.Caption.url"
          :src="getImageUrl(blog.Caption.url)"
          alt="Blog Caption"
          class="blog-image" />
      <div v-if="!blog.Is_Paid || isPaid">
        <div v-html="parseContent(blog.Content)"></div>
      </div>
      <div v-else>
        <p>This is a paid article. Please pay to read the full content.</p>
        <paystack-button
          :email="userEmail"
          :amount="5"
          :reference="generateReference()"
          @payment-success="handlePaymentSuccess"
          @payment-closed="handlePaymentClosed"
        />
      </div>
    </div>
  </div>
</template>

<script setup>
import { ref, onMounted } from 'vue'
import { useRoute } from 'vue-router'
import api from '../api'
import PaystackButton from './PaystackButton.vue'

const route = useRoute()
const blog = ref(null)
const isPaid = ref(false)
const userEmail = ref('user@example.com') // In a real app, this would come from user authentication
const loading = ref(true)
const error = ref(null)

const fetchBlog = async () => {
  try {
    loading.value = true
    const response = await api.get(`/blogs/${route.params.id}?populate=*`)
    blog.value = response.data.data
  } catch (err) {
    console.error('Error fetching blog:', err)
    error.value = 'An error occurred while fetching the blog. Please try again later.'
  } finally {
    loading.value = false
  }
}

const generateReference = () => {
  return `BLOG_${route.params.id}_${Date.now()}`
}

const handlePaymentSuccess = async (response) => {
  console.log('Payment successful:', response)
  isPaid.value = true
  // Here you would typically update the backend to record the payment
  try {
    await api.post('/payments', {
      blogId: blog.value.documentId, // Use documentId for the blog
      paymentReference: response.reference,
      amount: response.amount,
    })
  } catch (err) {
    console.error('Error recording payment:', err)
  }
}
const parseContent = (content) => {
  if (Array.isArray(content)) {
    return content.map(block => {
      if (block.type === 'paragraph') {
        return `<p>${block.children.map(child => child.text).join('')}</p>`
      }
      // Add more conditions for other block types if needed
      return ''
    }).join('')
  }
  return content
}

const getImageUrl = (imageUrl) => {
  if (imageUrl) {
    return `http://localhost:1337${imageUrl}`
  }
  return ''
}

const handlePaymentClosed = () => {
  console.log('Payment window closed')
}

onMounted(() => {
  fetchBlog()
})
</script>

<style scoped>
.blog-image {
width: 500px;
height: auto;
}
</style>
This component displays the details of a specific blog post retrieved based on the route parameter.
- It handles paid content by checking the
Is_Paidattribute and offering a Paystack button for payment. - It utilizes a dedicated
PaystackButtoncomponent for payment processing. - It parses rich text content (assumed to be an array of blocks) into HTML for display.
- It interacts with the backend API to fetch blog data and potentially record payment information.
Create Home view
In the src/ directory, create a views/HomeView.vue file view and update it to display the blog list:
<template>
    <div class="home">
      <h1>Welcome to My Blog</h1>
      <p>Here you can find a collection of articles on various topics.</p>
      <router-link to="/blogs" class="cta-button">View All Articles</router-link>
    </div>
  </template>

  <style scoped>
  .home {
    text-align: center;
  }

  h1 {
    font-size: 2.5em;
    margin-bottom: 20px;
  }

  p {
    font-size: 1.2em;
    margin-bottom: 30px;
  }

  .cta-button {
    display: inline-block;
    background-color: #42b983;
    color: white;
    padding: 10px 20px;
    border-radius: 5px;
    text-decoration: none;
    font-weight: bold;
    transition: background-color 0.3s;
  }

  .cta-button:hover {
    background-color: #3aa876;
  }
  </style>
This view component serves as the homepage of the blog application.
- It provides a welcoming message and a clear call to action for users to explore the blog content.
- The simple layout and styling create a visually appealing and user-friendly experience.
- The router-link allows users to navigate directly to the blog posts page.
Create Routers
In the src/ directory, create a routers/index.js file and update it to include routers to your views and components:
import { createRouter, createWebHistory } from 'vue-router'
import Home from '../views/HomeView.vue'
import BlogList from '../components/BlogList.vue'
import BlogDetail from '../components/BlogDetail.vue'

const routes = [
  {
    path: '/',
    name: 'Home',
    component: Home
  },
  {
    path: '/blogs',
    name: 'BlogList',
    component: BlogList
  },
  {
    path: '/blogs/:id',
    name: 'BlogDetail',
    component: BlogDetail
  }
]

const router = createRouter({
  history: createWebHistory(),
  routes
})

export default router
This code configures the routing system for a Vue.js application using Vue Router. It defines the available routes and their corresponding components, allowing users to navigate between different pages or views within the application.
Create API Configuration
Create a file src/api.js to centralize your API configuration and add the code below:
import axios from 'axios'

const api = axios.create({
  baseURL: 'http://localhost:1337/api',
  headers: {
    'Authorization': `Bearer ${process.env.VUE_APP_STRAPI_BEARER_TOKEN}`
  }
})

export default api
This code creates an Axios instance configured to interact with the Strapi API at the specified base URL.
Generate the Strapi API Token
- Navigate to your Strapi dashboard.
- Go to Settings > API Tokens > Create New API Token
- Configure the token with these recommended settings:
- Name:
blog-frontend - Token type: Full access token
- Token duration: Unlimited (for development) or set an expiration date for production
- Description: "Token for blog-frontend application"
- Name:
- In the API Token creation form, set up the following permissions:
- Collection Types:
- Read permissions for all content types your frontend needs to access
- Write permissions if your frontend needs to create/update content
- Custom Permissions: Enable as needed for your specific use case.
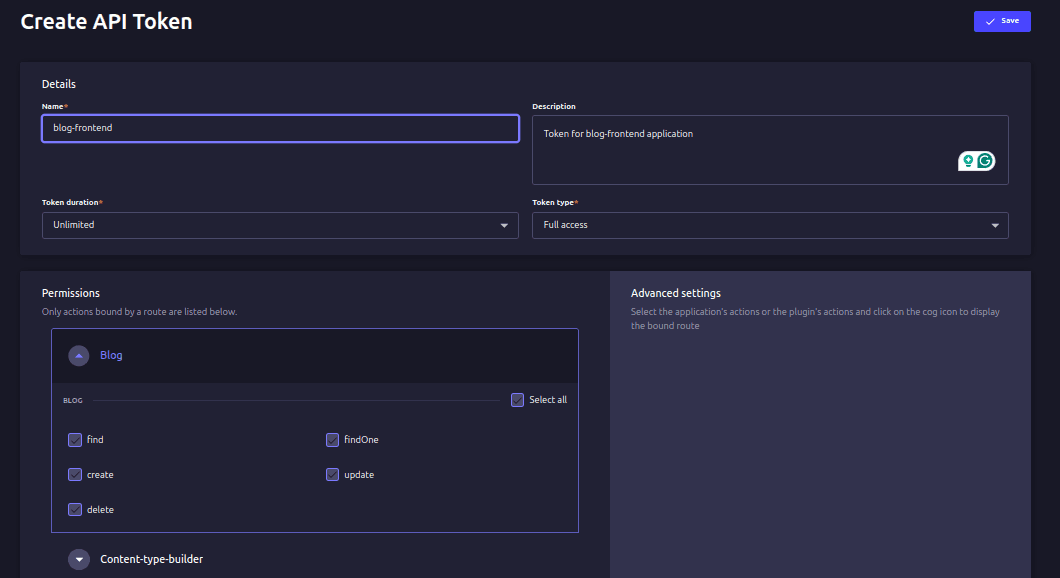
- Collection Types:
- Save to generate your API key.
- Copy and store your API key in a safe place for later use.
Set Up Environment Variables
- Create a
.envfile in your project root. - Add your token:
Replace
VUE_APP_STRAPI_BEARER_TOKEN=YOUR_STRAPI_API_TOKENYOUR_STRAPI_API_TOKENwith your actual Strapi API token. - Add
.envto your.gitignorefile to keep the token secure Your API configuration is now set up with Bearer token authentication.
Set up CORS settings
For Strapi v5 or later, in the strapi app directory, my-blog you will update ./config/middlewares.js as follows:
module.exports = [
  'strapi::errors',
  {
    name: 'strapi::security',
    config: {
      contentSecurityPolicy: {
        useDefaults: true,
        directives: {
          'connect-src': ["'self'", 'https:'],
          'img-src': ["'self'", 'data:', 'blob:', 'https://yourvueapp.com'],
          'media-src': ["'self'", 'data:', 'blob:', 'https://yourvueapp.com'],
          upgradeInsecureRequests: null,
        },
      },
    },
  },
  {
    name: 'strapi::cors',
    config: {
      origin: ['http://localhost:8080', 'https://yourvueapp.com'],
      headers: ['*'],
      methods: ['GET', 'POST', 'PUT', 'PATCH', 'DELETE', 'OPTIONS', 'HEAD'],
      credentials: true,
    },
  },
  'strapi::poweredBy',
  'strapi::logger',
  'strapi::query',
  'strapi::body',
  'strapi::session',
  'strapi::favicon',
  'strapi::public',
];
Save the file and restart your Strapi server for the changes to take effect.
Note Only allow origins that actually need access to your Strapi API.
Setup App.vue Component
In the src directory, update the App.vue file as follows to load the Home page view:
<template>
<div id="app">
<header>
<nav>
<router-link to="/">Home</router-link> |
<router-link to="/blogs">Blogs</router-link>
</nav>
</header>
<main>
<router-view></router-view>
</main>
<footer>
<p>© 2024 My Blog Application</p>
</footer>
</div>
</template>
<style>
#app {
font-family: Arial, sans-serif;
-webkit-font-smoothing: antialiased;
-moz-osx-font-smoothing: grayscale;
color: #2c3e50;
max-width: 800px;
margin: 0 auto;
padding: 20px;
}
header {
margin-bottom: 20px;
}
nav {
padding: 20px 0;
}
nav a {
font-weight: bold;
color: #2c3e50;
text-decoration: none;
margin-right: 10px;
}
nav a.router-link-exact-active {
color: #42b983;
}
main {
min-height: 300px;
}
footer {
margin-top: 40px;
text-align: center;
font-size: 0.9em;
color: #666;
}
</style>This component serves as the foundation for the application, providing the overall structure and navigation while allowing for dynamic content rendering through the router.
Update the main.js file to include the routers:
import { createApp } from 'vue'
import App from './App.vue'
import router from './router'

createApp(App).use(router).mount('#app')
Next, in the root directory, create a .eslintrc.js file and add the following:
module.exports = {
    env: {
      node: true,
    },
    extends: [
      'eslint:recommended',
      'x:vue/vue3-recommended',
    ],

    globals: {
      defineProps: "readonly",
      defineEmits: "readonly",
      defineExpose: "readonly",
      withDefaults: "readonly"
    }
  }
This configuration ensures that your code adheres to consistent coding standards and helps catch potential errors or stylistic issues.
- The inherited rules provide a solid foundation for linting, while the custom rules allow you to tailor the configuration to your specific project needs.
- The
globalssection defines commonly used Vue.js 3 functions as read-only, preventing accidental redefinitions.
Testing the Application
Run the vuejs server:
npm run serveAccess the app through http://localhost:8080/.
Expected Output
Home page
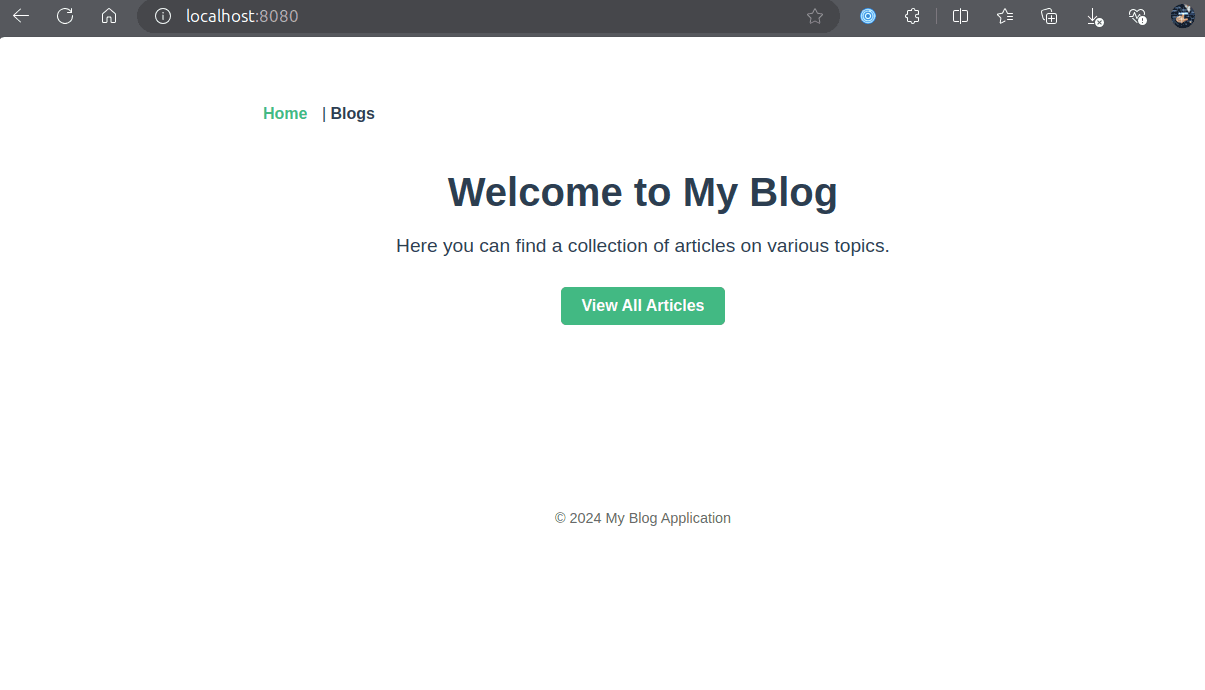
Blog List page:
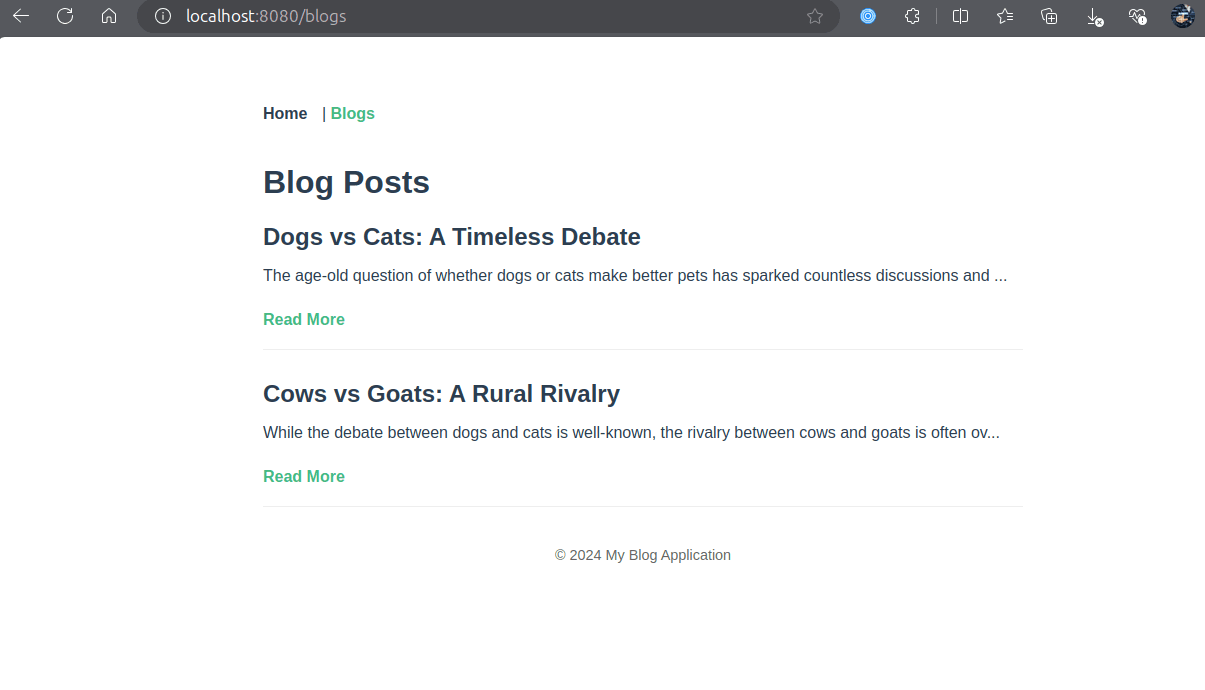
Blog detail page:
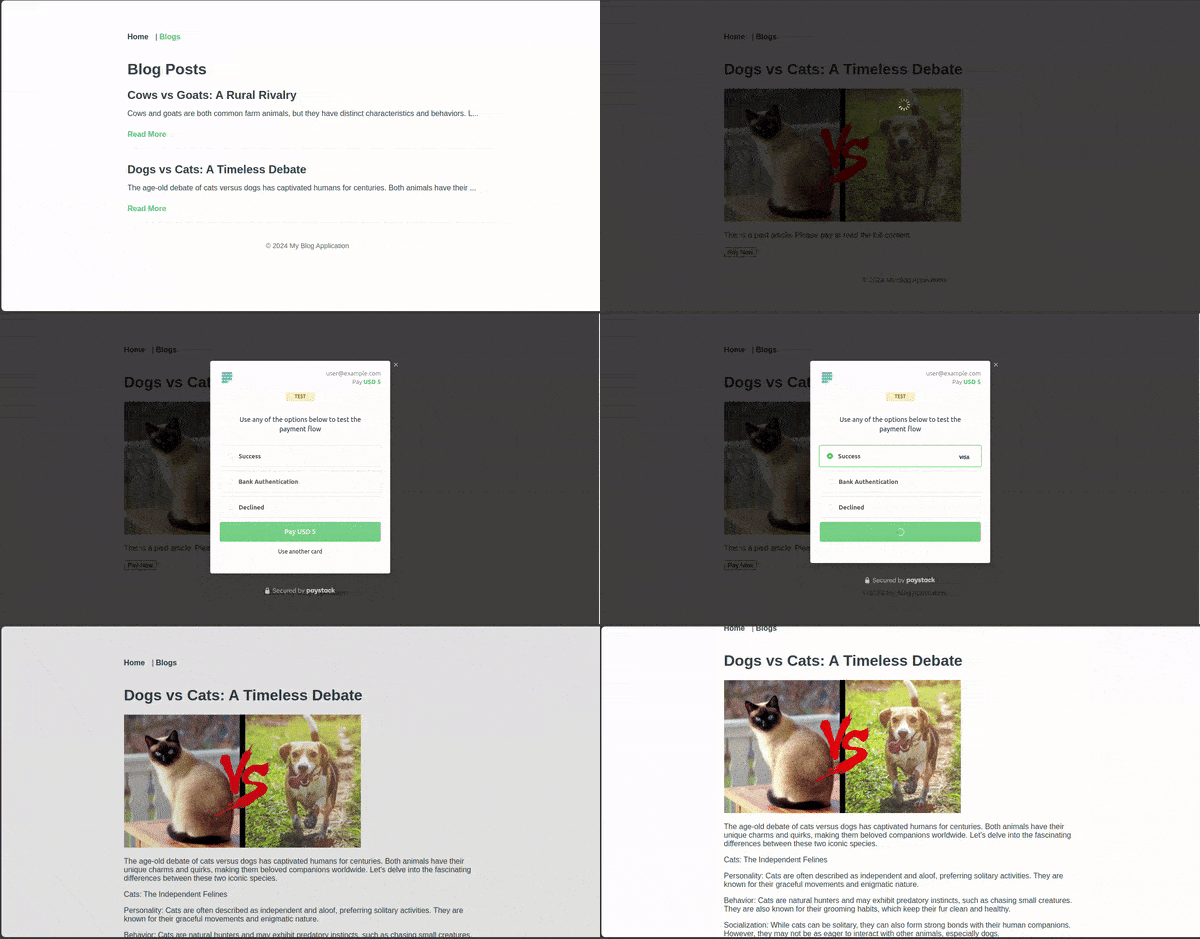
Project Source Code
The source code for this project can be found on Github. Have a look at the Vue app code here and the Strapi backend here.
Conclusion
You have successfully built a Vue.js application that integrates Strapi for content management and Paystack for handling payments. This project demonstrates several key concepts and technologies like Vue.js and Vue Router, content management with Strapi, payment integration with Paystack, API integration, component-based architecture(allows for reusable and maintainable code), error handling and loading states and rich text handling.
You can expand the project in several ways like implementing user authentication, adding more sophisticated content filtering and search functionality, and improving the UI/UX with a more polished design.