In this tutorial, we will learn how to build a Next.js frontend application with GitHub authentication using Strapi. We'll cover Next.js route handlers and middleware to create a secure, user-friendly authentication system.
By the end of this guide, we'll have a working example ready to integrate other auth providers supported by Strapi. Let's get started.
Project Overview and Demo
See the project overview and demo of this video on YouTube.
Setting Up Next.js Frontend for GitHub Authentication
Install a Next.js Application
To set up Next.js GitHub OAuth with Strapi, we will first start by setting up our Next.js frontend. We have to first navigate to our preferred project folder. This is where we will create our Strapi and Next.js projects.
Start by running the following command in the terminal:
npx create-next-app@latestThe command above will install the lastest Next.js application.
We will call our project frontend.
We will be asked the following question during installation; and we will select "Yes" for everything except using ESLint.
➜  auth-provider-blog npx create-next-app@latest
✔ What is your project named? … frontend
✔ Would you like to use TypeScript? … Yes
✔ Would you like to use ESLint? … No
✔ Would you like to use Tailwind CSS? … Yes
✔ Would you like to use `src/` directory? … Yes
✔ Would you like to use App Router? (recommended) … Yes
✔ Would you like to customize the default import alias (@/*)? … Yes
Creating a new Next.js app in /Users/paulbratslavsky/temp/auth-provider-blog/frontend.
Now that we have our Next.js project set up, we can start it with the following command.
cd frontend
yarn dev
In the command above, we CD into our frontend folder, where our Next.js application resides and start the development server.
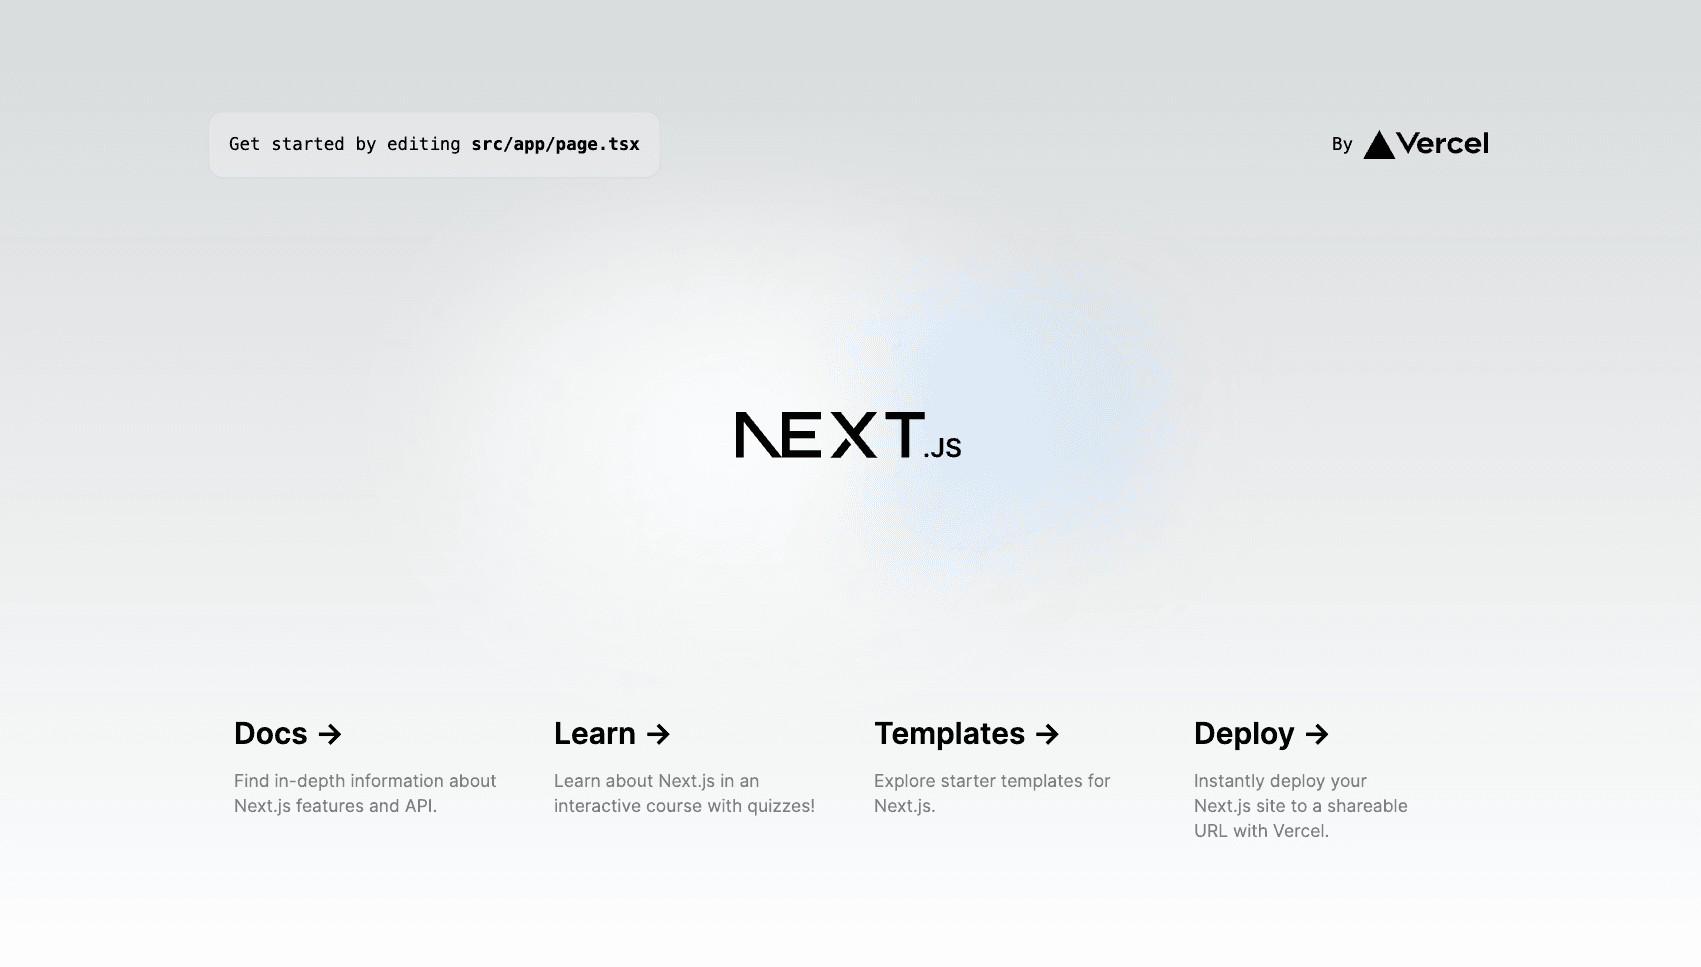
Once our project starts, we will see the following displayed on our screen.
Create The Login form
Now, let's create our form for signing in. We are going to replace the code on our page.tsx file with the following code.
// ./src/app/page.tsx

import Link from "next/link";

export default function Home() {
  const backendUrl =
    process.env.NEXT_PUBLIC_BACKEND_URL ?? "http://localhost:1337";
  const path = "/api/connect/github";
  const url = new URL(backendUrl + path);

  return (
    <div className="flex min-h-screen flex-1 flex-col justify-center py-12 sm:px-6 lg:px-8">
      <div className="sm:mx-auto sm:w-full sm:max-w-md">
        <img
          className="mx-auto h-10 w-auto"
          src="https://tailwindui.com/img/logos/mark.svg?color=indigo&shade=600"
          alt="Your Company"
        />
        <h2 className="mt-6 text-center text-2xl font-bold leading-9 tracking-tight text-gray-900">
          Sign in to your account
        </h2>
      </div>

      <div className="mt-10 sm:mx-auto sm:w-full sm:max-w-[480px]">
        <div className="bg-white px-6 py-12 shadow sm:rounded-lg sm:px-12">
          <div>
            <div className="grid grid-cols-1 gap-4">
              <form>
                <Link
                  href={url.href}
                  className="flex w-full items-center justify-center gap-3 rounded-md bg-white px-3 py-2 text-sm font-semibold text-gray-900 shadow-sm ring-1 ring-inset ring-gray-300 hover:bg-gray-50 focus-visible:ring-transparent"
                >
                  <svg
                    className="h-5 w-5 fill-[#24292F]"
                    aria-hidden="true"
                    fill="currentColor"
                    viewBox="0 0 20 20"
                  >
                    <path
                      fillRule="evenodd"
                      d="M10 0C4.477 0 0 4.484 0 10.017c0 4.425 2.865 8.18 6.839 9.504.5.092.682-.217.682-.483 0-.237-.008-.868-.013-1.703-2.782.605-3.369-1.343-3.369-1.343-.454-1.158-1.11-1.466-1.11-1.466-.908-.62.069-.608.069-.608 1.003.07 1.531 1.032 1.531 1.032.892 1.53 2.341 1.088 2.91.832.092-.647.35-1.088.636-1.338-2.22-.253-4.555-1.113-4.555-4.951 0-1.093.39-1.988 1.029-2.688-.103-.253-.446-1.272.098-2.65 0 0 .84-.27 2.75 1.026A9.564 9.564 0 0110 4.844c.85.004 1.705.115 2.504.337 1.909-1.296 2.747-1.027 2.747-1.027.546 1.379.203 2.398.1 2.651.64.7 1.028 1.595 1.028 2.688 0 3.848-2.339 4.695-4.566 4.942.359.31.678.921.678 1.856 0 1.338-.012 2.419-.012 2.747 0 .268.18.58.688.482A10.019 10.019 0 0020 10.017C20 4.484 15.522 0 10 0z"
                      clipRule="evenodd"
                    />
                  </svg>
                  <span className="text-sm font-semibold leading-6">
                    GitHub
                  </span>
                </Link>
              </form>
            </div>
          </div>
        </div>
      </div>
    </div>
  );
}
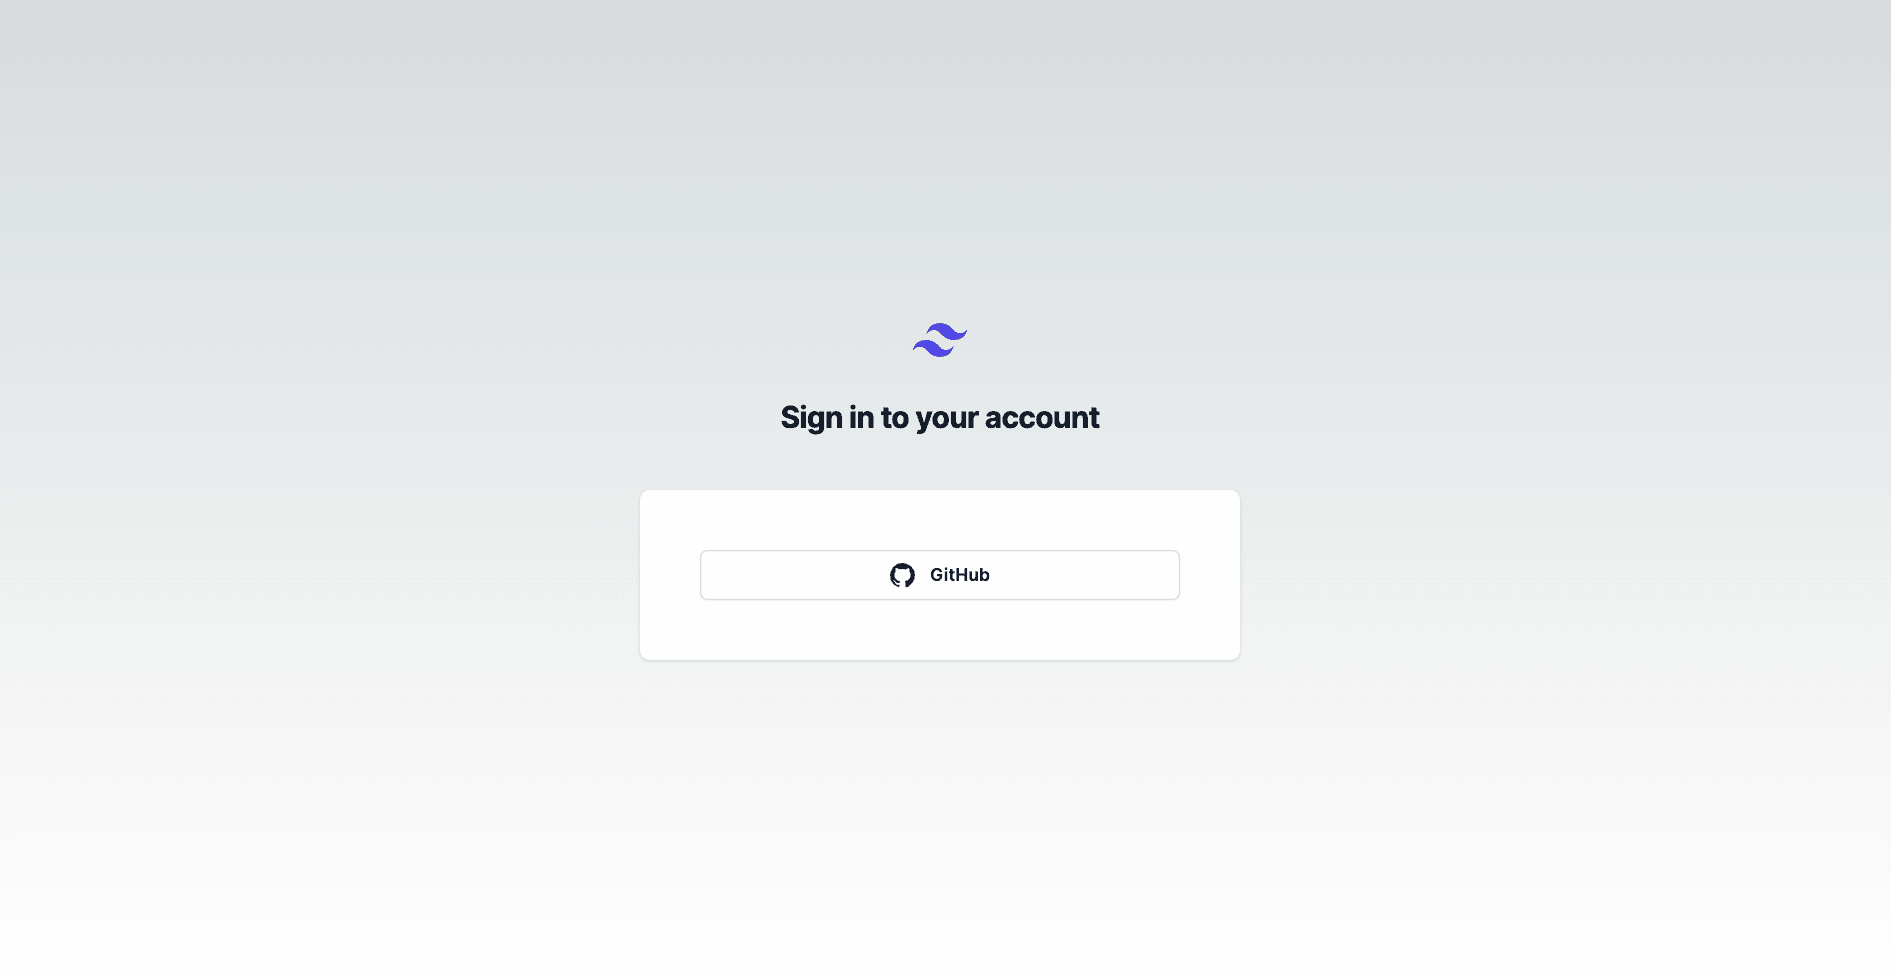
All we are doing in the code above is creating a button link that will redirect us to the http://localhost:1337/api/connect/github Strapi API endpoint, which is responsible for initiating authentication using the GitHub provider.
We will cover this in more detail, but first, let's build out our front end, which will handle this process.
Once we have added the code above, we can restart our application, and should now see the following view.
Implementing Callback Route for GitHub Authentication in Next.js
Understanding the Auth Flow
So why do we need a route to handle the auth callback? This is because we need to authenticate our Strapi user and set the JWT token.
But before we proceed to write the code, here are the steps that will be in our auth flow.
We will use our local dev as an example.
- The user goes to our frontend app, http://localhost:3000, and clicks on your button to connect with Github.
- The front end will redirect the tab to the backend URL: http://localhost:1337/api/connect/github.
- The backend redirects the tab to the GitHub login page where the user logs in. Once this is done, Github redirects the tab to the backend URL at http://localhost:1337/api/connect/github/callback?code=abcdef.
- The backend uses the given code to get an
access_tokenfrom Github, which can be used for a period of time to make authorized requests to Github to get the user information. - Once the token is gotten, the backend redirects the tab to the url of your choice with the param
access_token.This will be our callback, and we will be responsible for logging in or creating our first user in Strapi via GitHub credentials.
Setting Up the Route Handler
To accomplish Next.js GitHub Authentication, we will create an Route Handler in Next.js, you can learn more about them here.
In our project, inside the app folder, create the following folders connect/[provider]/redirect. After that, inside the new redirect folder, create a route.ts file with the following code:
// ./src/app/connect/[provider]/[redirect]/route.ts

import { NextResponse } from "next/server";
import { cookies } from "next/headers";

const config = {
  maxAge: 60 * 60 * 24 * 7, // 1 week
  path: "/",
  domain: process.env.HOST ?? "localhost",
  httpOnly: true,
  secure: process.env.NODE_ENV === "production",
};

export const dynamic = "force-dynamic"; // defaults to auto
export async function GET(
  request: Request,
  params: { params: { provider: string } }
) {
  const { searchParams } = new URL(request.url);
  const token = searchParams.get("access_token");

  if (!token) return NextResponse.redirect(new URL("/", request.url));

  const provider = params.params.provider;
  const backendUrl =
    process.env.NEXT_PUBLIC_BACKEND_URL ?? "http://localhost:1337";
  const path = `/api/auth/${provider}/callback`;

  const url = new URL(backendUrl + path);
  url.searchParams.append("access_token", token);

  const res = await fetch(url.href);
  const data = await res.json();

  cookies().set("jwt", data.jwt, config);

  return NextResponse.redirect(new URL("/dashboard", request.url));
}
Let's break down what the above code does.
Step 1: Imports
import { NextResponse } from "next/server";
import { cookies } from "next/headers";NextResponse: A utility from Next.js for generating server responses.cookies: A utility for handling cookies in server-side requests and responses.
Step 2: Configuring JWT Token
The configuration for our JWT token:
const config = {
  maxAge: 60 * 60 * 24 * 7, // 1 week
  path: "/",
  domain: process.env.HOST ?? "localhost",
  httpOnly: true,
  secure: process.env.NODE_ENV === "production",
};maxAge: The cookie's lifespan is set to 1 week.path: The path scope of the cookie is set to the root directory.domain: The domain scope of the cookie, taken from an environment variable or defaulting tolocalhost.httpOnly: The cookie is accessible only through HTTP, not JavaScript.secure: The cookie is sent only over HTTPS if in production.
Step 3: Extract Search Parameters
Extracts the query parameters from the request URL to get the access_token.
const { searchParams } = new URL(request.url);
const token = searchParams.get("access_token");
Step 4: Redirect if No Token
If the access_token is not present, redirects the user to the homepage.
if (!token) return NextResponse.redirect(new URL("/", request.url));Step 5: Construct Backend URL
Constructs the URL for the backend or Strapi authentication callback, appending the access_token as a query parameter.
const provider = params.params.provider;
const backendUrl =
  process.env.NEXT_PUBLIC_BACKEND_URL ?? "http://localhost:1337";
const path = "/api/auth/github/callback";
const url = new URL(backendUrl + path);
url.searchParams.append("access_token", token);
Step 6: Fetch Data from Backend
Sends a request to the backend or Strapi authentication endpoint and waits for the response, then parses the response as JSON.
const res = await fetch(url.href);
const data = await res.json();
Step 7: Set JWT Cookie
cookies().set("jwt", data.jwt, config);
Sets a cookie named jwt with the JWT obtained from the backend response, using the previously defined configuration.
Step 8: Redirect to Dashboard
Redirects the user to the /dashboard page after setting the cookie.
return NextResponse.redirect(new URL("/dashboard", request.url));The code above will authenticate our user and set our cookie.
Now that we have this in place let's create our Dashboard page, which will be our protected route. Later on, using Next.js protected routes ideology, we will secure this page.
Creating Dashboard Page In Next.js
With the route handler configured, we need to create a dashboard page that a user will be redirected to.
Create Dashboard Page
Inside the app folder, create a new folder called dashboard. Within that folder, create a page.tsx file and paste it into the following code.
// ./src/app/dashboard/page.tsx

import { LogoutButton } from "@/components/Logout";
import React from "react";

export default function Dashboard() {
  return (
    <div className="container mx-auto px-4 flex justify-between items-center my-4">
      <h2 className="text-xl">Dashboard</h2>
      <LogoutButton />
    </div>
  );
}
As we can see that this code above uses a LogoutButton component. So let's create it.
Create The Logout Button Component
Inside the src folder, create a new folder called components. Within the components folder, create the LogoutButton.tsx file and paste in the following code:
// ./src/components/LogoutButton.tsx

import { cookies } from "next/headers";
import { redirect } from "next/navigation";

const config = {
  maxAge: 60 * 60 * 24 * 7, // 1 week
  path: "/",
  domain: process.env.HOST ?? "localhost",
  httpOnly: true,
  secure: process.env.NODE_ENV === "production",
};

async function logoutAction() {
  "use server";
  cookies().set("jwt", "", { ...config, maxAge: 0 });
  redirect("/");
}

export function LogoutButton() {
  return (
    <form action={logoutAction}>
      <button
        type="submit"
        className="bg-white hover:bg-gray-100 text-gray-800 font-semibold py-2 px-4 border border-gray-400 rounded shadow"
      >
        Logout
      </button>
    </form>
  );
}
The above code will handle the logout functionality by removing our cookie and redirecting the user to the / home route.
This is accomplished by our logoutAction server action, which will be triggered upon form submission.
Now that our dashboard page is ready, let's see if it works. We can view it by typing in the dashboard path inside the url bar. So, let's restart our app and navigate our the dashboard route http://localhost:3000/dashboard.
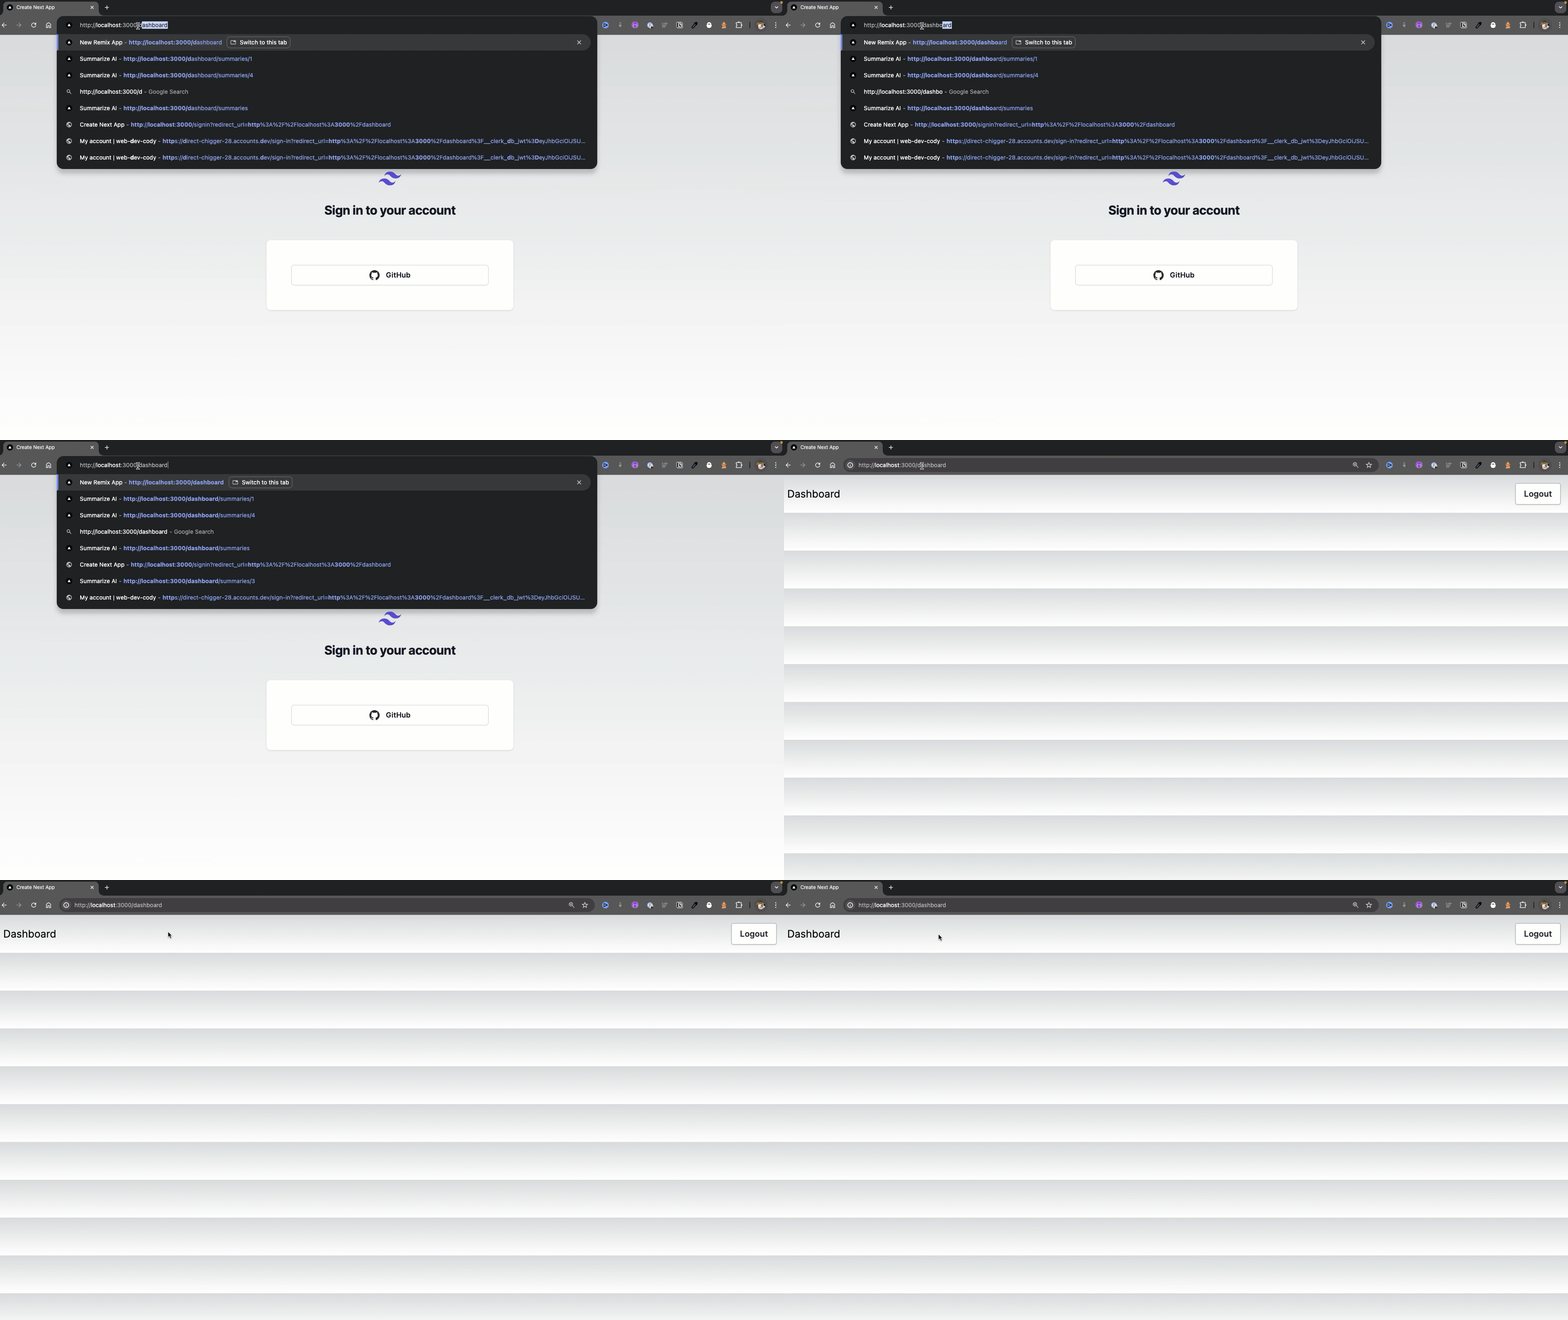
Excellent, we now have our Dashboard page with our LogoutButton component, which is really cool.
We will revisit how to make this route private via Next.js Auth Middleware, but let's focus on setting up our Strapi backend.
Setting Up Strapi Github Auth Provider
Let's get started by creating our Strapi project. We just released the Strapi 5 release candidate, so let's take it out for a spin. This example would work the same with Strapi 4, too.
To get started, at the root of our project, run the following command:
Create a Strapi App
npx create-strapi-app@rc backend --quickstartOnce all the dependencies get installed, you will be greeted with the following screen, go ahead and create our first Strapi Admin user.
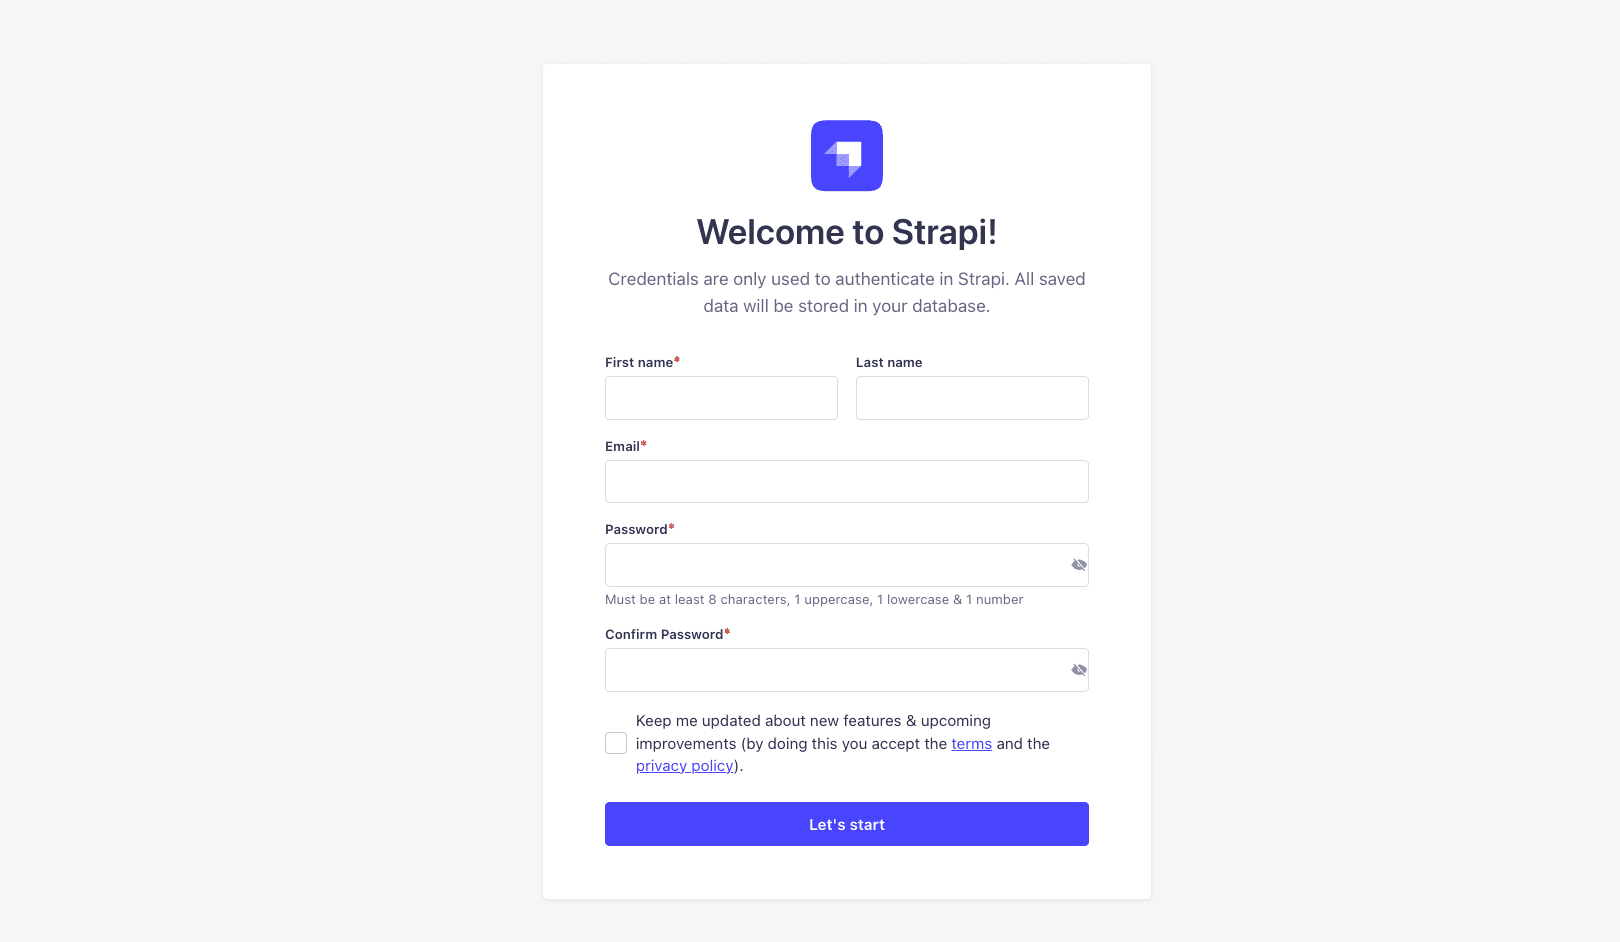
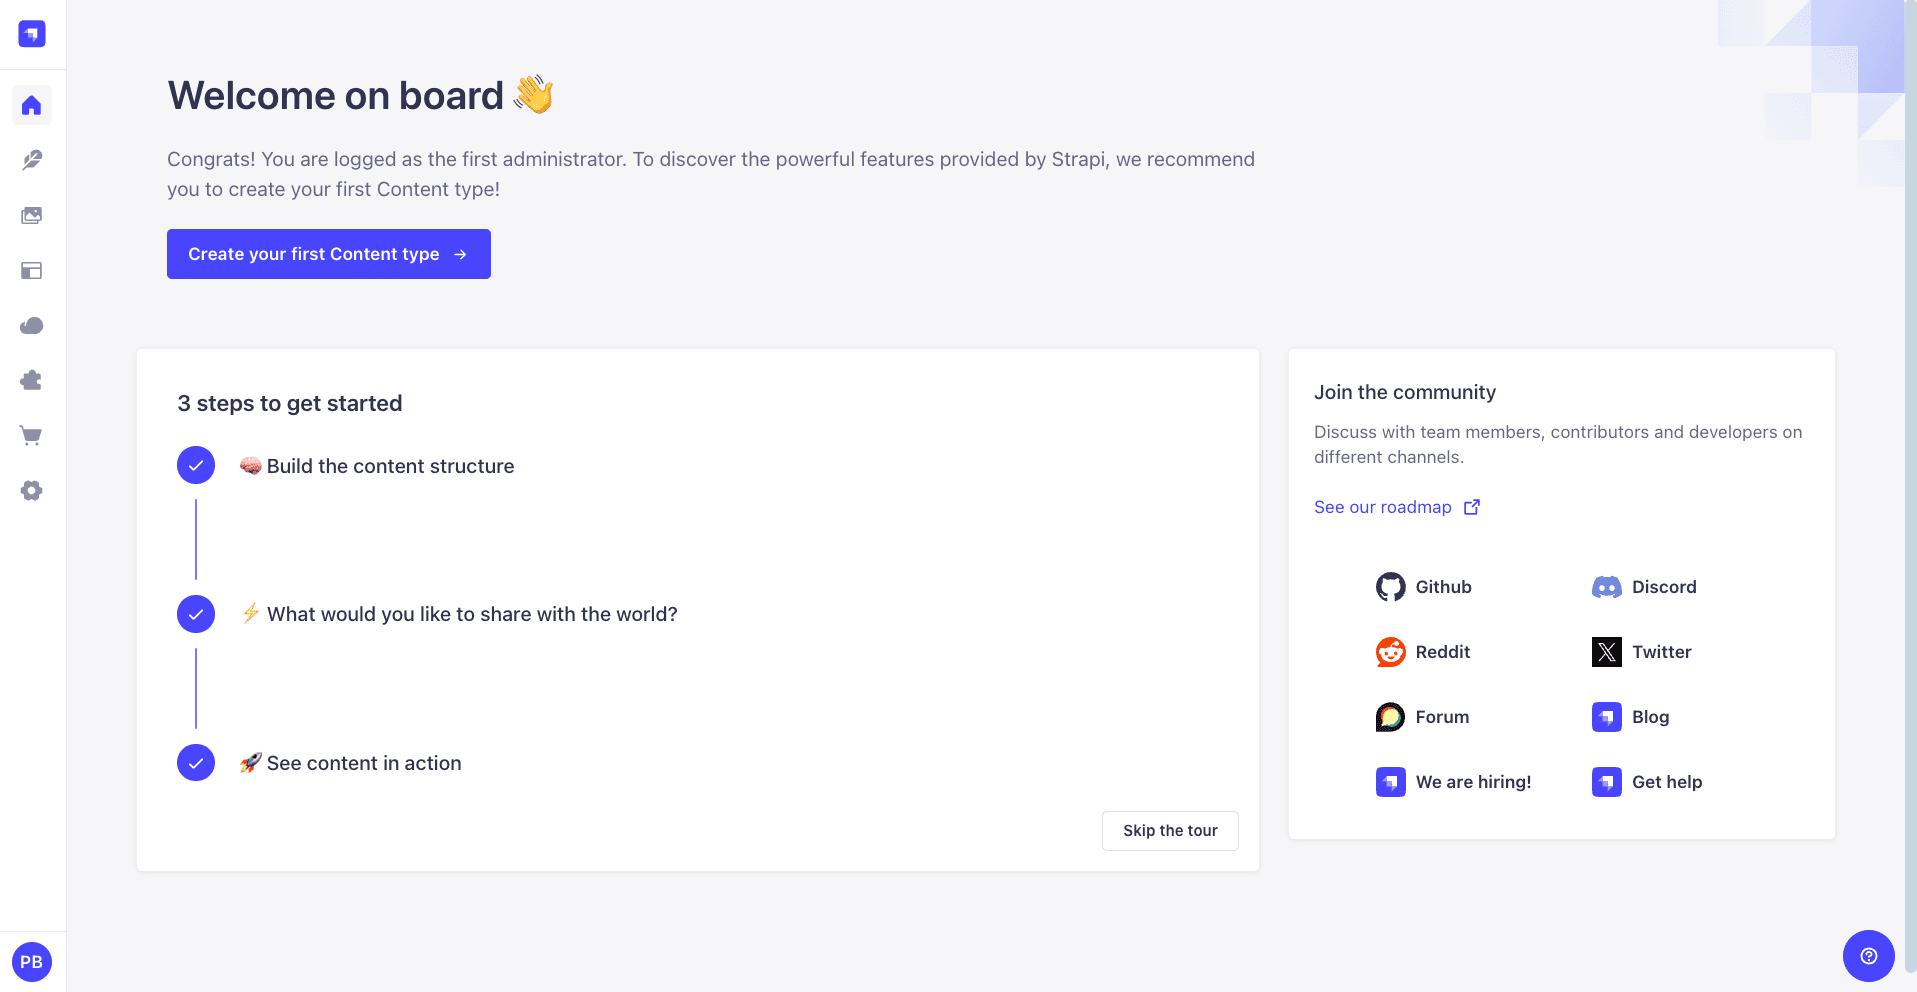
Once done, you will be greeted by the admin panel.
Now that we have our Strapi project, we can test our login with the GitHub button on our frontend app's Home page.
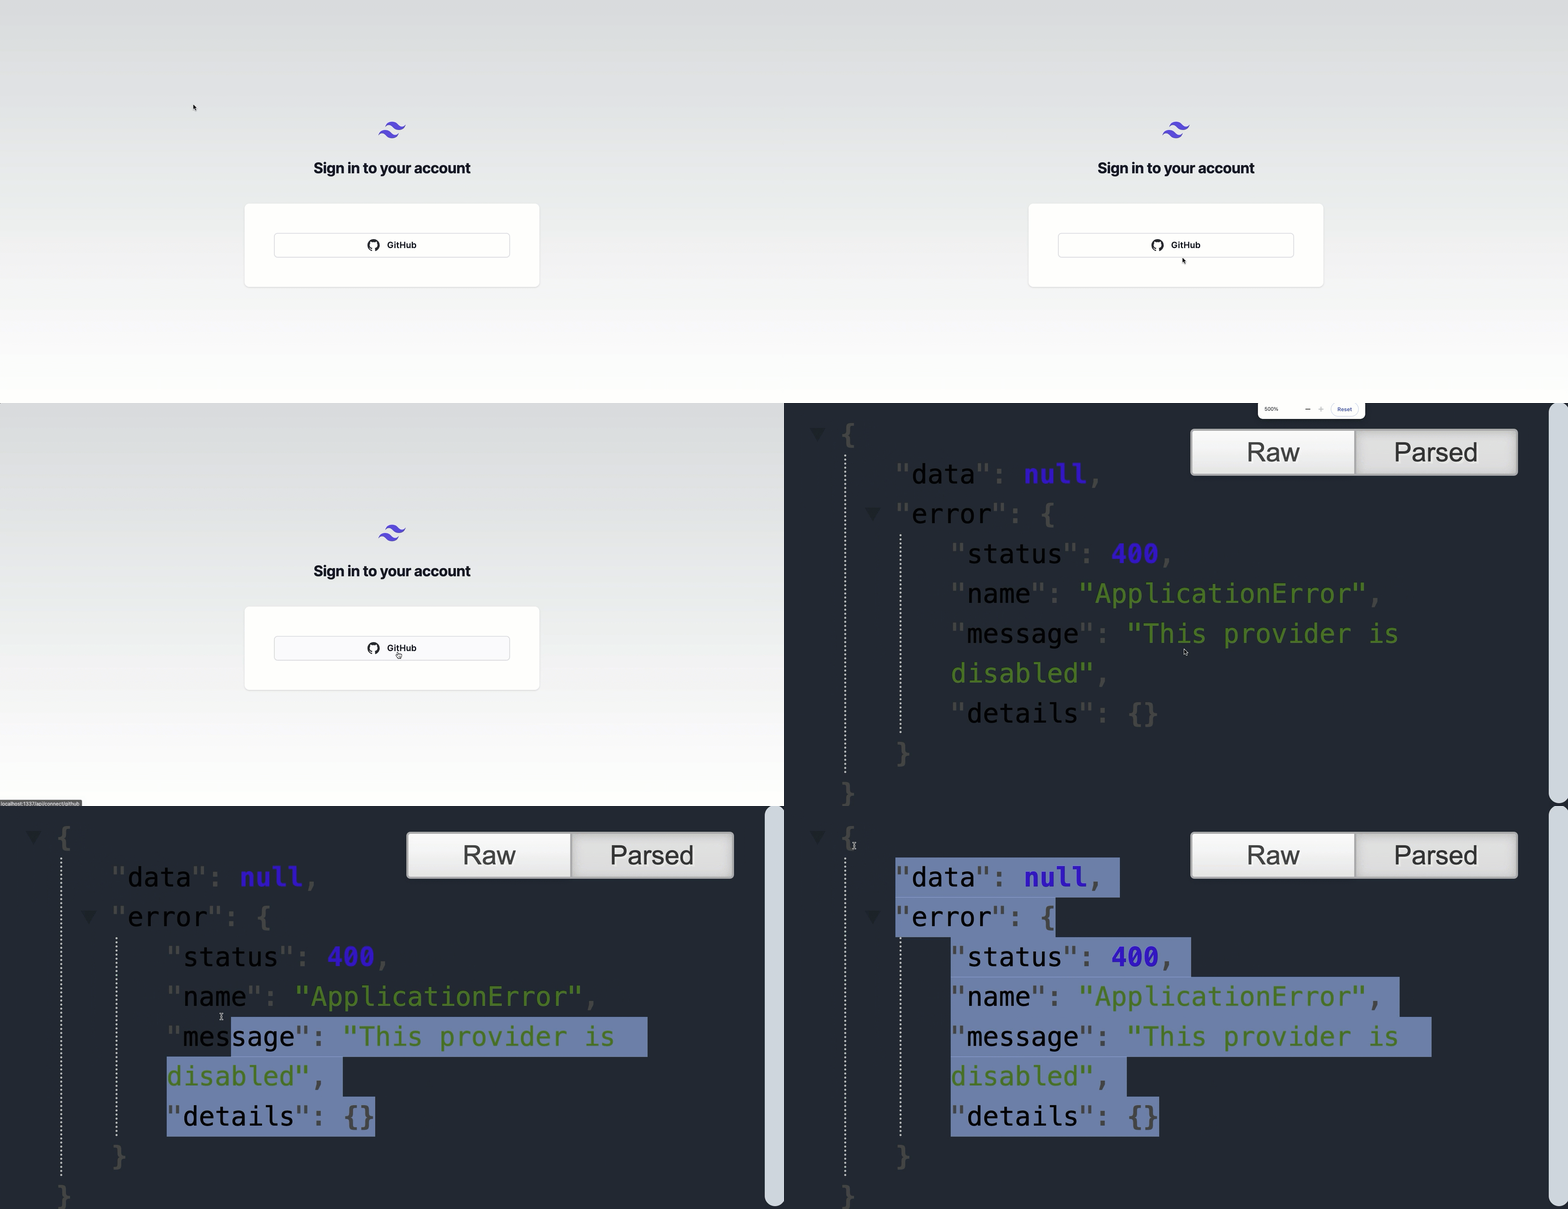
Clicking the button will show us the message above: This is a good sign; it means that our redirect link is working correctly, and we need to set up our provider in Strapi Admin.
Set Up Github Provider in Strapi Admin Dashboard
Let's navigate to our Providers page and select GitHub, which we will use in this tutorial.
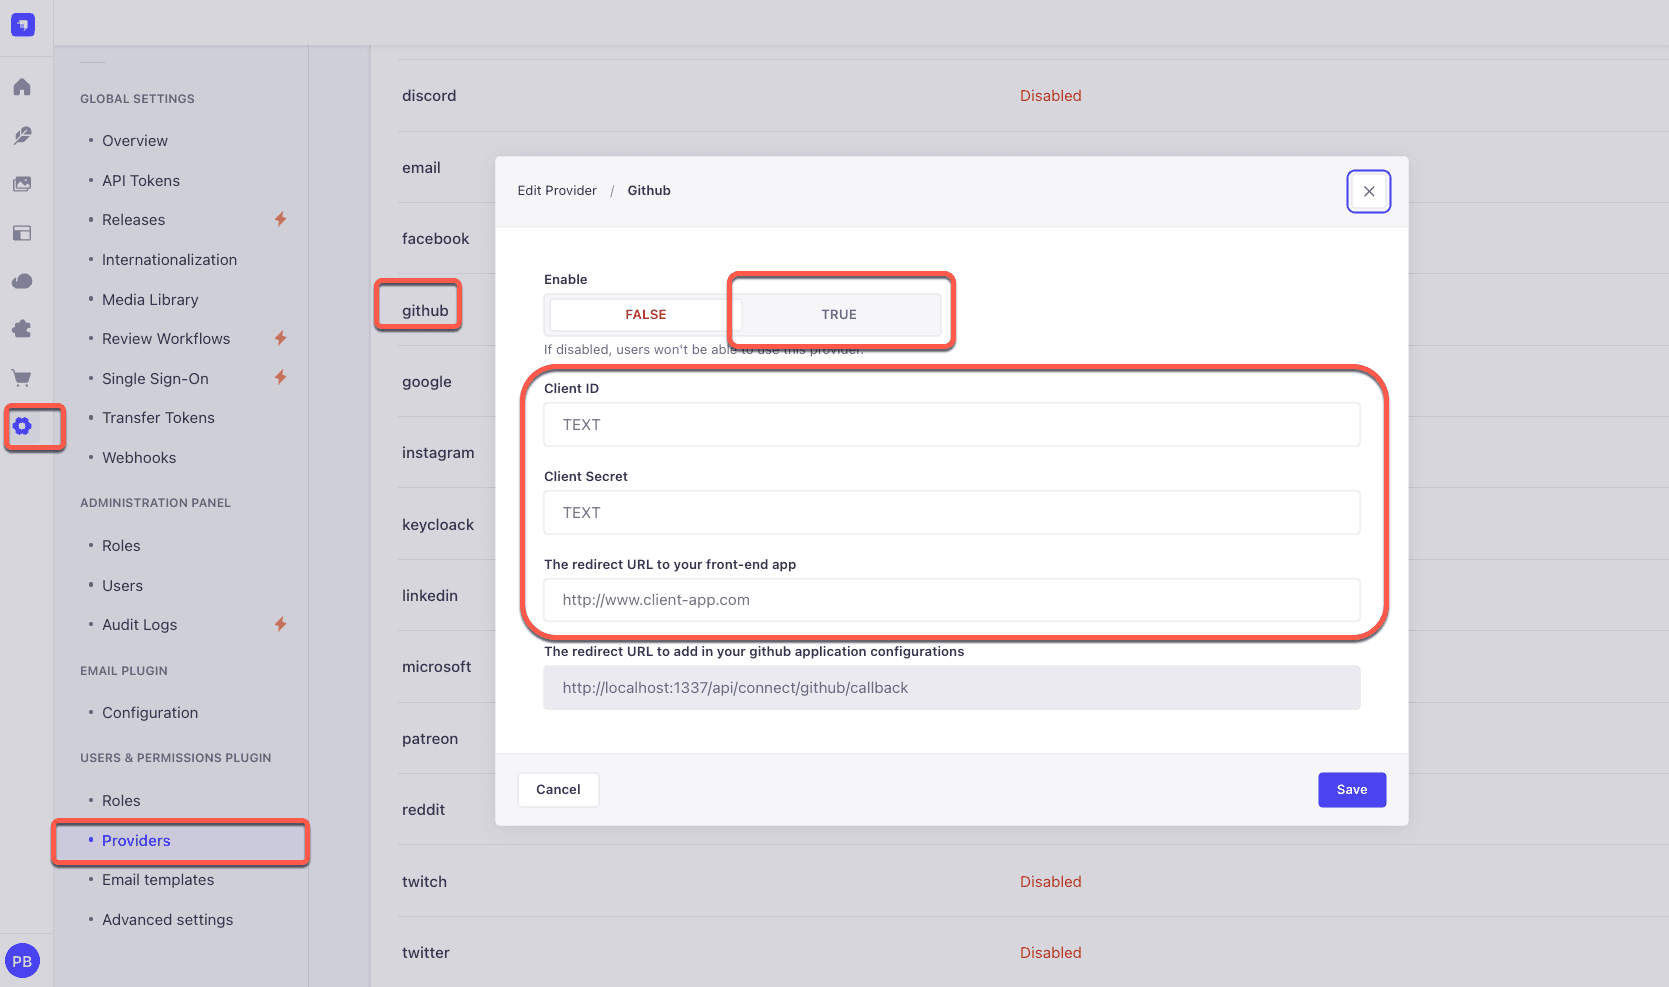
We will need to fill out the following fields: Enabled, which we will set to true. Then, we will need to get Client ID and Client Secret from GitHub and fill them in.
Finally, we must reference our The redirect URL to your front-end app, which we created earlier via our Next.js Route Handler. This URL will be accessed with the following URL path: http://localhost:3000/connect/github/redirect.
Create a Github OAuth App
Let's see where we can find these credentials. We must log into our GitHub account and navigate to the OAuthAPP page.
- Click on your Profile image.
- Select Settings
- Navigate to Developer Settings
- Select OAuthApp
- Click on the New OAuth App button
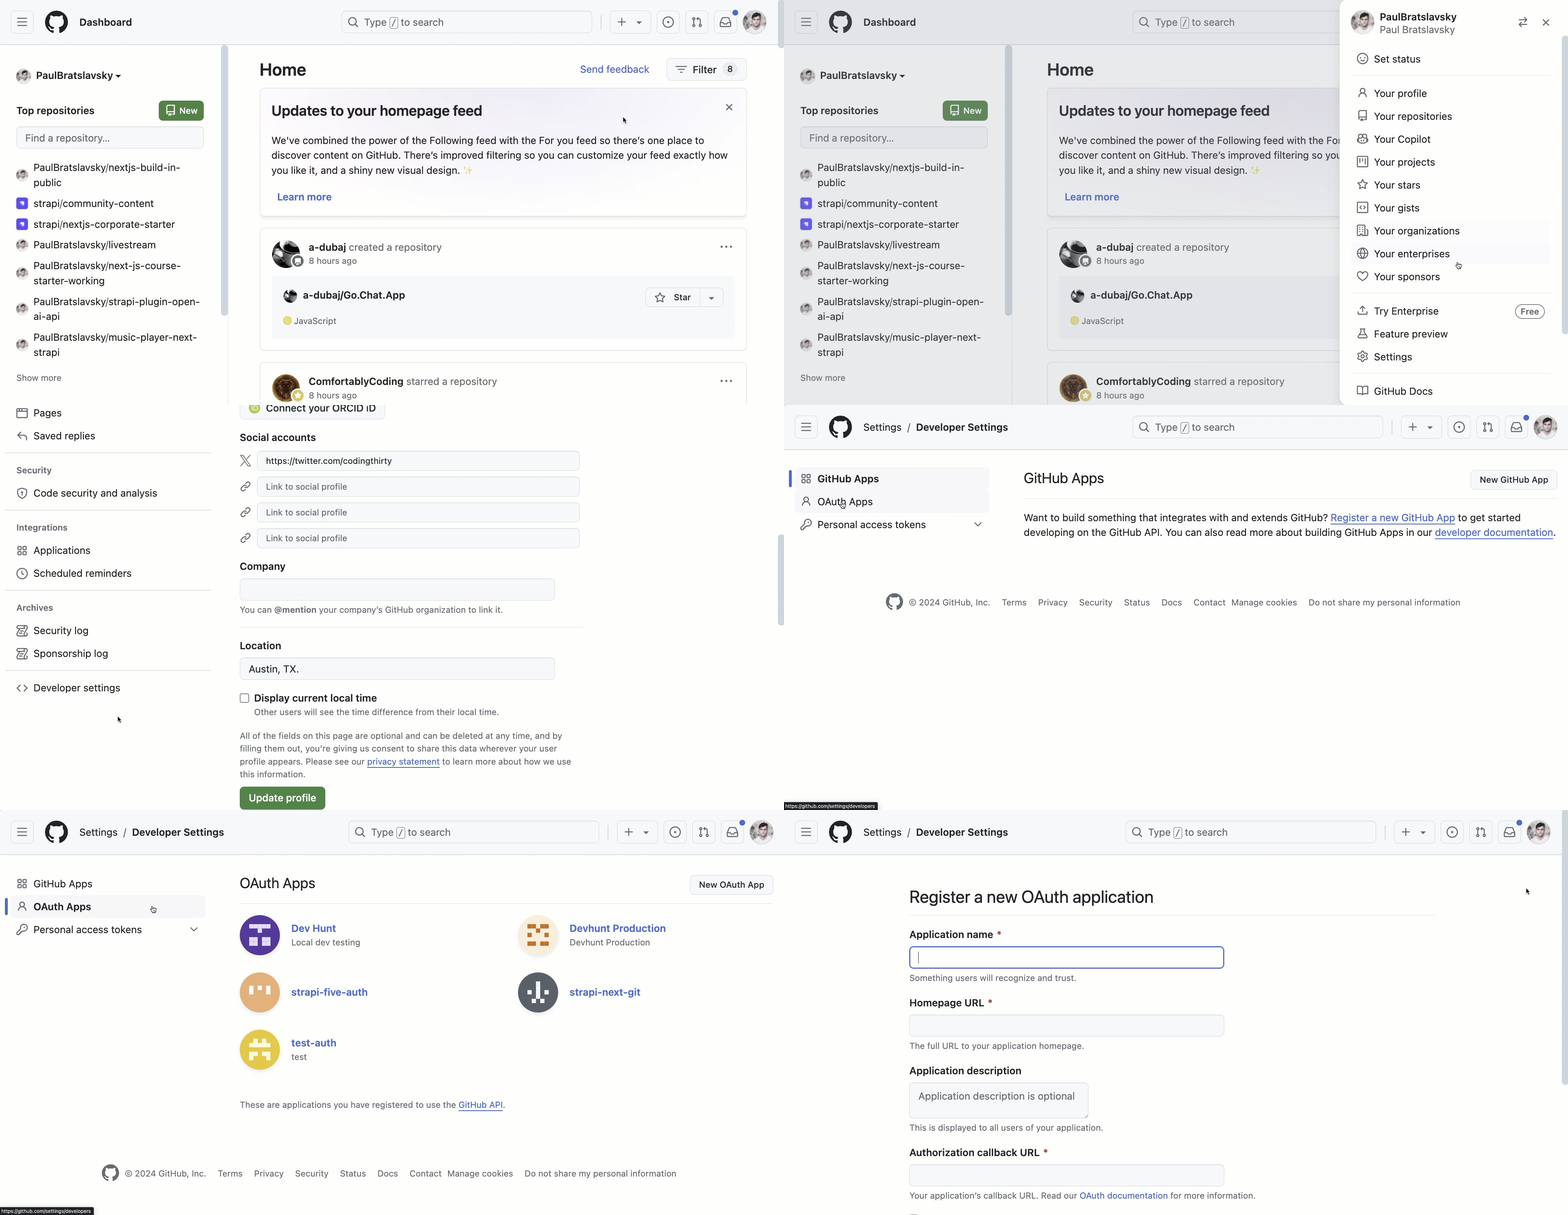
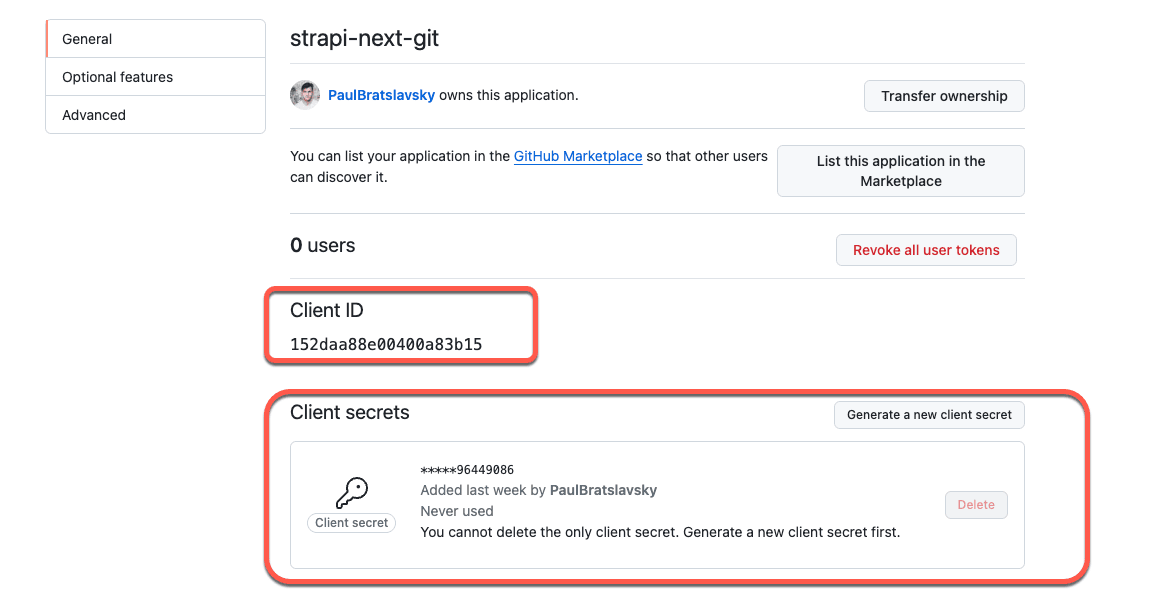
Once on the page, we will have access to the Client ID and the ability to create Client Secret. Let's go ahead and do that now.
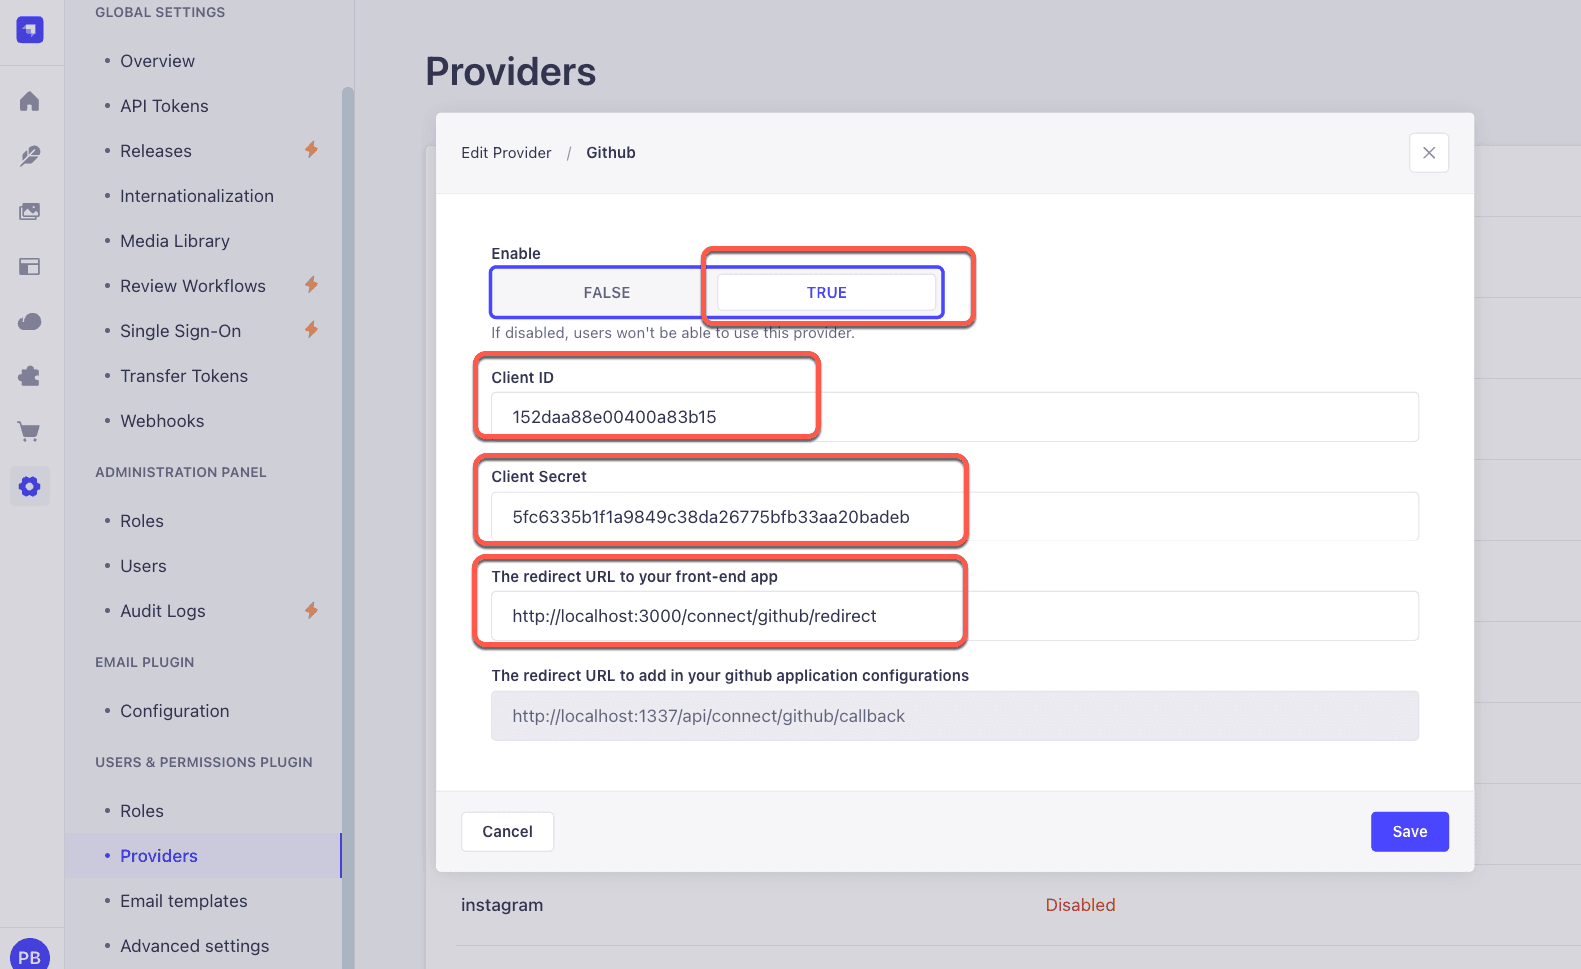
Now, we navigate to our Strapi Admin area and inside our GitHub Provider menu and update the Client ID and Client Secret with the credentials.
We will also need to fill out the redirect URL for our frontend; this references our Route Handler we created earlier. The value for this should be: http://localhost:3000/connect/github/redirect
And finally, we need to make one more change on our GitHub OAuth settings page.
HomePage URL: This references our Next.js frontend. This will behttp://localhost:3000.Authorization callback URL: This references our Strapi call back handler. And this will behttp://localhost:1337/api/connect/github/callback.
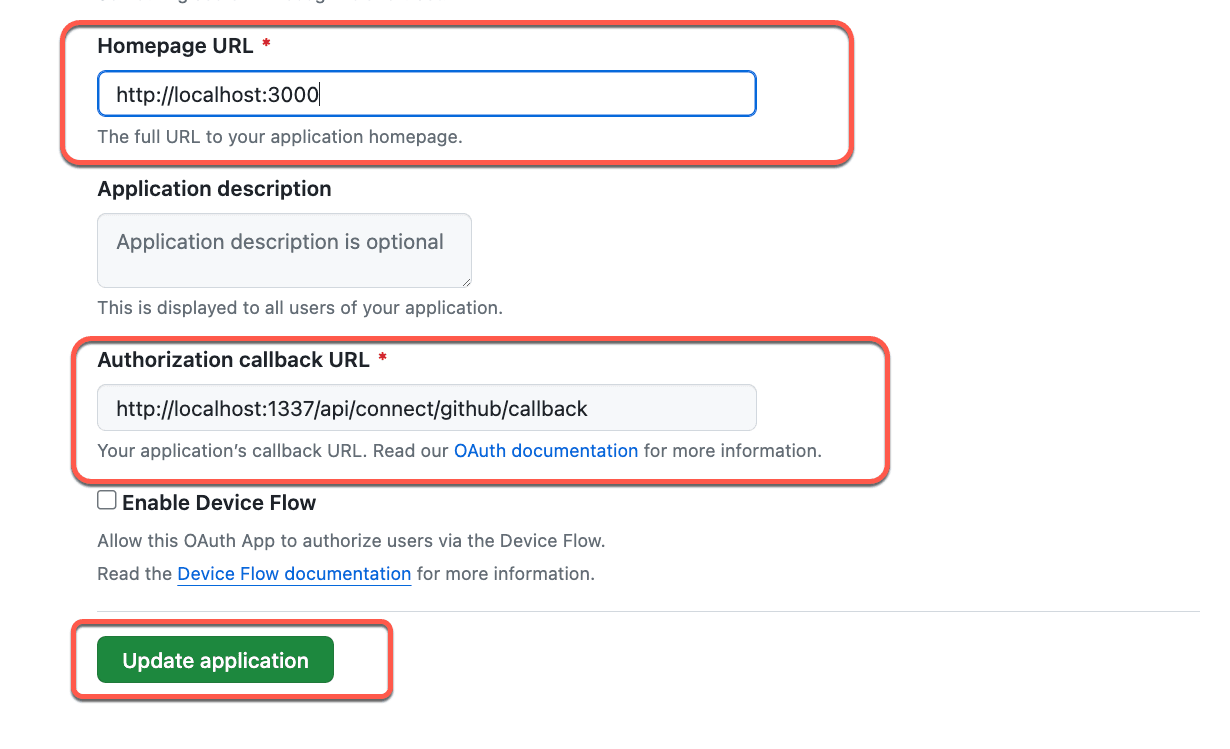
Remember, we have to save our changes.
After Github OAuth is set up, we need to make sure that both our Next.js and Strapi apps are running. We navigate to our project's home page, and let's try our GitHub login button.
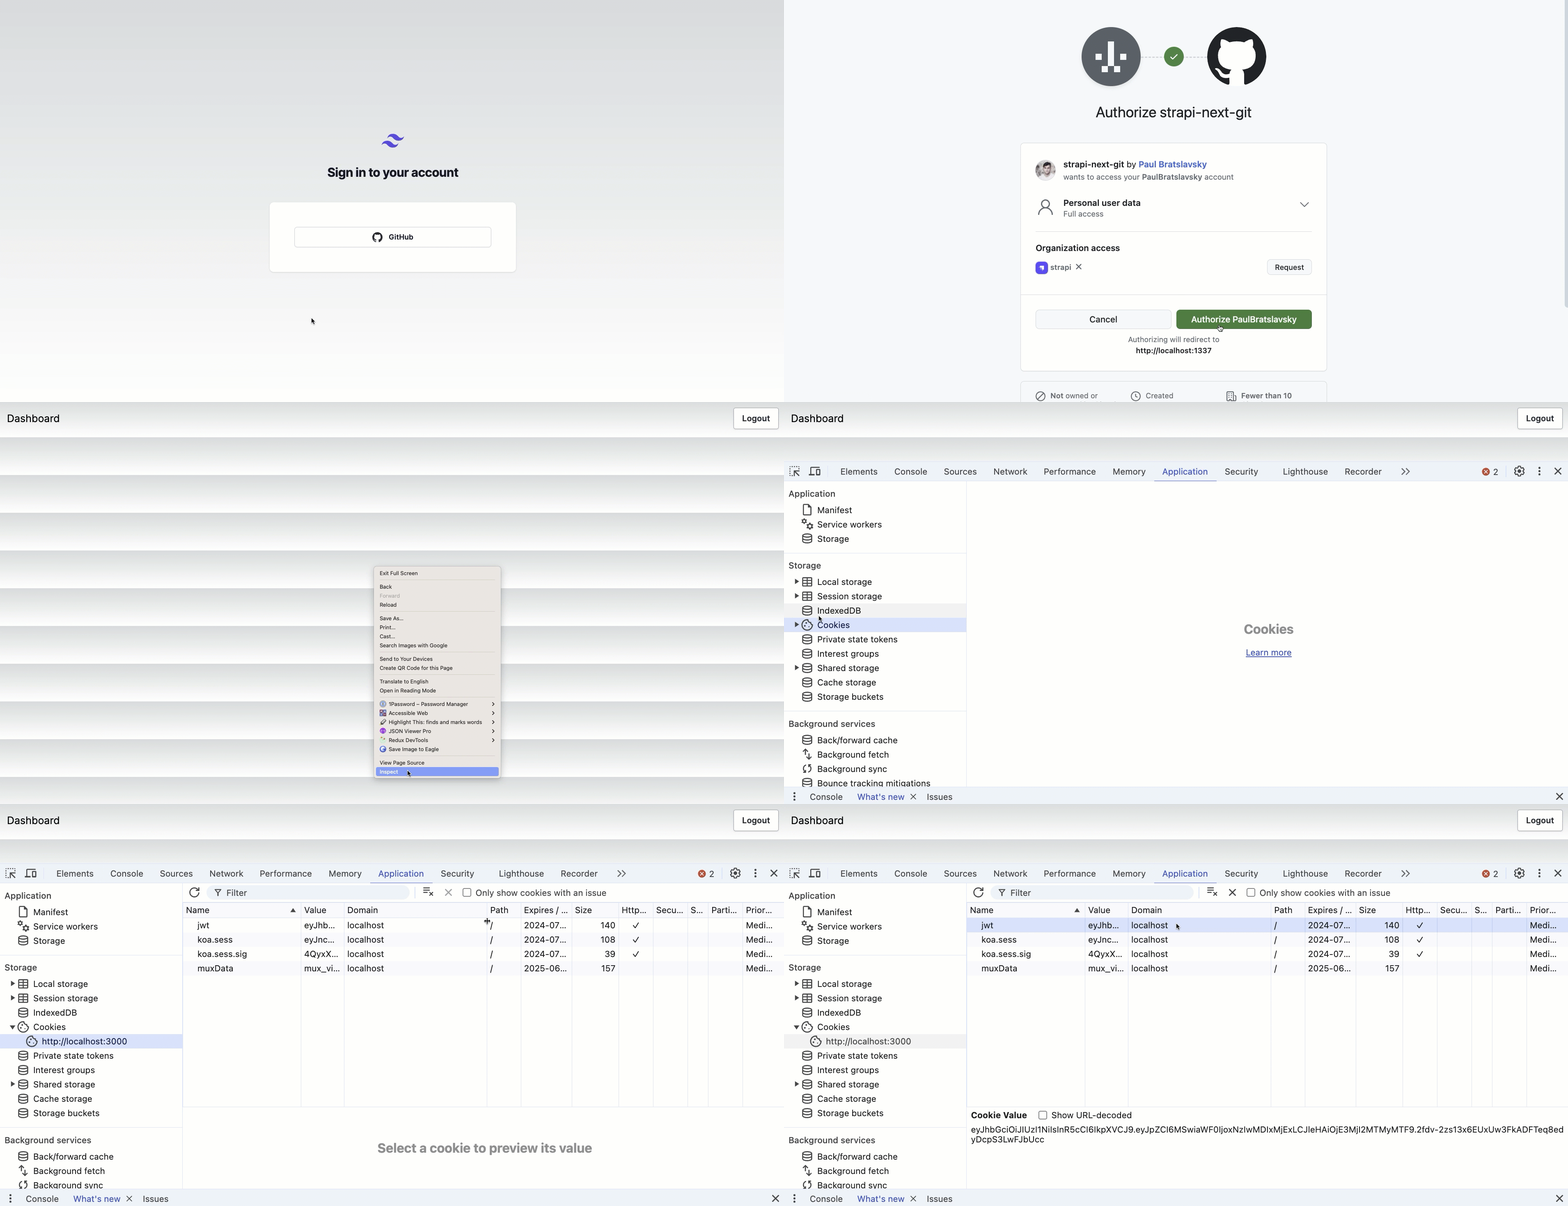
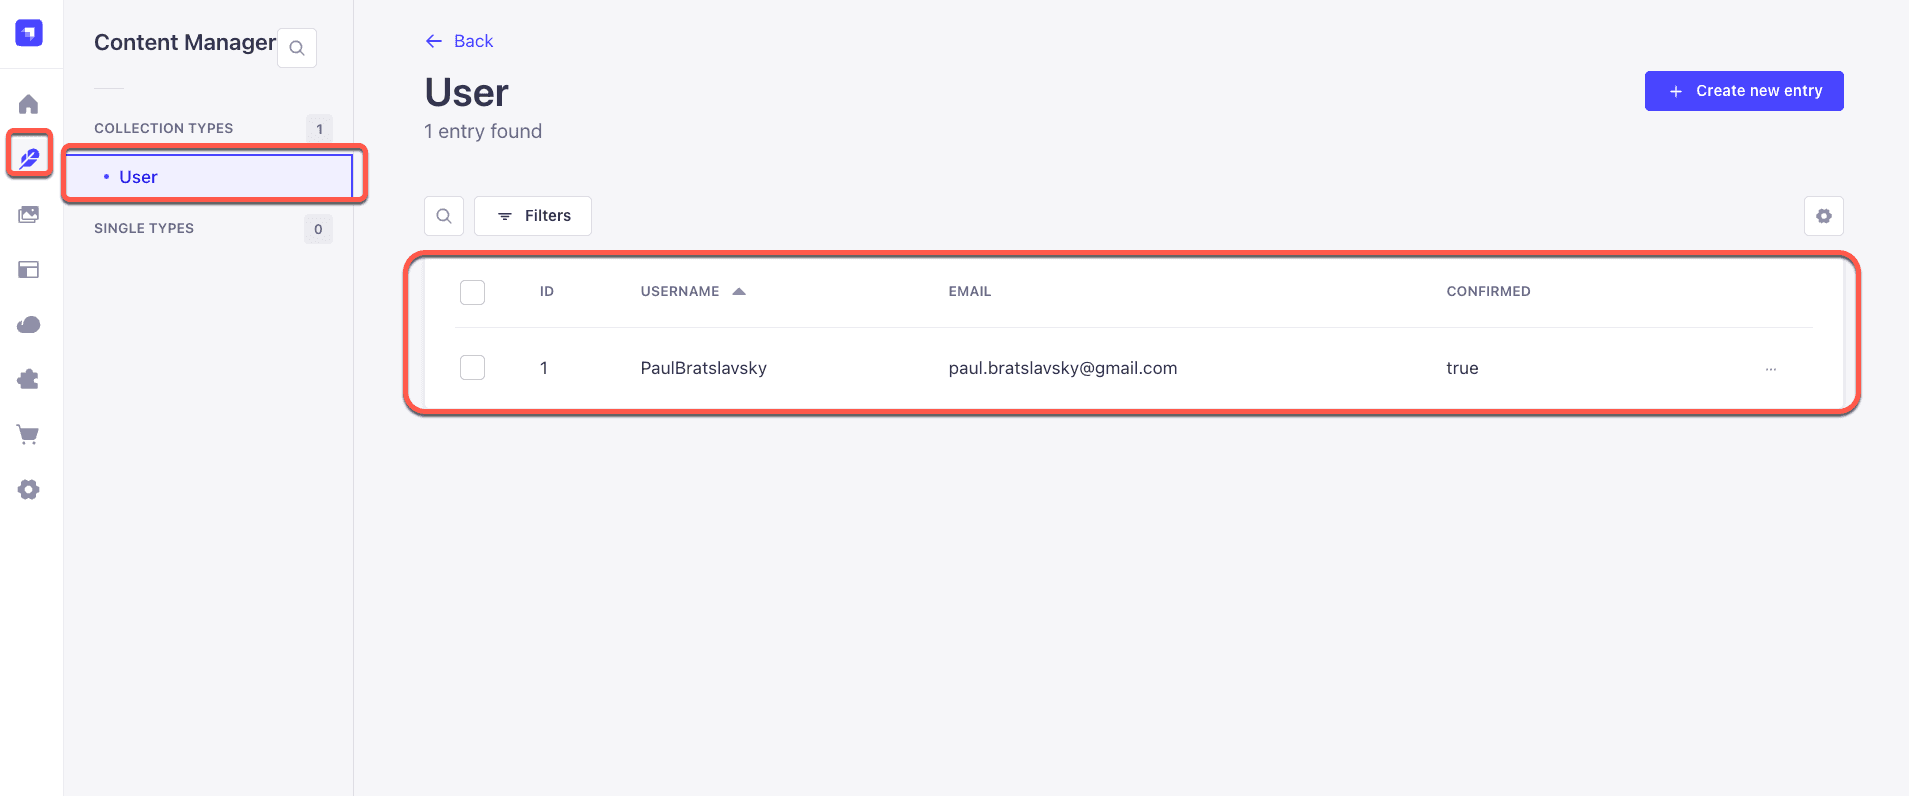
Nice, our create account or login with GitHub is working. We can confirm that a new user was created in our Strapi Admin panel.
Even though we redirected to our Dashboard route, it is still not protected; you can test it by logging out and trying to navigate to it via the browser URL bar.
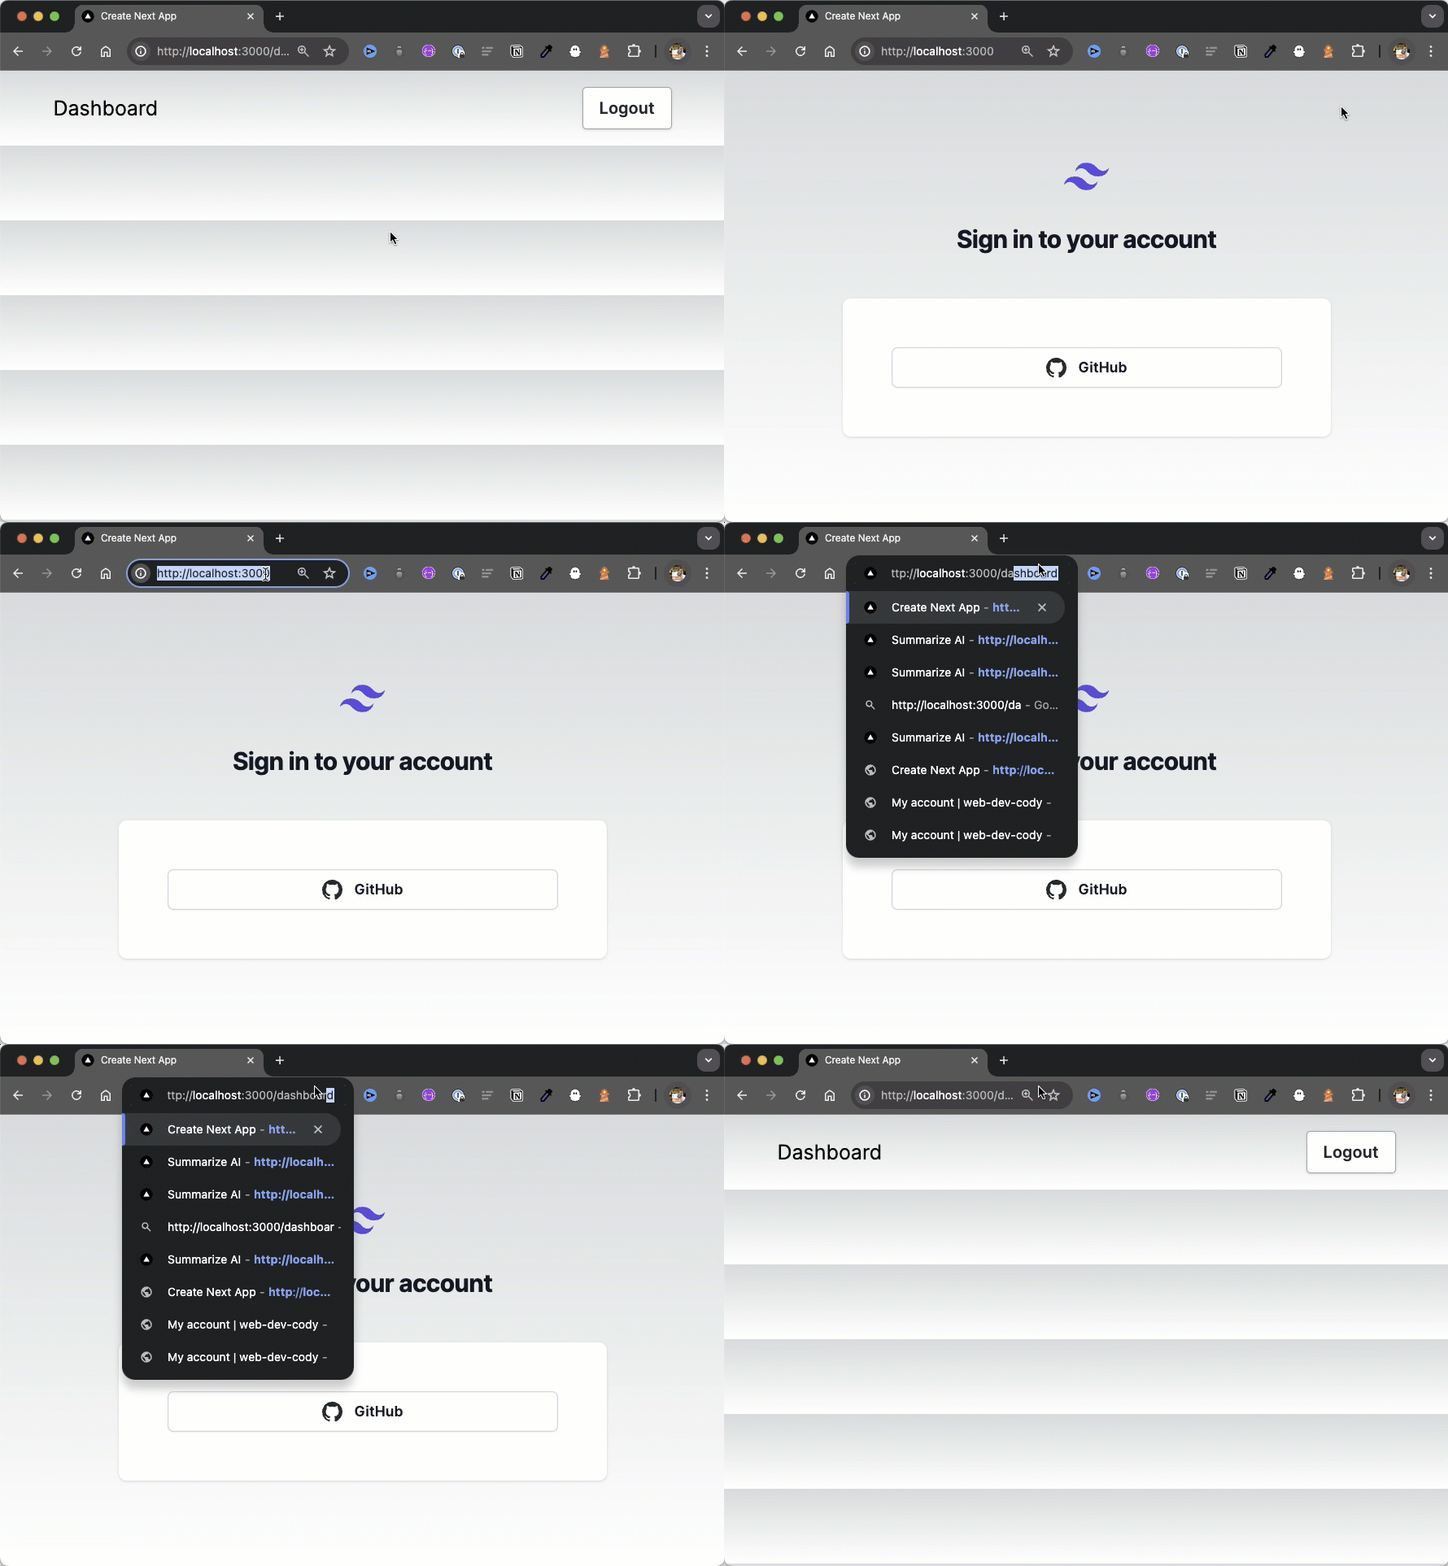
Notice that we can navigate to our Dashboard without logging in. Let's change that.
Private Routes In Next.js via Next.js Middleware
Let's look at how we can create Next.js middleware to make the route private and check whether a user is logged in. By the way, you can learn more about Next.js Auth Middleware here.
Create a Middleware in Next.js
Inside the src folder in our Next.js project, we create a file named middleware.ts and add the following code.
// ./src/middleware.ts

import { NextResponse } from "next/server";
import type { NextRequest } from "next/server";
import { getUserMeLoader } from "@/services/user-me-loader";

export async function middleware(request: NextRequest) {
  const user = await getUserMeLoader();
  const currentPath = request.nextUrl.pathname;

  if (currentPath.startsWith("/dashboard") && user.ok === false) {
    return NextResponse.redirect(new URL("/", request.url));
  }

  return NextResponse.next();
}
In the code above, we use the getUserMeLoader function to get the actual user from Strapi who is logged in.
Then, we check to see if we don't have the logged-in user and redirect them to the home page.
We may wonder why we are looking to get the user info from Strapi instead of using our own JWT token.
That is because we want our source of truth to be the server where our user is actually logged in. So we will make a call to a Strapi endpoint users/me with the provided JWT token. If the token is valid and the user is logged in, we will get the user's data in the response.
Create a Service to Fetch User in Next.js
So, let's create our getUserMeLoader function.
Let's create a folder named services in the src folder. Create a file called user-me-loader.ts and add the following code.
import { cookies } from "next/headers";

export async function getAuthToken() {
  const authToken = cookies().get("jwt")?.value;
  return authToken;
}

export async function getUserMeLoader() {
  const baseUrl =
    process.env.NEXT_PUBLIC_BACKEND_URL ?? "http://localhost:1337";
  const path = "/api/users/me";

  const url = new URL(path, baseUrl);

  const authToken = await getAuthToken();
  if (!authToken) return { ok: false, data: null, error: null };

  try {
    const response = await fetch(url.href, {
      method: "GET",
      headers: {
        "Content-Type": "application/json",
        Authorization: `Bearer ${authToken}`,
      },
      cache: "no-cache",
    });
    const data = await response.json();
    if (data.error) return { ok: false, data: null, error: data.error };
    return { ok: true, data: data, error: null };
  } catch (error) {
    console.log(error);
    return { ok: false, data: null, error: error };
  }
}
The above code fetches our logged-in user from Strapi.
Demo Time!
Now that we have all these components let's test our auth and redirect to see if our Dashboard page is protected. We can secure more pages using the Next.js protected routes ideology.
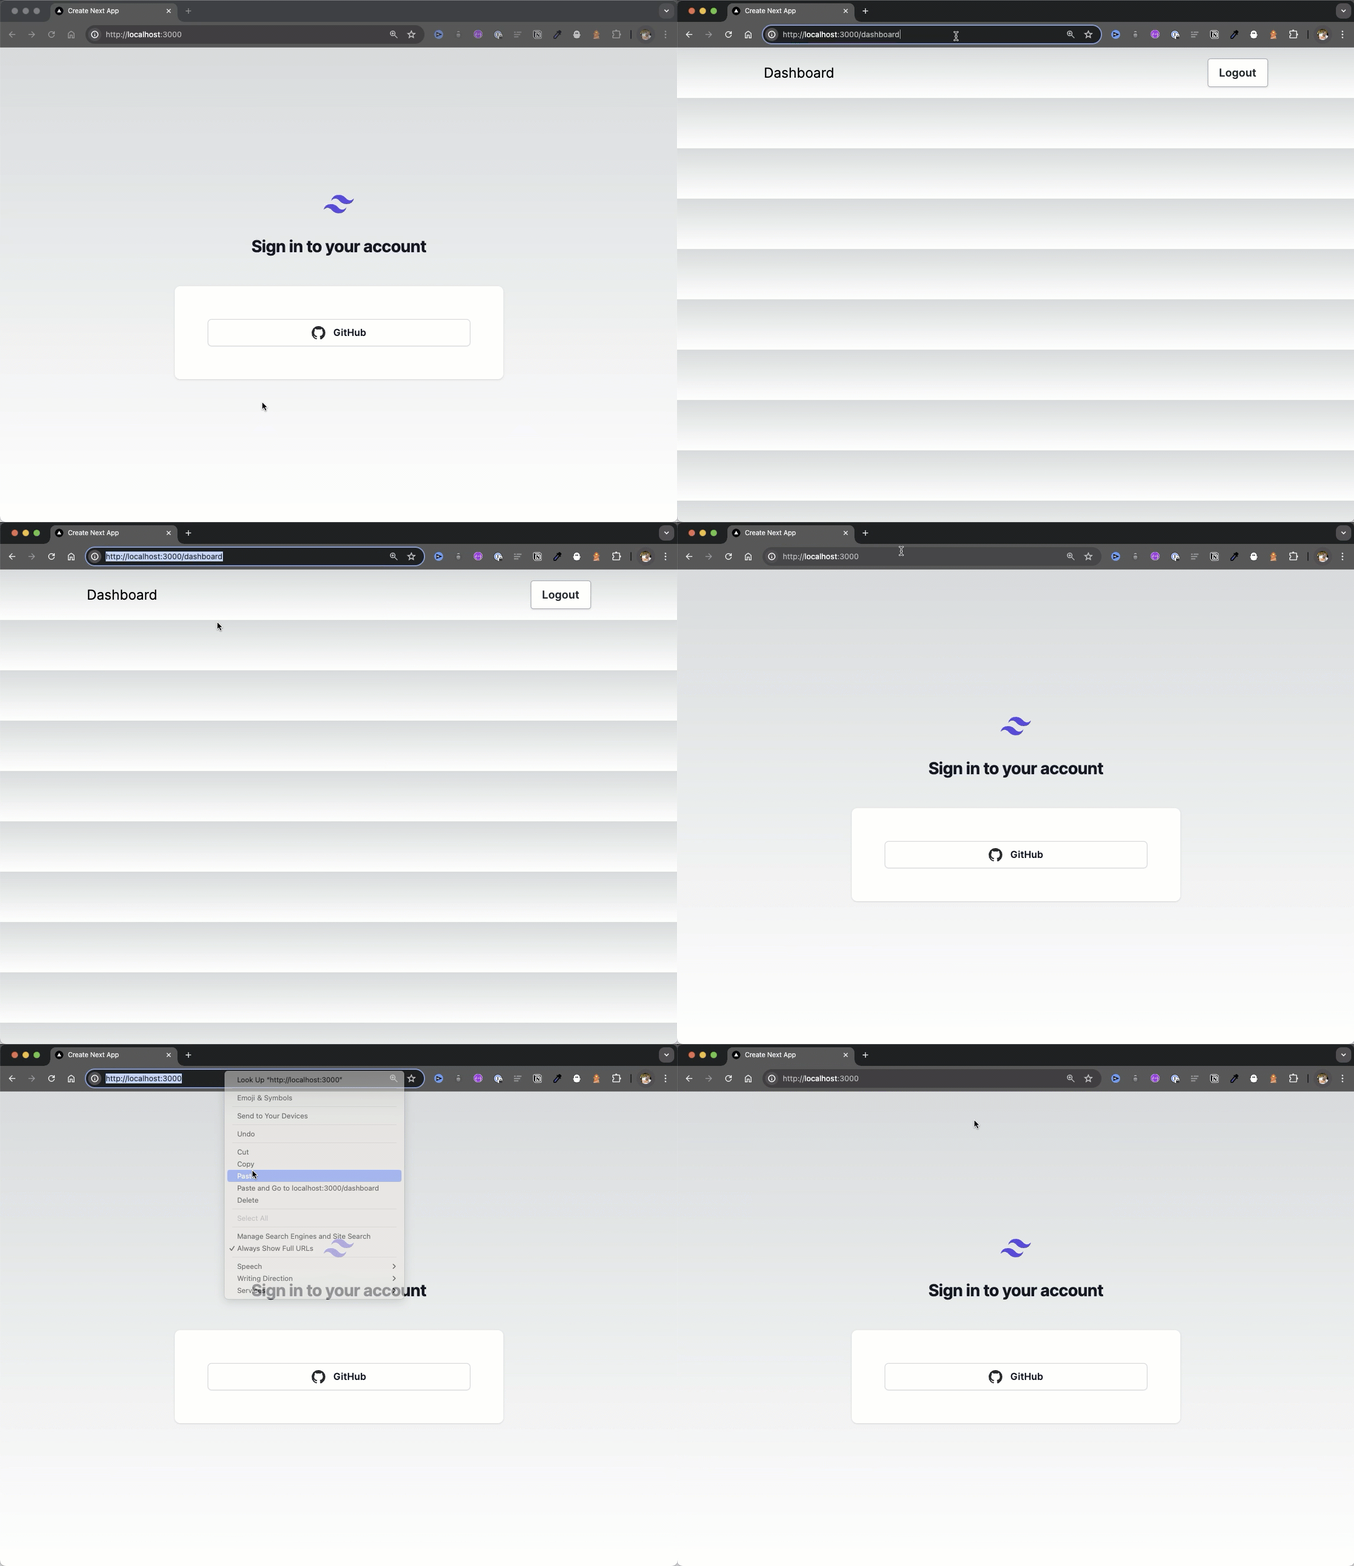
In the image above, we can see that when we try to directly navigate to the /dashboard route, we cannot access it. Our middleware is working.
Conclusion
In this tutorial, we walked through the process of implementing social authentication in a Strapi and Next.js application using the GitHub provider. Next.js GitHub Authentication is one of many ways to implement social login in an application.
We created a dynamic route handle to allow us to add additional providers easily in the future.
We have covered each step in detail, from setting up our Next.js frontend, creating a user-friendly sign-in form to configuring Strapi, and handling the authentication flow with Next.js middleware for route protection.
By following these steps, we have a secure and efficient authentication system that enhances user experience by leveraging GitHub OAuth with Strapi for social login.
This setup simplifies the login process for users and ensures that our application remains secure and scalable.
Thank you for checking out this tutorial, and happy coding!
Community Support
And remember, if you ever have questions, you can always join us on our Discord during the "Open Office Hours."
Morning Session:
Join us at 4 AM CST (9:00 AM GMT) for our new early bird session. Perfect for our global community members!
Afternoon Session:
Remember our regular session at 12:30 PM CST (6:30 PM GMT). It's a great time for an afternoon break and chat!