Introduction
Publishing content is only one part of a modern content workflow. While Strapi handles content creation and publishing, many teams still rely on other tools to manage their editorial process.
The challenge comes after publishing. Someone still needs to update the tracker, add the live URL, change the status, and notify the team. These small tasks quickly become repetitive and easy to miss as your workflow scales.
Automation solves this by turning a publish event in Strapi into a trigger for the rest of your content workflow.
Video Resource
Here is the video for this tutorial below.
What You Will Learn
In this tutorial, you will build an automation workflow using Strapi and n8n that automatically performs the following steps whenever content is published:
- Receives a publish event from Strapi with a webhook
- Checks Airtable for the matching content assignment
- Generates the live URL for the published entry
- Updates Airtable with the publish date, status, and URL
- Sends a Slack notification to your team
- Emails editors when no matching Airtable record is found
This workflow keeps your editorial tracker synchronized with your CMS without requiring manual updates.
By the end, you will have a production-friendly workflow that connects your CMS to your editorial operations.
What you will build
Here is the flow you will create:
Strapi publish event → n8n webhook → Airtable search → Airtable update → Slack notification
If the Airtable record is missing, the workflow follows a fallback path and emails the editors instead.
This setup is useful for teams that manage:
- Editorial calendars in Airtable
- Content production in Strapi
- Publication notifications in Slack
- Operational follow-up through email
Prerequisites
Before you begin, make sure you have the following:
- A Strapi project
- An n8n instance running locally or in the cloud
- An Airtable base with a table for content assignments
- A Slack workspace connected to n8n. Check out how to connect one here.
- A Gmail account or another email provider configured in n8n. Check out how to connect one here.
You should also have a Content type in Strapi that includes at least:
titleslugpublishedAt(This is provided by Strapi by default)
In this tutorial, the workflow supports multiple content models, including:
Blog-PostIntegrationComparator
To quickly integrate Strapi and n8n, check out the Strapi and n8n integration page.
What is Automation?
Automation is the process of using software to perform tasks automatically without manual intervention.
Instead of repeating the same steps every time an event occurs, automation allows you to define a set of rules that handle those tasks for you.
Key Attributes of Automation
- Data Transfer: moving information from one system to another
- Trigger: an event that starts the automation (manual, scheduled, or app-based)
- Filter (Conditions): rules that decide whether the workflow should continue
- Actions: tasks performed after the trigger, such as updating records or sending notifications
Benefits of Automation
Some key benefits include:
- Saves time by removing repetitive tasks
- Reduces human error by standardizing processes
- Improves team visibility through automatic notifications
- Keeps tools in sync across your workflow
- Scales easily as your content production grows
What is a Workflow?
A workflow is a sequence of automated steps that connect a trigger to one or more actions.
At its core: Trigger + Filter + Action = Workflow
For example, when a blog post is published (trigger), check if a matching record exists (filter), then update a tracker and notify the team (actions).
n8n Basics
n8n is a workflow automation tool that lets you connect different applications and automate processes visually.
It works by linking together different steps (called nodes) into a workflow.
There are two key concepts in n8n:
- Webhooks (Reverse API) – allow external apps like Strapi to send data to n8n in real time
- APIs – allow n8n to send or retrieve data from other services like Airtable, Slack, or Gmail.
n8n Nodes
Nodes are the building blocks of an n8n workflow.
Each node performs a specific task, such as receiving data, transforming it, or sending it to another service.
You can:
- Execute a node
- Configure its settings
- Duplicate or delete it
- Connect it to other nodes
Categories of Nodes in n8n
1. Entry Point Nodes: These start the workflow. Examples include Webhook and Schedule Trigger 2. Function / Processing Nodes: These transform or prepare data. Examples include Set node (define variables), Code node (custom logic), and If node (conditional logic) 3. Exit / Action Nodes:: These perform actions in external systems. Examples are Airtable (create/update records), Slack (send messages), and Gmail (send emails).
Types of Nodes
n8n provides different types of nodes depending on what you want to achieve:
- Triggers: start workflows (Webhook, Cron)
- Actions in Apps: interact with services like Slack, Airtable, Gmail
- Data Transformation: modify or format data (Set, Code)
- Flow Control: control logic (If, Switch)
- Files: handle file uploads/downloads
- Advanced Nodes: for custom or complex operations
Now, let's create a workflow!
Prepare your Airtable table
Start by creating an Airtable table to track your content assignments.
Your table can include fields like these:
- Assignment Name – the article title used to match Strapi entries
- Assignment Status – the editorial status
- Publish Date – the date the entry went live
- URL – the live URL of the published entry
The key thing here is consistency.
This workflow searches Airtable by title, so the Assignment Name field in Airtable must exactly match the title of the Strapi entry.
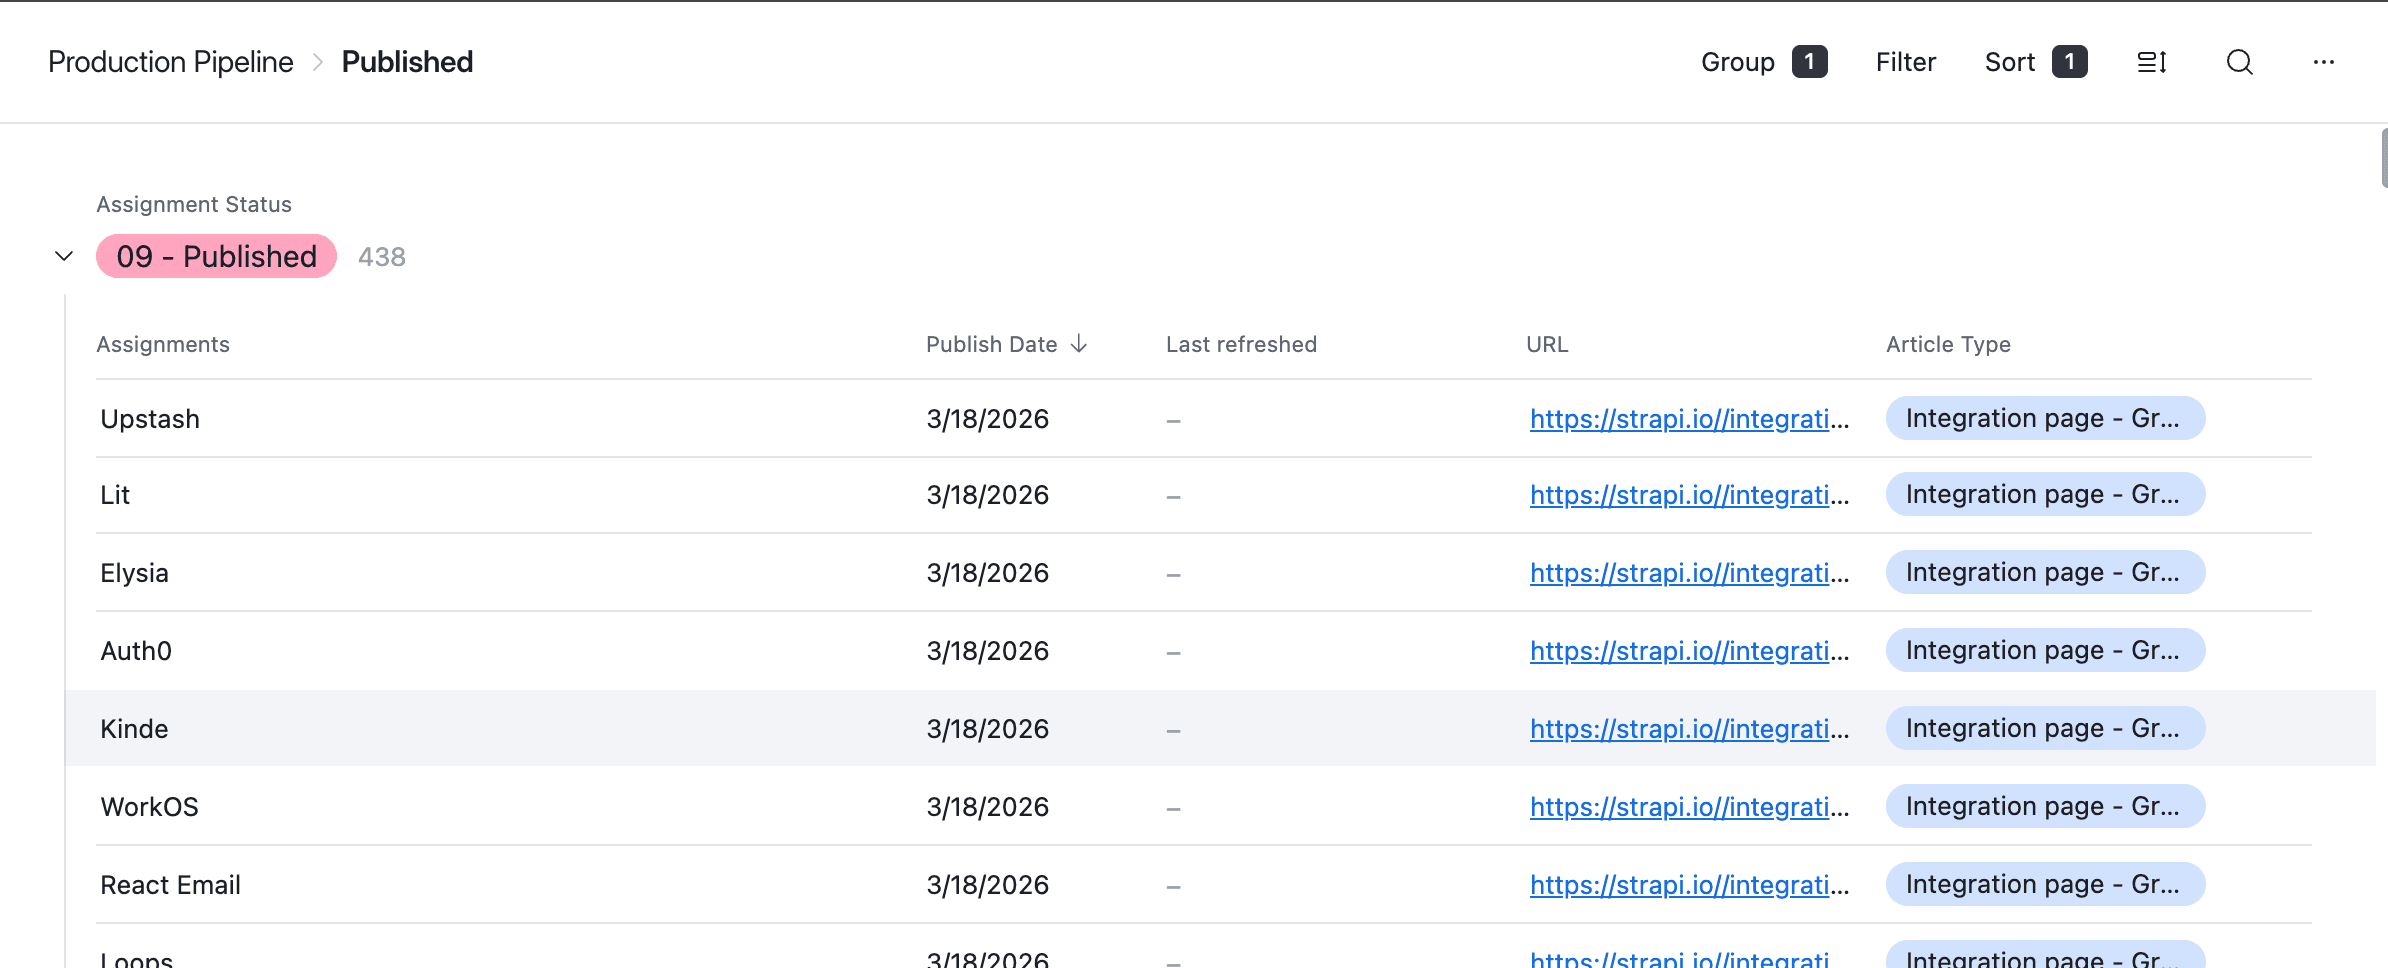
For example:
| Assignment Name | Assignment Status | Publish Date | URL |
|---|---|---|---|
| How to Build a Blog with Strapi | 08 - Ready to Publish |
Once the matching Strapi entry is published, the workflow updates that row automatically.
Create a Webhook in n8n
The workflow begins with a Webhook trigger node in n8n.
Configure it like this:
- HTTP Method:
POST - Path:
posts
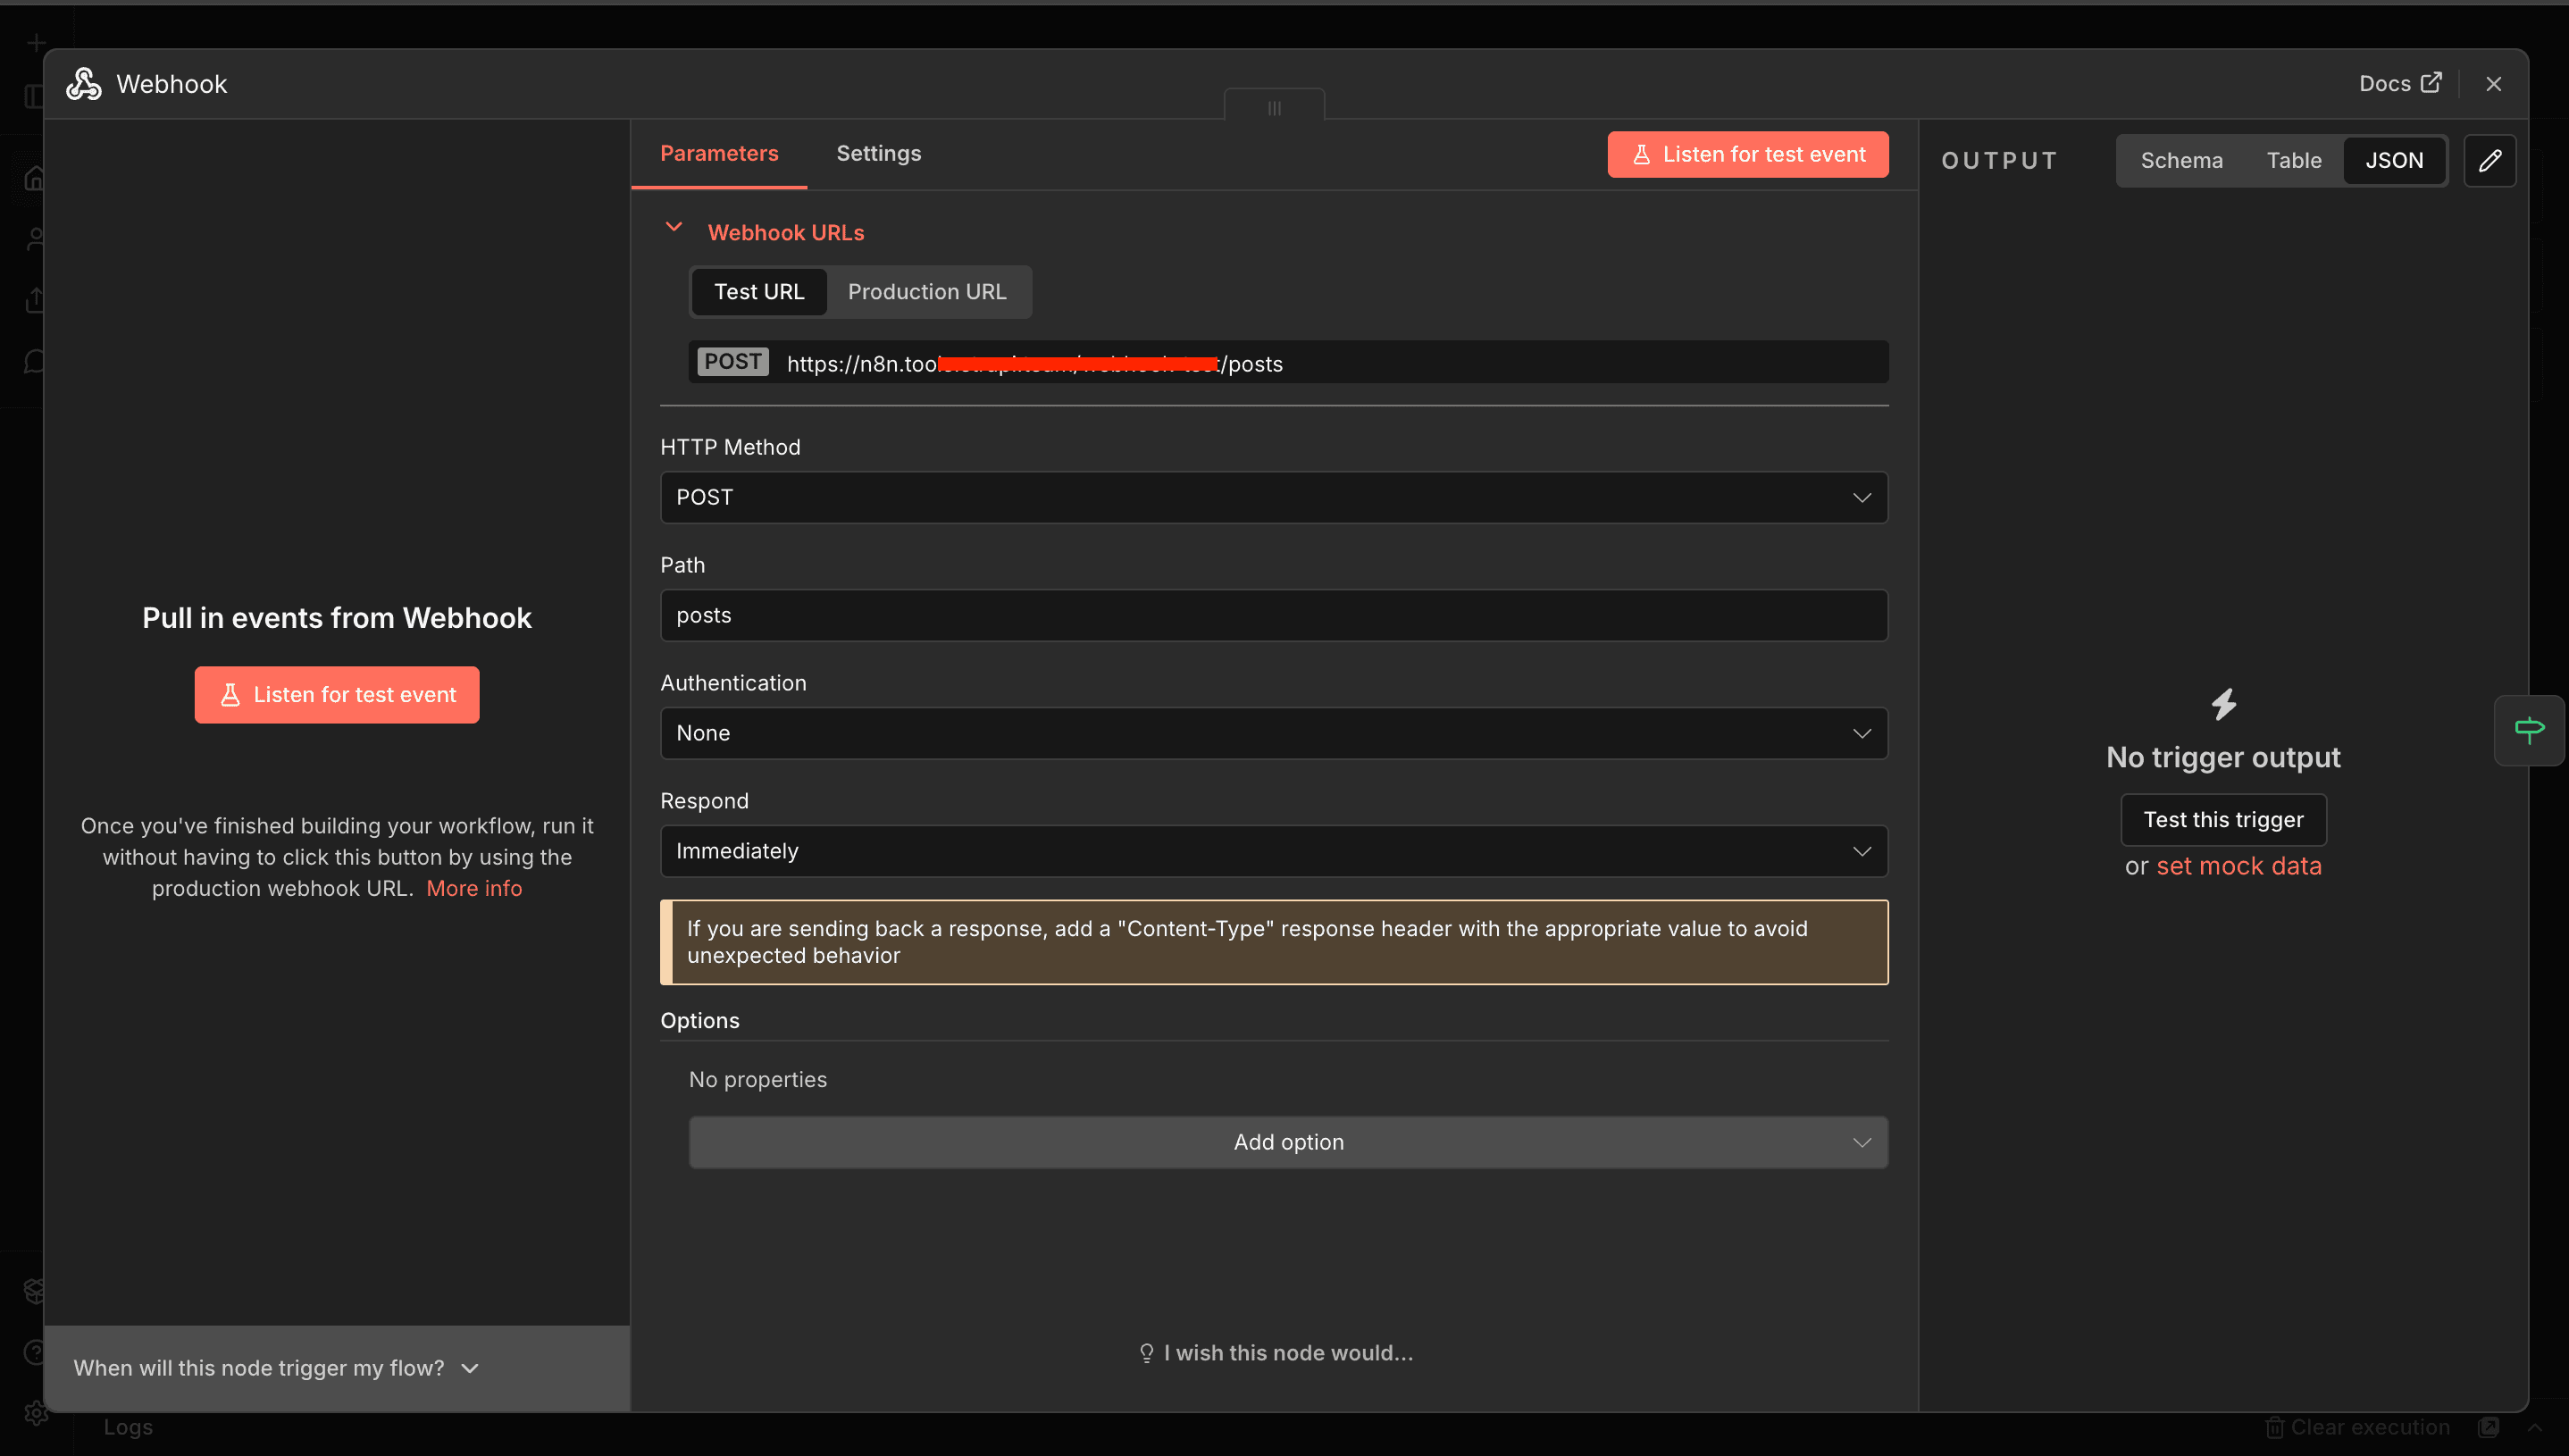
This gives you a webhook endpoint that Strapi can call whenever an entry is published.
Why use a webhook?
A webhook allows Strapi to push events to n8n in real time. That means your automation runs exactly when content is published instead of relying on a polling schedule.
Configure Strapi to Send the Publish Event
In Strapi, add a webhook that points to your n8n endpoint.
You want Strapi to send events when entries are published.
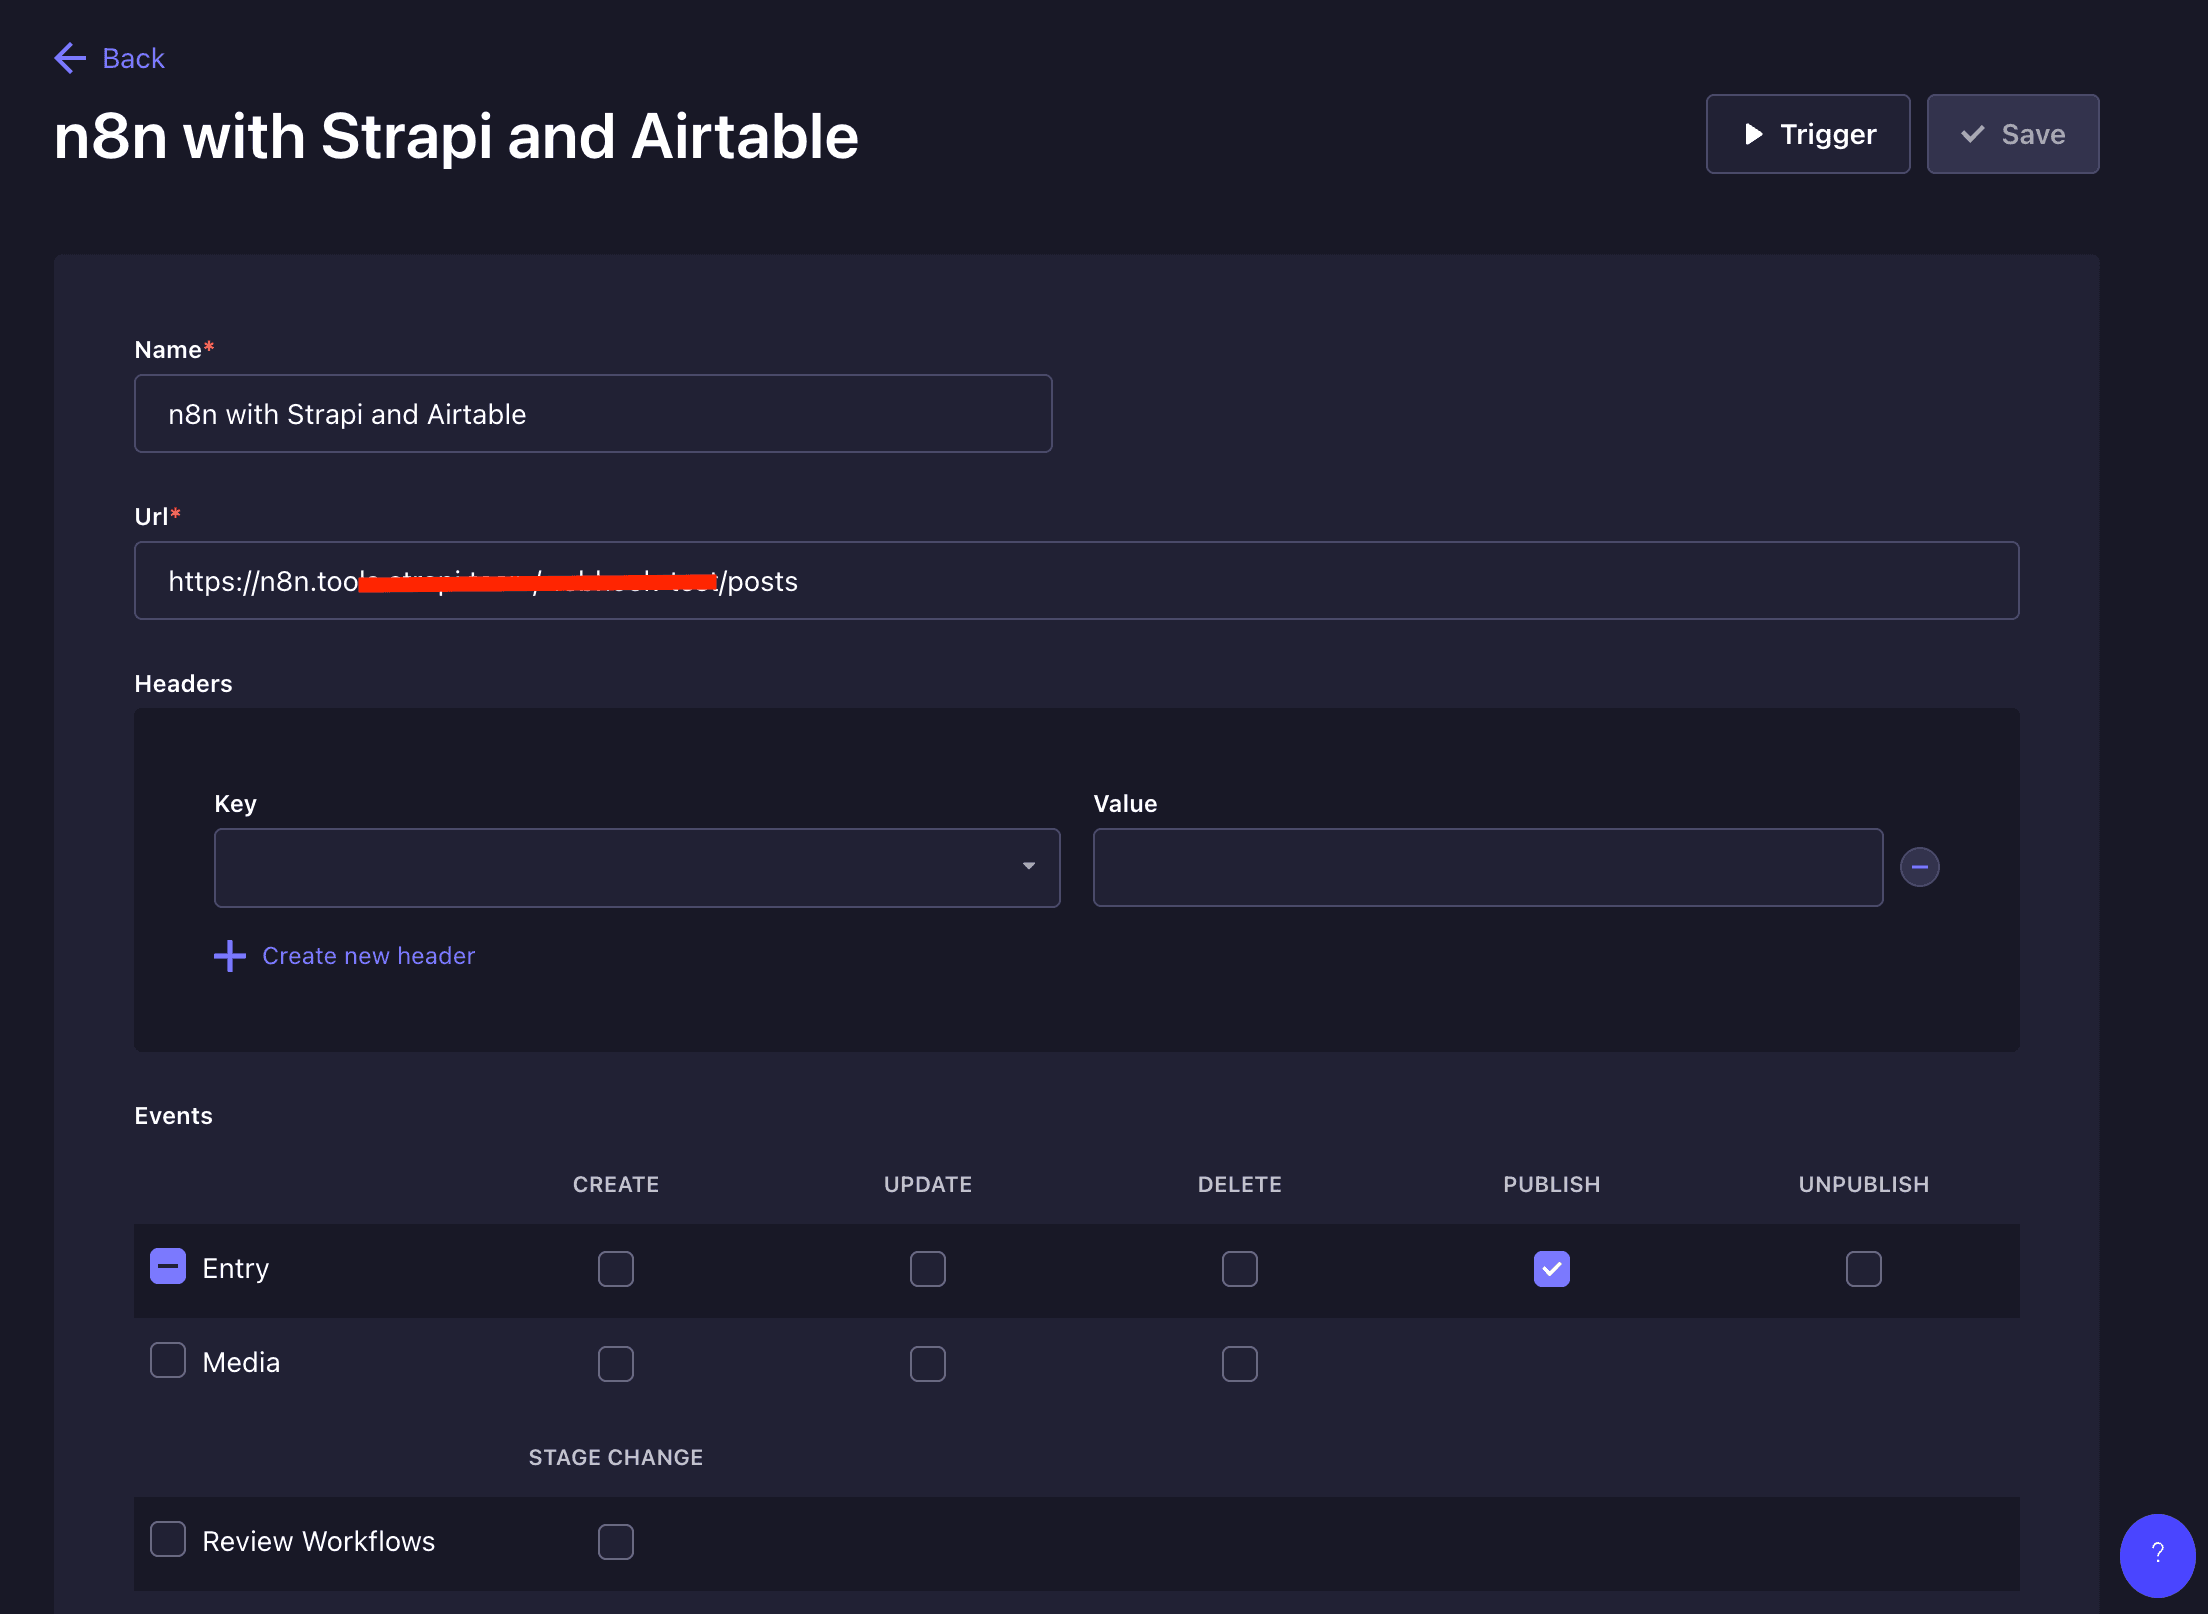
The event payload should include information about the entry, including:
- The event name
- The model name
- The entry title
- The slug
- The published date
Your n8n workflow expects a payload structure like this:
...
{
  "event": "entry.publish",
  "model": "blog-post",
  "entry": {
    "title": "How to Automate Publishing with Strapi",
    "slug": "how-to-automate-publishing-with-strapi",
    "publishedAt": "2026-03-10T16:22:07.594Z"
  }
}
...
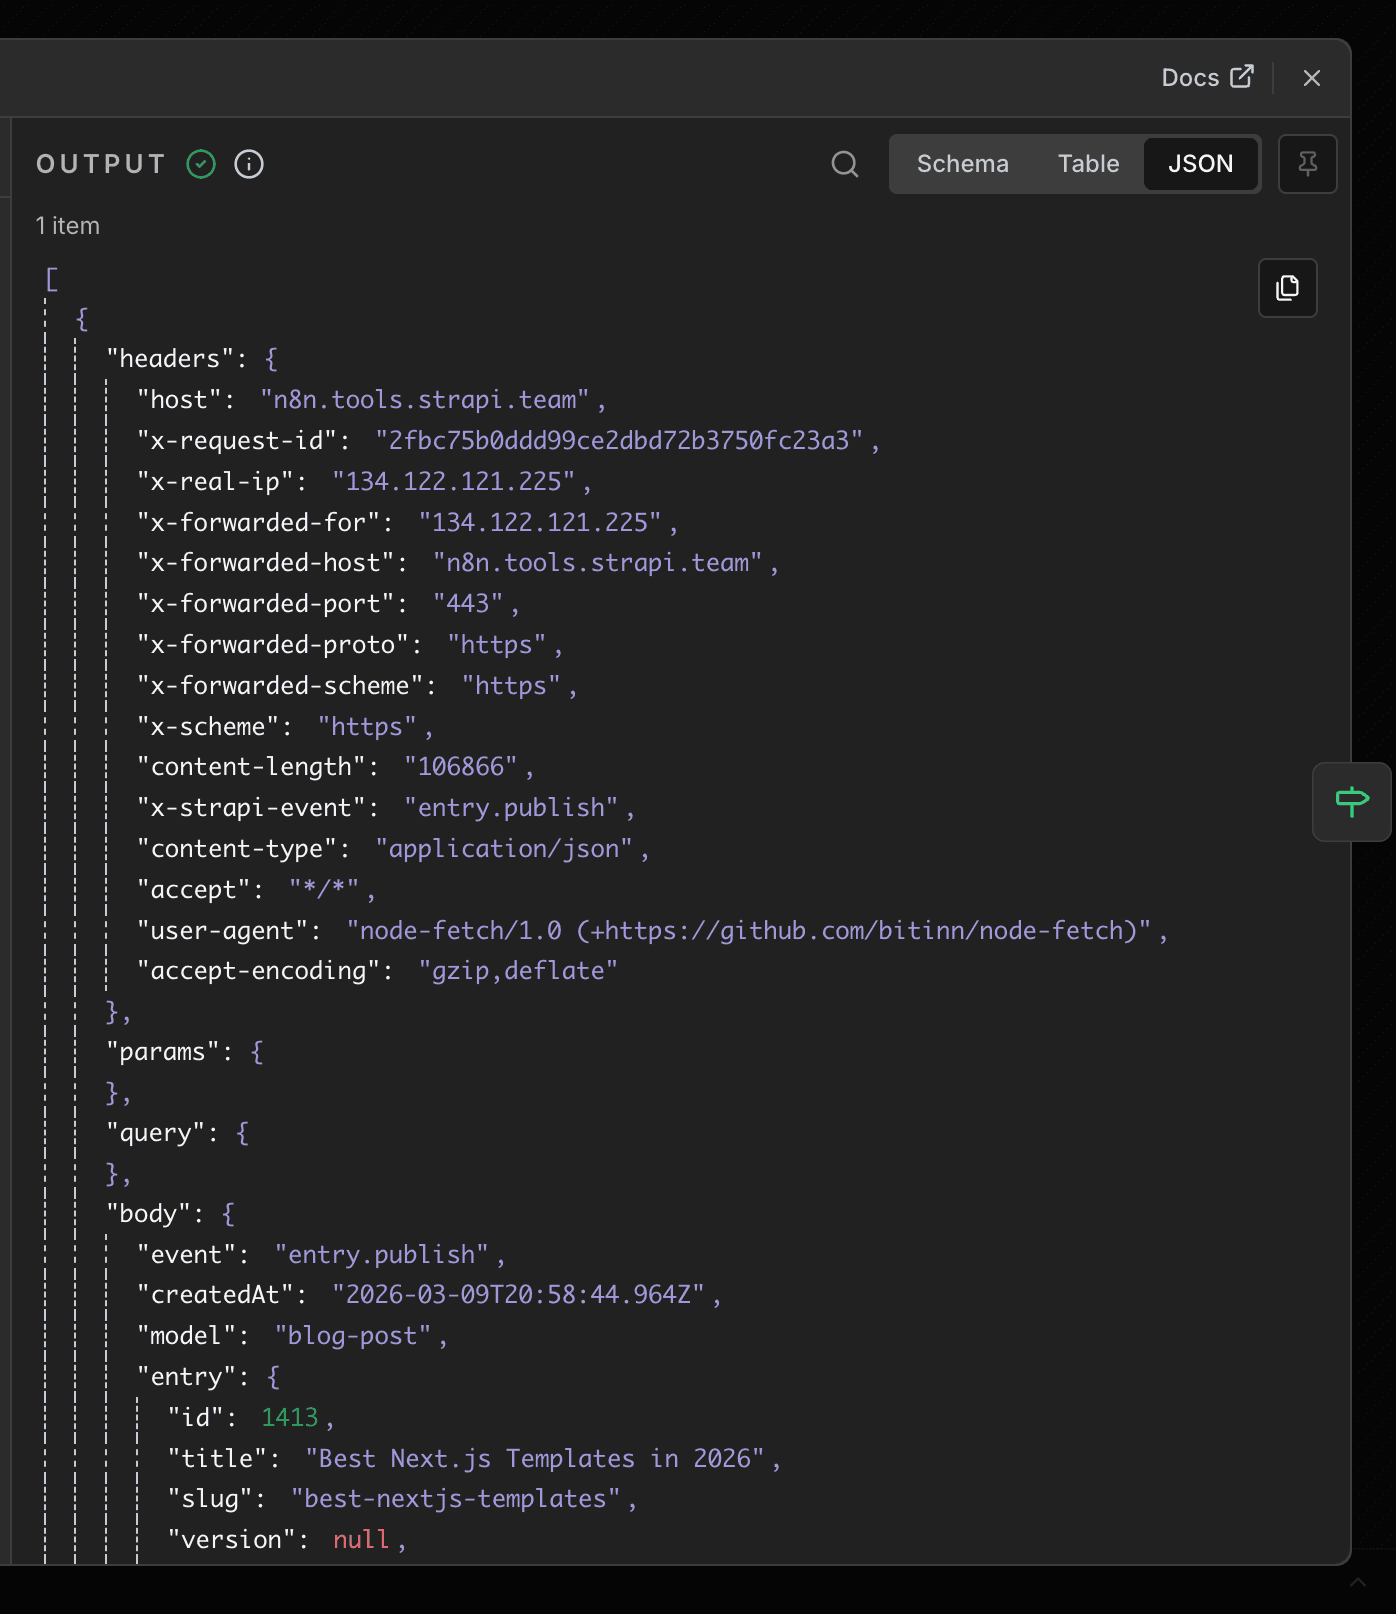
Once your webhook is active, publishing a Strapi entry will trigger the workflow.
Here is an example webhook event:
Filter Workflow to run only on publish
After the webhook node, add an If node in n8n. This node checks whether the incoming event is actually entry.publish.
Use a condition like this:
{{ $json.body.event }} === 'entry.publish'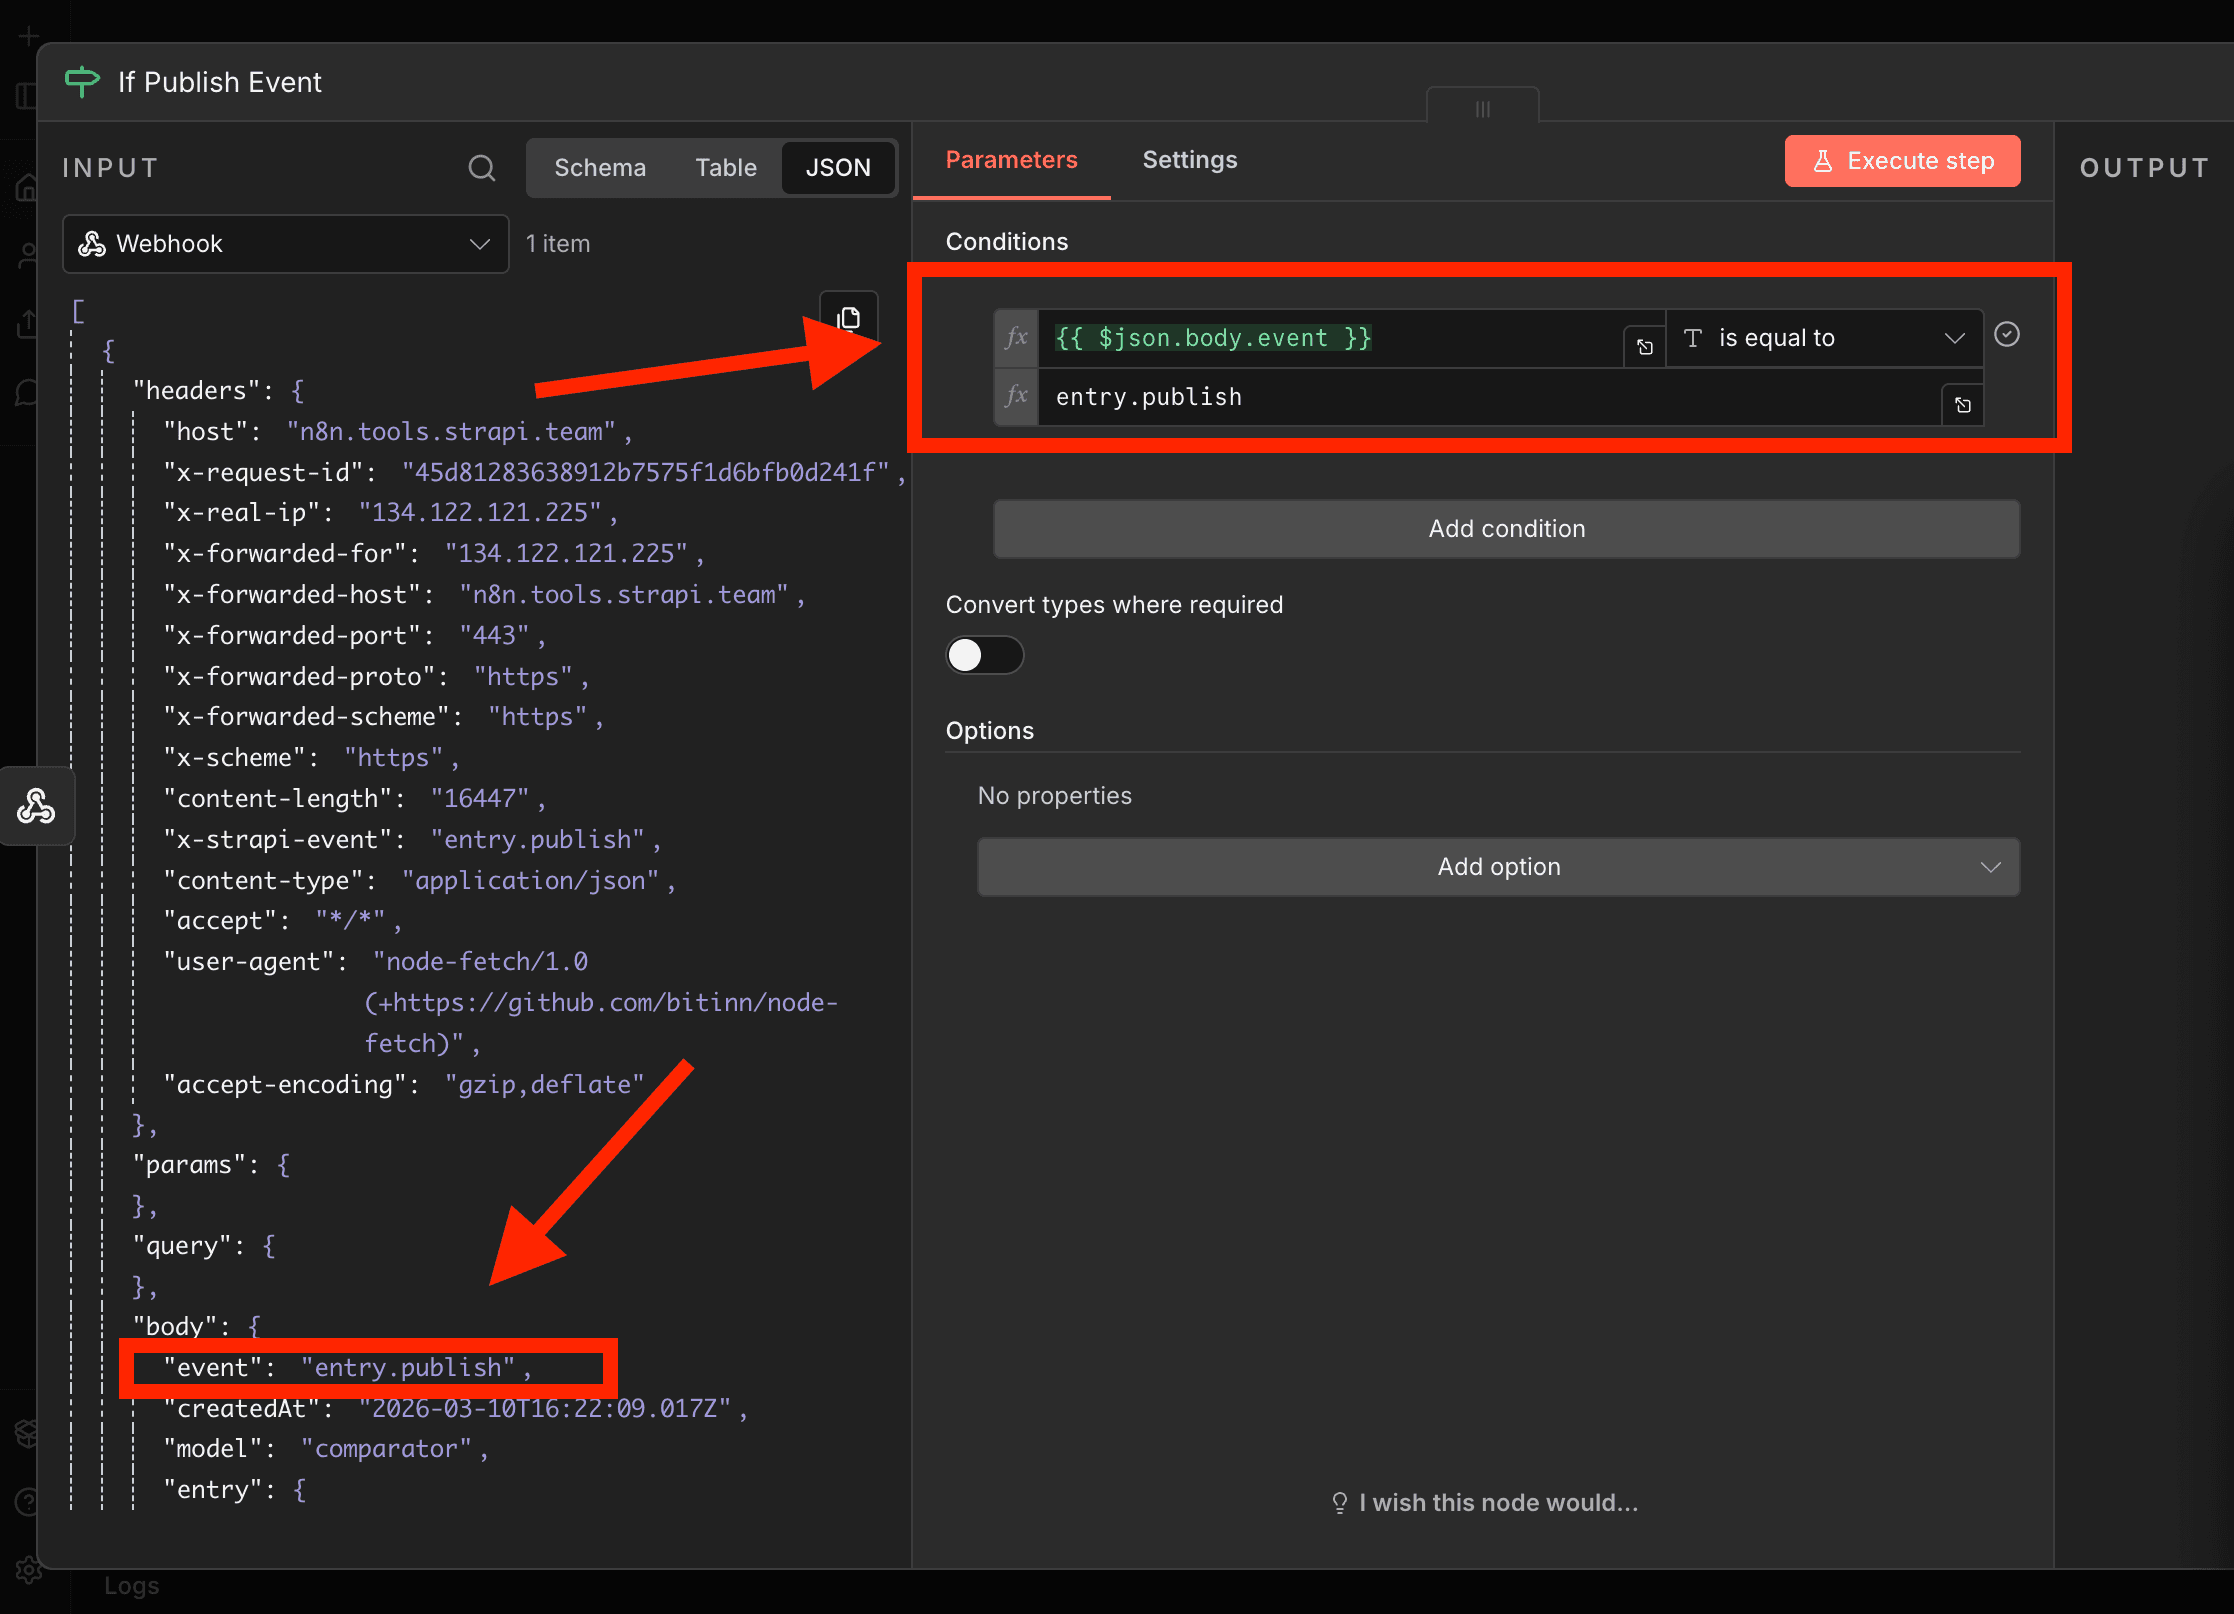
This step prevents the workflow from running on unrelated events.
That is especially useful if your Strapi webhook setup sends multiple event types to the same endpoint.
Set your Airtable Search Values
Next, add a Set node to prepare the Airtable search configuration.
In your workflow, this node defines String values like:
AIRTABLE_BASE_ID: This is the unique identifier of your Airtable base. Every Airtable workspace (called a base) has its own ID, and it tells n8n which database to query.FIELD_NAME: This is the name of the field used to search for a matching record in Airtable.SEARCH_TITLE: This is the actual value used to find the matching record. It comes directly from the Strapi webhook payload:TABLE_ID: Inside each Airtable base, you can have multiple tables. TheTABLE_IDspecifies which table contains your content assignments. In this tutorial, that table is your Assignments table.
✋ NOTE: You can use n8n Environment variable feature to add your sensitive data. But we won't use it for this tutorial.
Example values:
AIRTABLE_BASE_ID: appX7f9K2LmN8QpR4
FIELD_NAME: Assignment Name
SEARCH_TITLE: {{ $json.body.entry.title }}
TABLE_ID: tblA1b2C3d4E5f6G7
This makes the next search step easier to manage and reuse.
Search Airtable for the matching assignment
Add an Airtable node and set the operation to Search.
This node looks for the record whose Assignment Name matches the title of the published Strapi entry.
Your formula can look like this:
{{ '{' + String($json.FIELD_NAME).replace(/[{}]/g, '').trim() + '}' }} = "{{ $json.SEARCH_TITLE.trim() }}"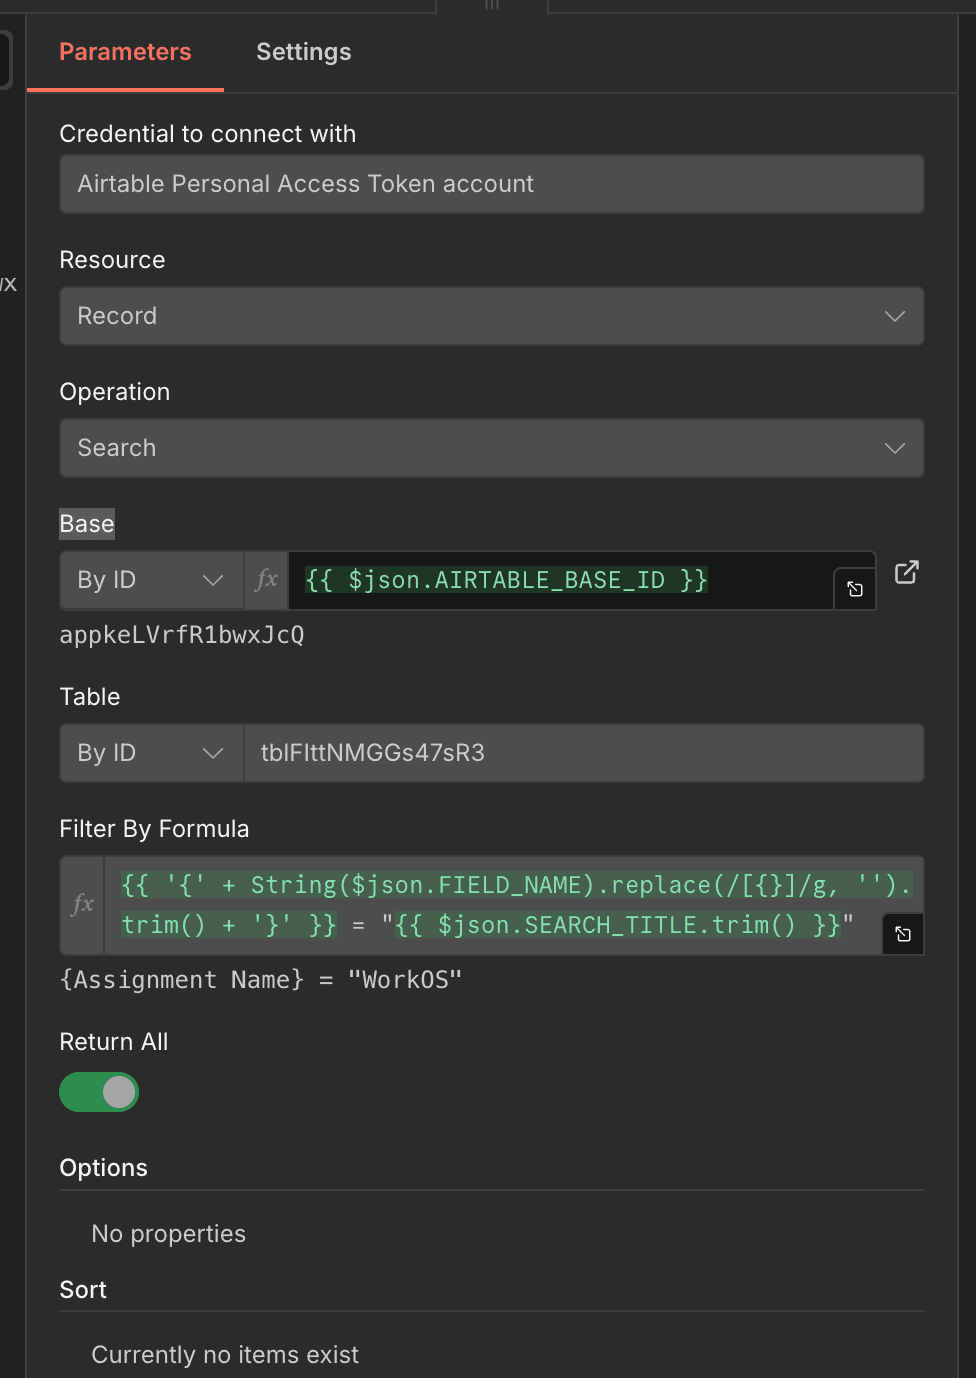
What this does
It dynamically builds an Airtable formula using the field name and the title from the Strapi webhook.
If a record is found, the workflow continues.
If no record is found, the workflow takes the fallback path and sends an email to your editors.
Here is the output of a matched record:
Handle the Missing Record Case
Add an If node after the Airtable search to check whether a record was found.
In your workflow, this condition checks whether id exists on the Airtable search result.
If the record does not exist, the workflow does two things:
- Defines editor email addresses in a Set node
- Sends an email using the Gmail node with a clear explanation of the error
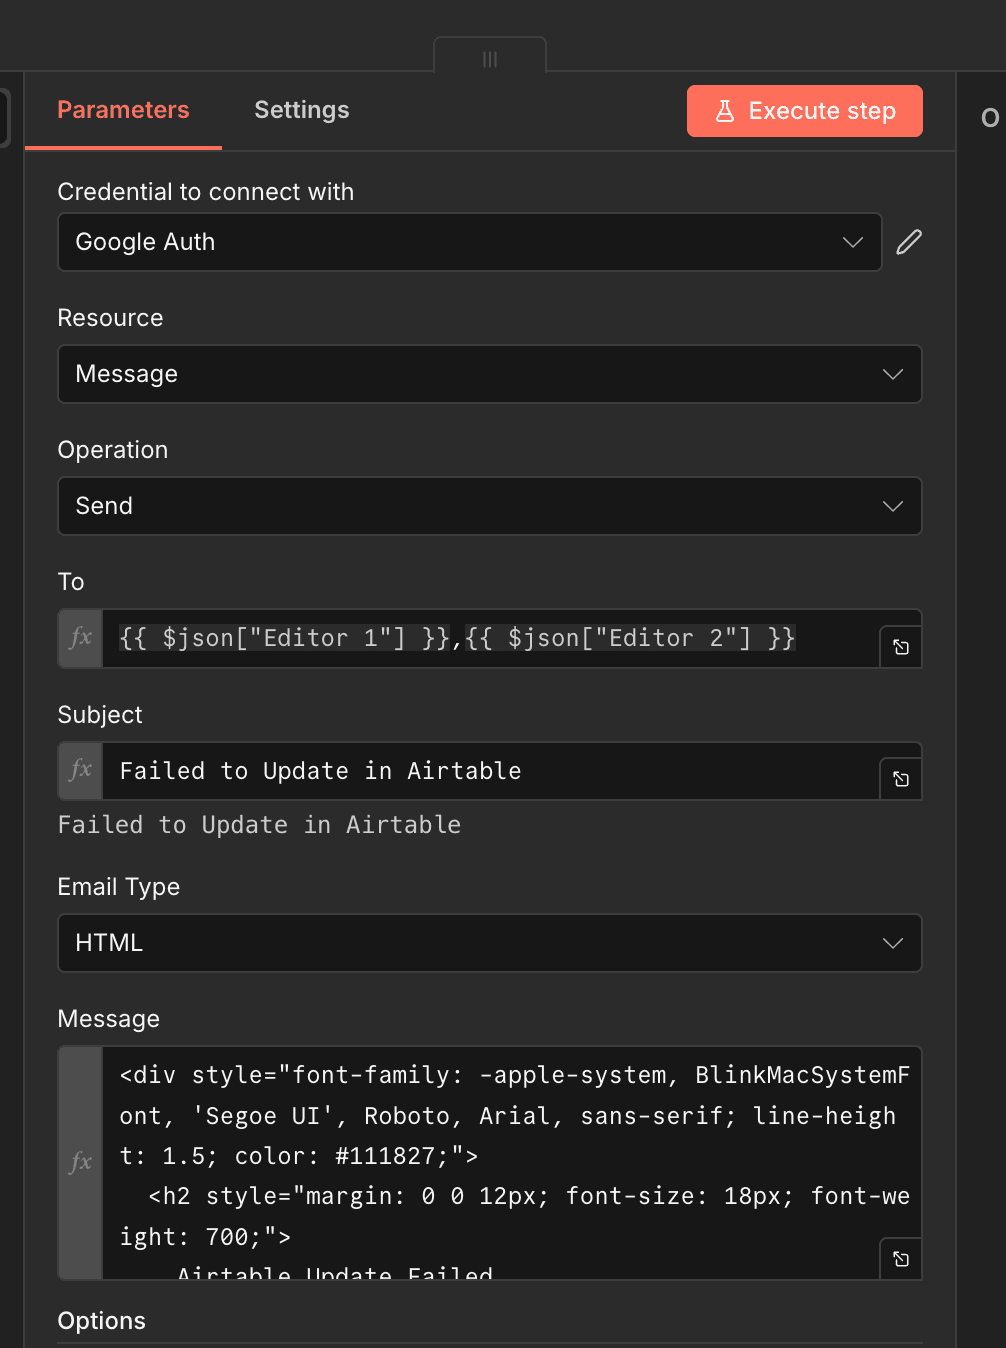
You can check out the n8n Google credentials page to learn more about authenticating your Google account.
This is a smart operational pattern. Instead of failing silently, the workflow tells the team exactly what went wrong.
Here is the message to the editors written in HTML.
Example email message
<div style="font-family: -apple-system, BlinkMacSystemFont, 'Segoe UI', Roboto, Arial, sans-serif; line-height: 1.5; color: #111827;">
  <h2 style="margin: 0 0 12px; font-size: 18px; font-weight: 700;">
    Airtable Update Failed
  </h2>

  <p style="margin: 0 0 12px;">
    The assignment status for the post titled
    <strong>{{ $('Webhook').item.json.body.entry.title }}</strong>
    could not be updated in Airtable.
  </p>

  <div style="margin: 16px 0; padding: 12px 14px; background: #FEF3C7; border: 1px solid #F59E0B; border-radius: 8px;">
    <p style="margin: 0; font-weight: 600;">What happened?</p>
    <p style="margin: 6px 0 0;">
      The record could not be fetched from Airtable because no matching title was found.
    </p>
  </div>

  <div style="margin: 16px 0; padding: 12px 14px; background: #EFF6FF; border: 1px solid #60A5FA; border-radius: 8px;">
    <p style="margin: 0; font-weight: 600;">How to fix it</p>
    <p style="margin: 6px 0 0;">
      Make sure the <strong>Entry Title</strong> in Strapi exactly matches the title in Airtable (including spelling, spacing, and punctuation).
    </p>
  </div>
</div>
The email explains:
- Which post could not be updated
- Airtable could not find a matching record
- that the title in Strapi must exactly match the title in Airtable
That makes debugging much faster for content teams.
Generate the live Strapi entry URL
If the Airtable record exists, the next step is to generate the public URL of the entry.
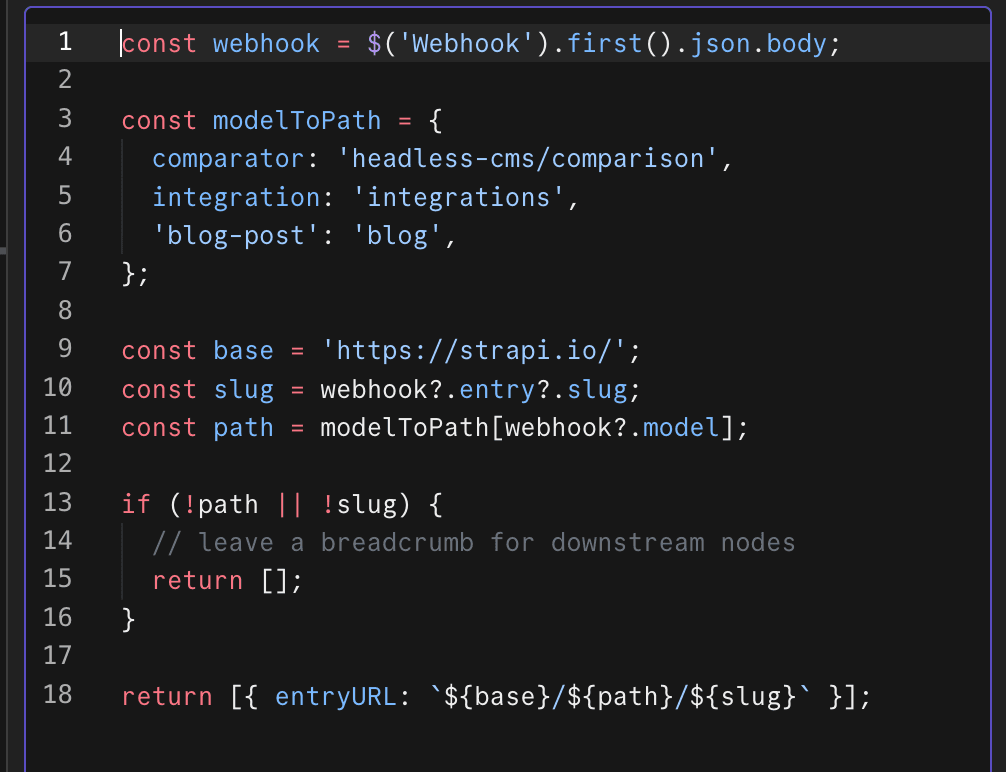
In your workflow, this happens inside a Code node:
const webhook = $('Webhook').first().json.body;

const modelToPath = {
  comparator: 'headless-cms/comparison',
  integration: 'integrations',
  'blog-post': 'blog',
};

const base = 'https://strapi.io/';
const slug = webhook?.entry?.slug;
const path = modelToPath[webhook?.model];

if (!path || !slug) {
  return [];
}

return [{ entryURL: `${base}/${path}/${slug}` }];
How it works
This script:
- Reads the content model from the webhook payload
- Maps the model to the correct path on your site
- Combines that path with the slug
- Returns the full public URL
For example:
blog-postbecomes/blog/{slug}integrationbecomes/integrations/{slug}comparatorbecomes/headless-cms/comparison/{slug}
This is a clean way to support multiple content types with one automation.
Prepare the Airtable Update Payload
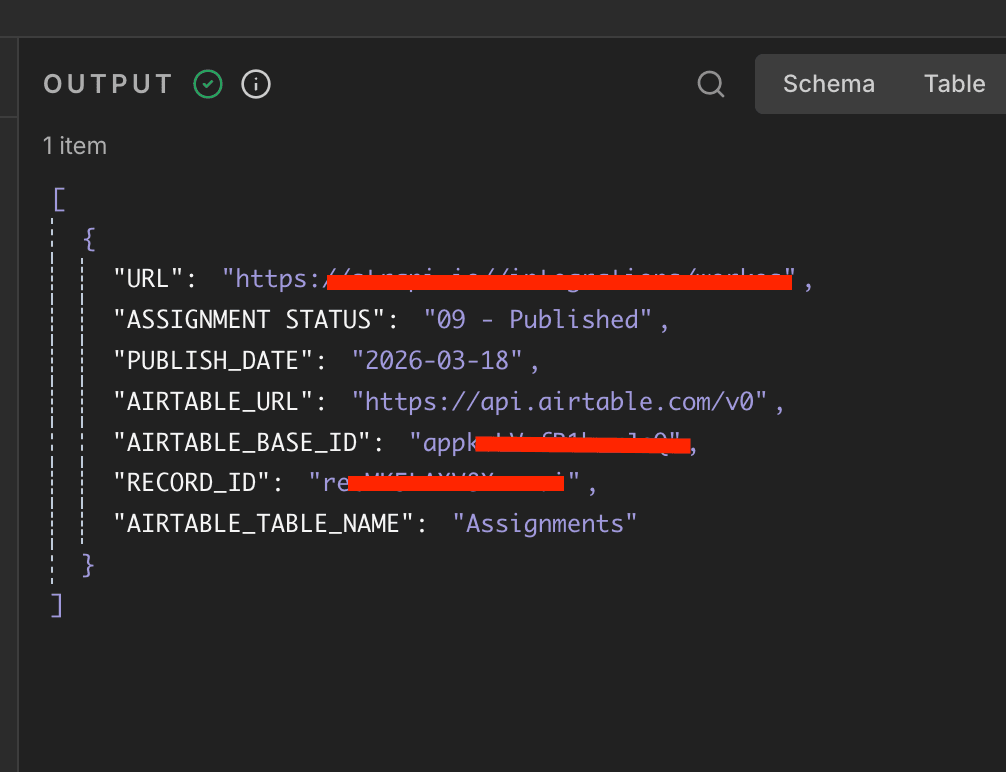
After generating the live entry URL, add another Set node to prepare the values Airtable needs.
This node sets:
URLASSIGNMENT STATUSPUBLISH_DATERECORD_IDAIRTABLE_BASE_IDAIRTABLE_TABLE_NAME
In your workflow, the status is set to:
09 - PublishedAnd the publish date is extracted from publishedAt like this:
{{ $('Webhook').item.json.body.entry.publishedAt
  ? $('Webhook').item.json.body.entry.publishedAt.split('T')[0]
  : "" }}
This gives Airtable a clean YYYY-MM-DD date string.
Here is an output of the Set Node.
Update the Airtable record
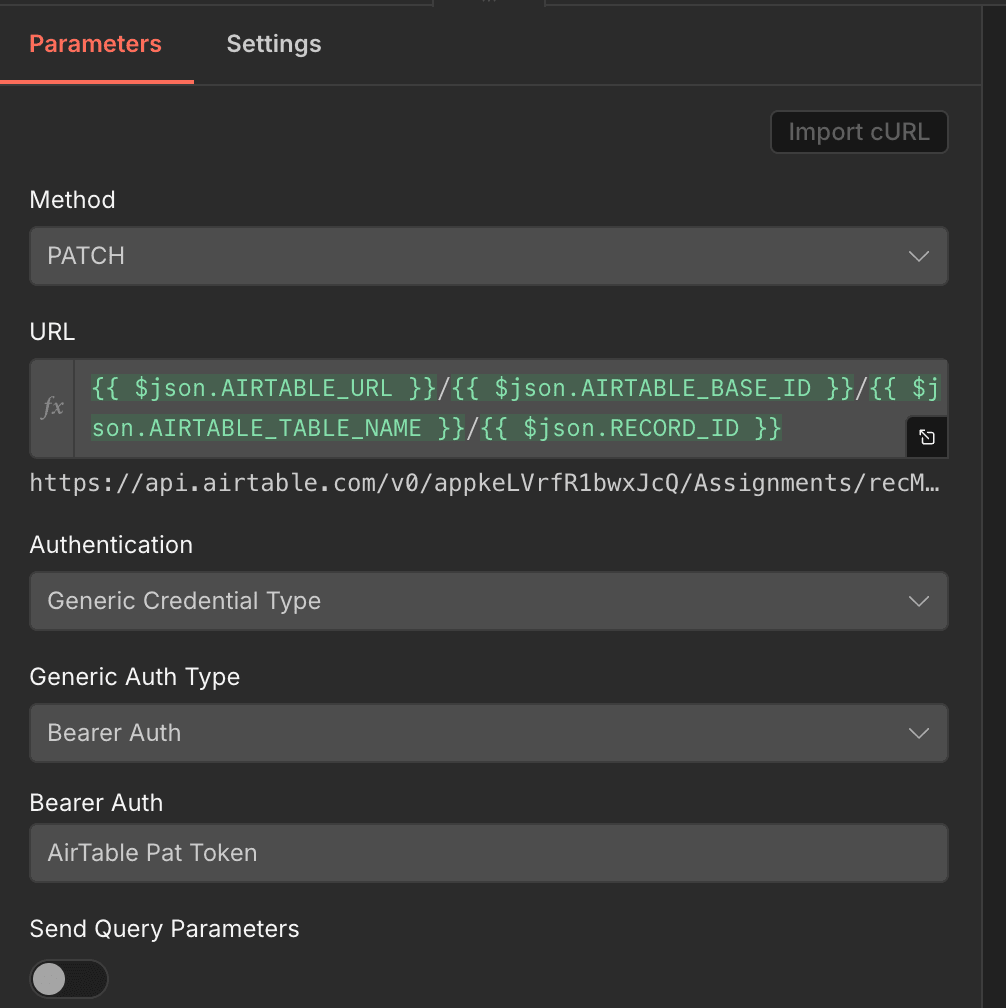
Now add an HTTP Request node to update the Airtable row.
This node sends a PATCH request to Airtable using the record ID returned by the search step.
Here are the authentication parameters:
Here is the JSON body:
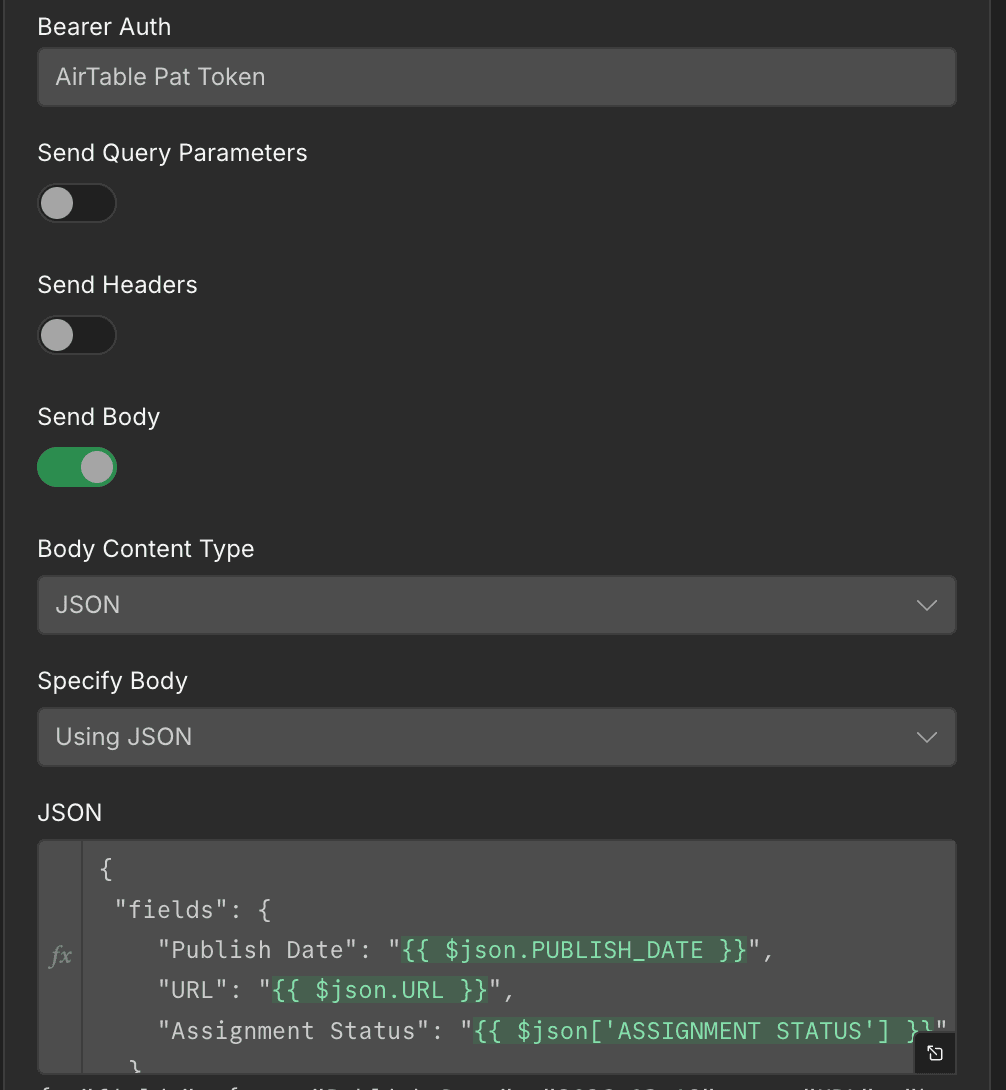
The JSON body in your workflow looks like this:
{
  "fields": {
    "Publish Date": "{{ $json.PUBLISH_DATE }}",
    "URL": "{{ $json.URL }}",
    "Assignment Status": "{{ $json['ASSIGNMENT STATUS'] }}"
  }
}
Why use an HTTP Request node here?
This gives you precise control over the request body and makes the update logic explicit.
Once this runs successfully, Airtable now reflects the published state of the Strapi entry.
Notify Slack after a successful update
After the Airtable update, add another If node to confirm the update succeeded.
When the update is successful, send a message to Slack using a Slack node.
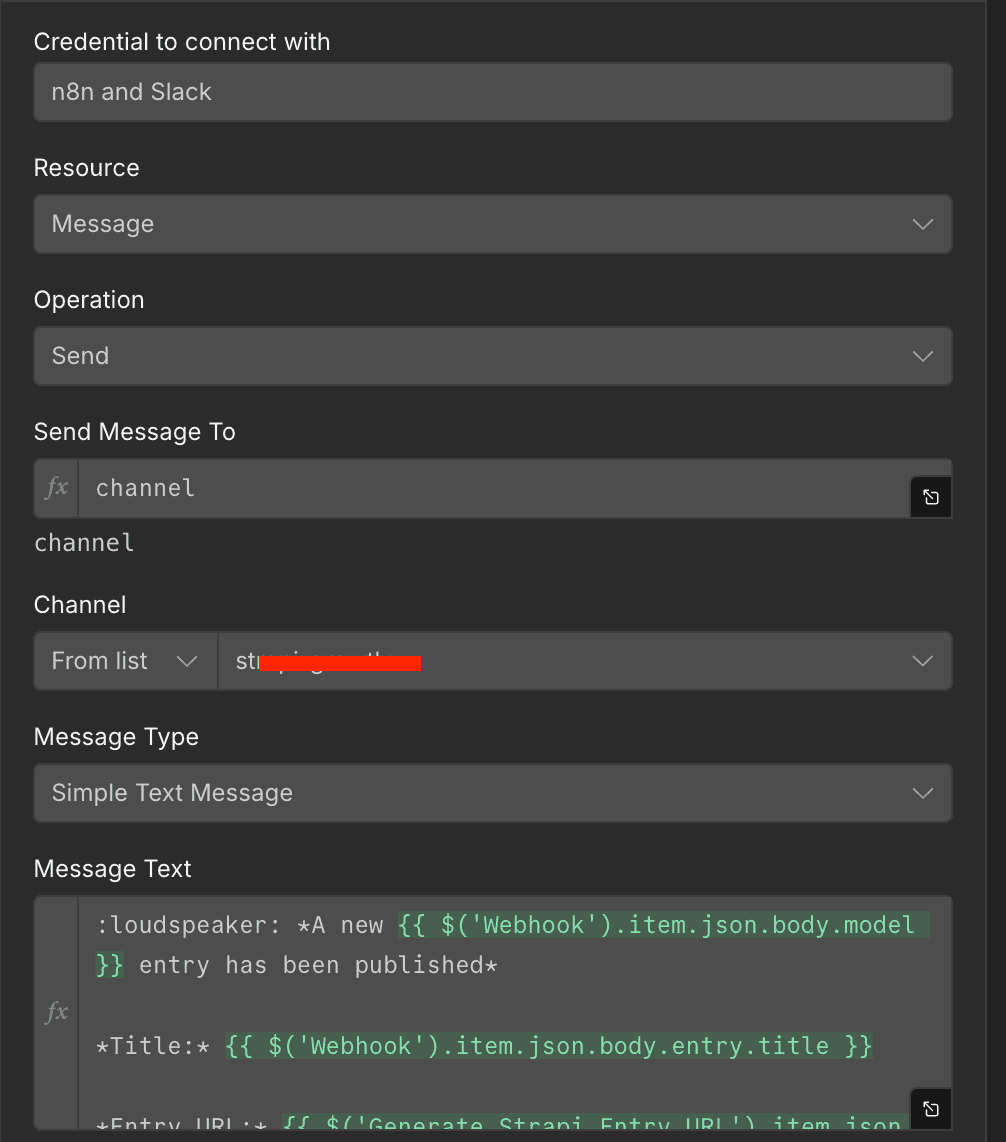
To learn how to add your Slack credential, check out the n8n Slack credential page.
Your Slack message can include:
- The model type
- The title of the entry
- The live URL
Example message:
A new blog-post entry has been published

Title: How to Automate Publishing with Strapi
Entry URL: https://strapi.io/blog/how-to-automate-publishing-with-strapi
This gives your team immediate visibility when new content goes live.
Full workflow logic recap
At this point, your workflow behaves like this:
- Strapi publishes an entry
- n8n receives the webhook event
- The workflow confirms that the event is
entry.publish - Airtable is searched for a matching assignment title
- If the record exists, the live URL is generated
- Airtable is updated with the publish date, URL, and status
- Slack is notified
- If the record does not exist, editors receive an email instead
This is a simple workflow, but it removes several repetitive steps from your publishing process.
Testing the workflow
Before you move this into production, test your workflow:
Testing these edge cases will make your automation much more reliable.
Tips for improving this workflow
Once the basic automation is working, here are a few useful upgrades you can add:
Move constants to environment variables
Values like your base URL, Airtable base ID, and editor emails are good candidates for environment variables.
That makes the workflow easier to maintain across development, staging, and production.
Support more Strapi models
You can extend your modelToPath object to support more content types as your site grows.
Why this workflow is useful
This kind of automation helps content teams in three important ways:
1. It removes manual operational work
Nobody has to update Airtable by hand after publishing.
2. It improves visibility
Slack notifications help everyone know when content is live.
3. It makes failures visible
The email fallback ensures broken editorial links do not go unnoticed.
That combination makes this workflow valuable not only for developers, but also for marketers, editors, and content operations teams.
Next steps
From here, you can take this workflow further by:
- Integrating with HubSpot to add published blog posts as assets to campaigns
- Syncing draft status updates back to Airtable
- Notifying different Slack channels by content type
- Triggering social media or newsletter automation after publication
Once Strapi becomes the source of truth for content, workflows like this help the rest of your stack stay in sync.
Conclusion
Strapi is excellent at managing and publishing content. But when you combine it with n8n and other external tools, you can build a much stronger content operations system around it.
With a single publish event, you can update your editorial tracker, generate the live URL, notify your team, and handle exceptions automatically.
That is the real value of automation: fewer repetitive tasks, fewer missed updates, and a smoother workflow for everyone involved.
If you are already using Strapi for content publishing, this is a great automation to add to your stack.
To learn more, visit the Strapi documentation page or the n8n documentation page.