
Validating the data received from an API request is a critical aspect to consider when building robust and scalable applications. API (Application Programming Interface) acts as an intermediary that enables data to be shared between various software applications. Certifying the data shared through APIs is important as it handles errors and guarantees data integrity and consistency. This tutorial demonstrates the need for API data validation by building a blog application.
What is API data validation?
API data validation is a way of verifying that the data being exchanged meets the laid down criteria. To explain further, the purpose of API data validation is to confirm that the data sent is in the proper format and that the responses received are as expected.
It is often implemented using various validation libraries and frameworks like Joi, Yup, AJV, and class-validator, which provide proper ways to define validation rules and handle validation errors.
Importance of API data validation
In software development, data validation plays a crucial role and we will discuss its key importance in this section.
-
Prevents errors: By rigorously inspecting the data sent and the responses received, API data validation drastically reduces the amount of errors in the software.
-
Protects against malicious attacks: Data validation ensures that the data received adheres to the outlined guidelines, thus protecting the application. The risk of exploitation is reduced by rejecting malicious data that could harm the application.
-
Enhances long-lasting performance: Preventing errors and safeguarding against malicious attacks, API data validation enhances the application's performance and guarantees a durable application.
The pivotal role of API data validation in software development makes its importance obvious.
Prerequisites
Before starting this tutorial, ensure you have the following setup:
- Node.js: Use Maintenance or LTS versions (v14, v16, or v18).
- For Strapi v4.3.9 and later, use Node v18.x.
- For Strapi v4.0.x to v4.3.8, use Node v16.x.
- Package Manager: Yarn is recommended. Install it globally with npm i -g yarn.
- NodeJS Knowledge: A basic understanding is required.
- Code Editor: Visual Studio Code is recommended.
Getting Started
Enough with the theories, let's dive into practical coding. 🚀
In this guide, we're building a straightforward blog application. Users will be able to register, log in, and perform CRUD operations on blog posts. We'll also delve into customizing the Strapi backend with plugins and controllers.
Setting Up the Project:
- Create a Project Folder: Name it as you like. For this tutorial, we'll use
blog-app. - Prepare the Backend Directory: Inside
blog-app, create another folder namedbackendfor your backend code. - Install Strapi: Open your terminal, navigate to the
backendfolder, and run:
yarn create strapi-app blog-app --quickstart
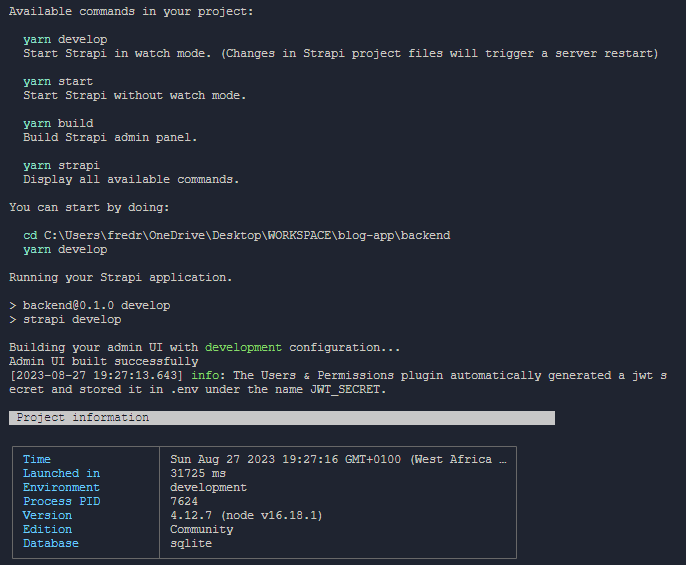
After installation, you'll see an output similar to this:
Now let’s setup the admin.
Admin Setup:
- Access Admin Panel: Open your browser and go to http://localhost:1337/admin.
- Create Admin Account: Complete the required fields and click the "Let’s Start" button.
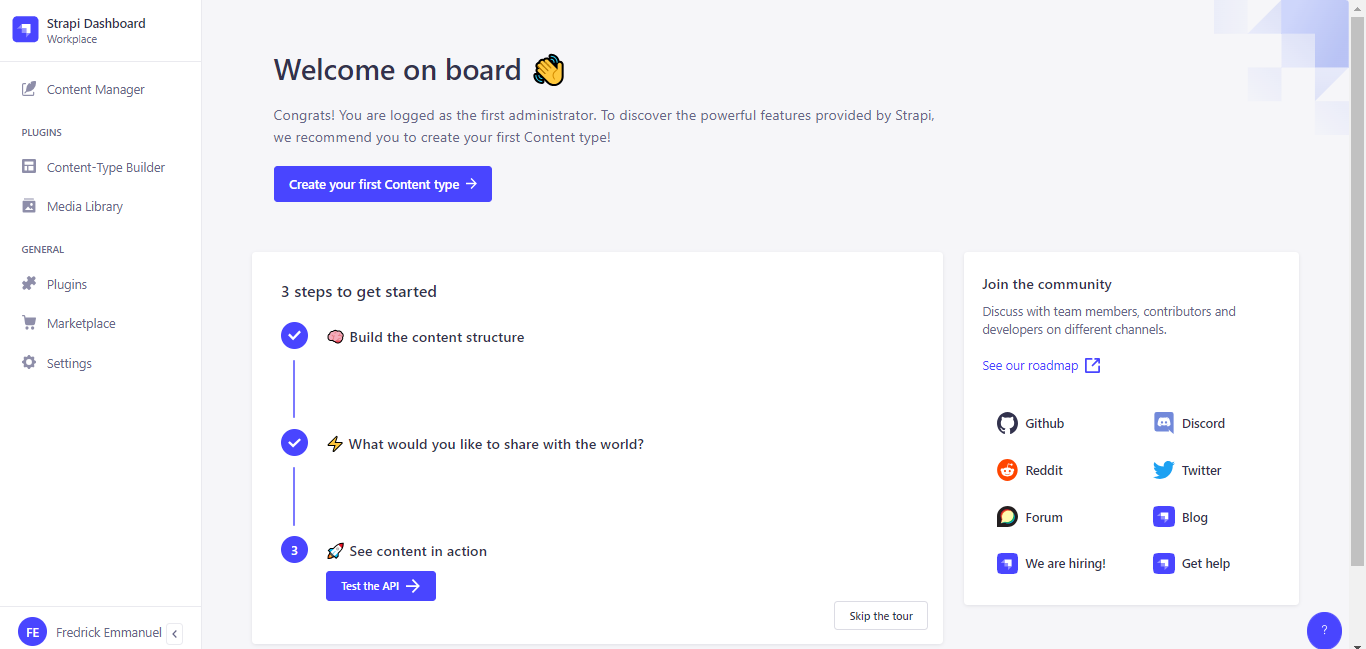
- Dashboard Access: You will then be redirected to the Strapi admin dashboard, which looks like this:
Setting up Strapi
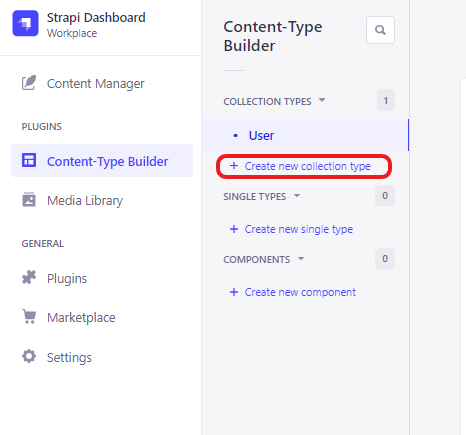
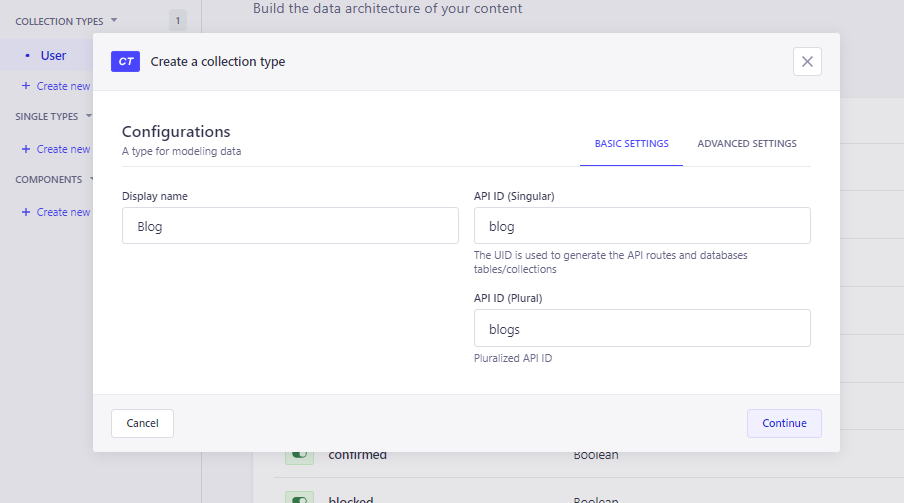
Select Content-Type Builder by the side nav bar and click on Create new collection type
Next, give the collection type a name in the Display name field. You have the freedom to choose the name for the collection; however, in this guide, we'll refer to the collection as Blog.
Select ADVANCED SETTINGS, uncheck the Draft & publish box, and click on Continue.
> Strapi has a default setting that enables administrators to preview each content sent, providing them with the ability to review and assess it.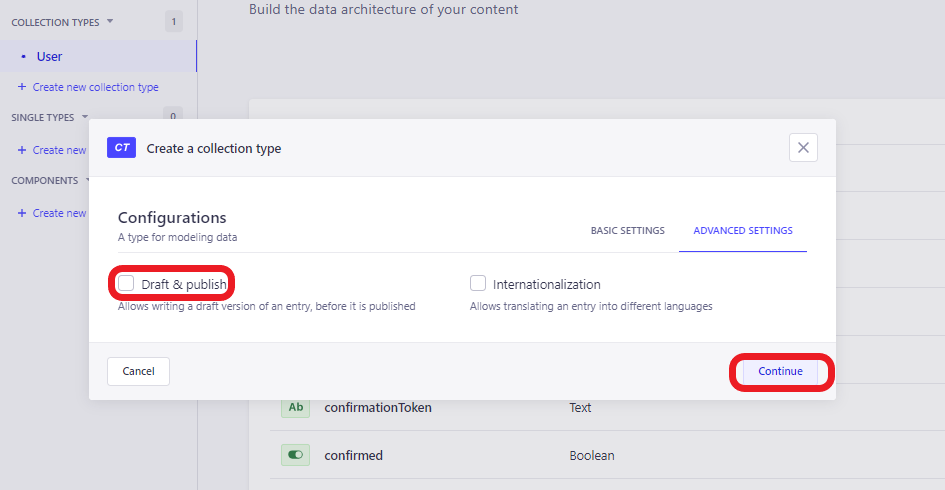
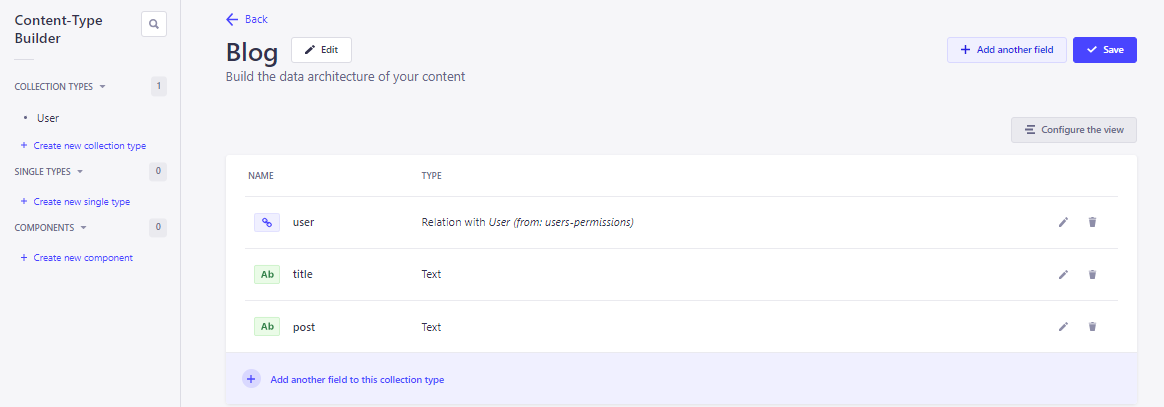
Now, let’s configure the collection to have the following fields:
-
Create a
many-t0-one relationfield with the User (from: users-permissions) collection called user.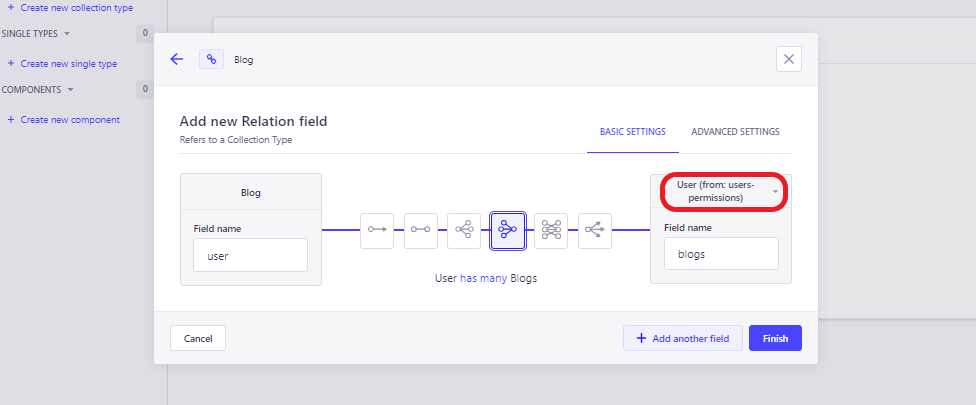
-
Click on Add another field and create a
Short Textfield called title.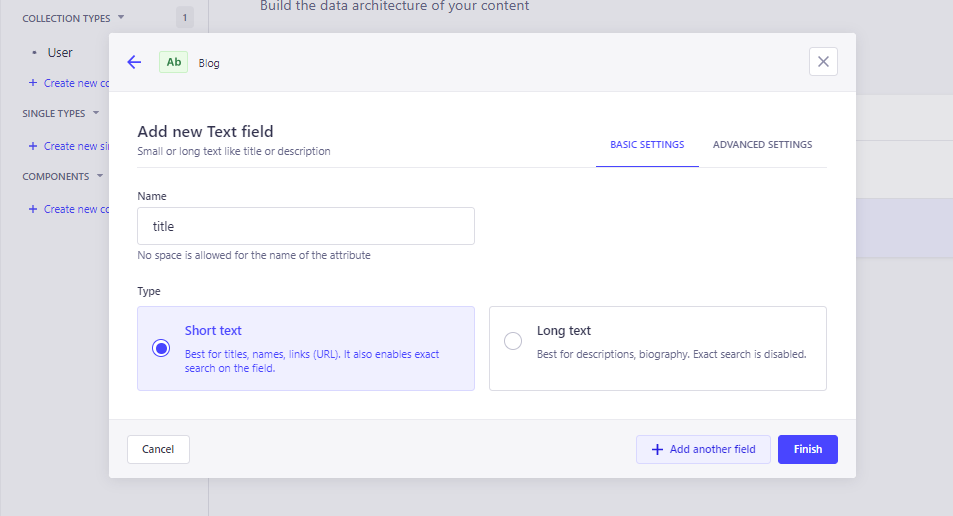
-
Lastly, add a
Long textfield called post and click Finish.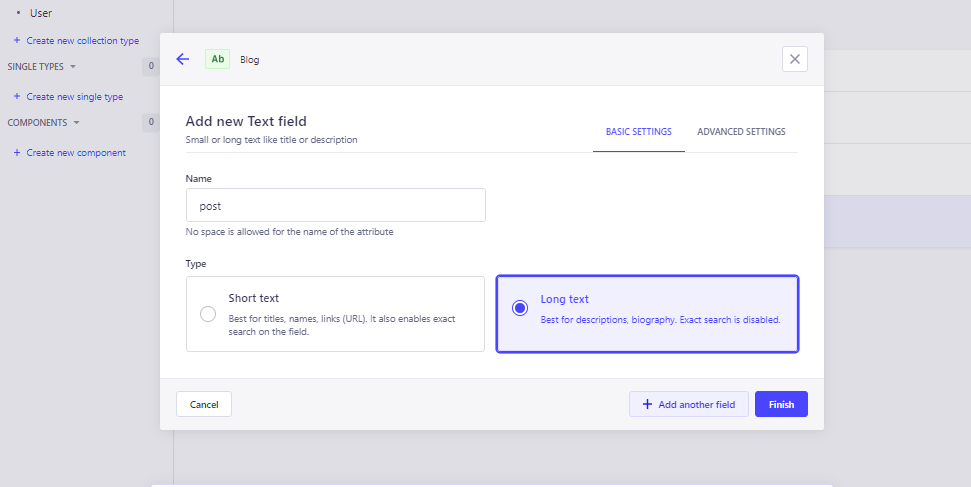
You should have an output similar to the one below after adding the various fields to the Blog collection type. Hit the Save button at the top right and wait a while for Strapi to restart the server automatically.
After creating the Blog collection, we will have to grant permission to authenticated and public users.
-
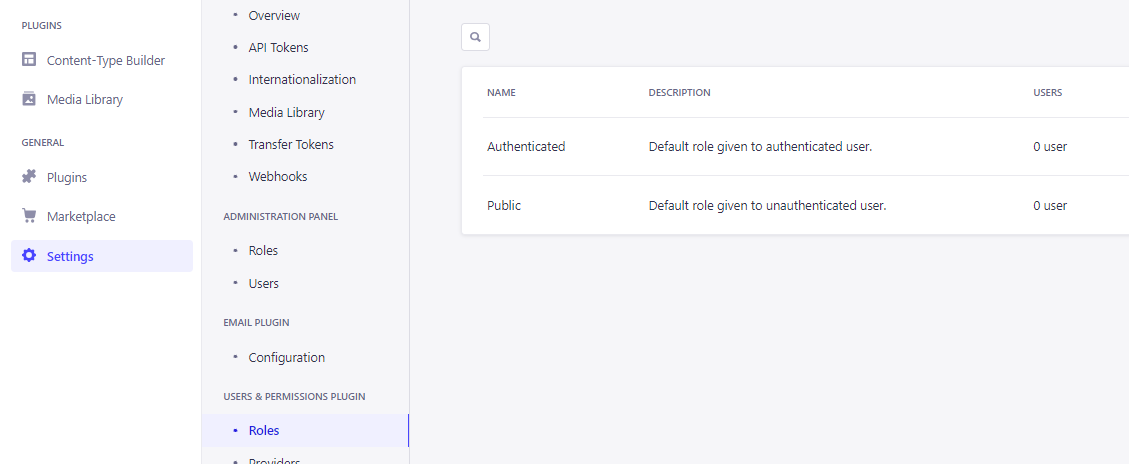
Select Settings on the side nav bar and click on Roles under USERS & PERMISSIONS PLUGIN
-
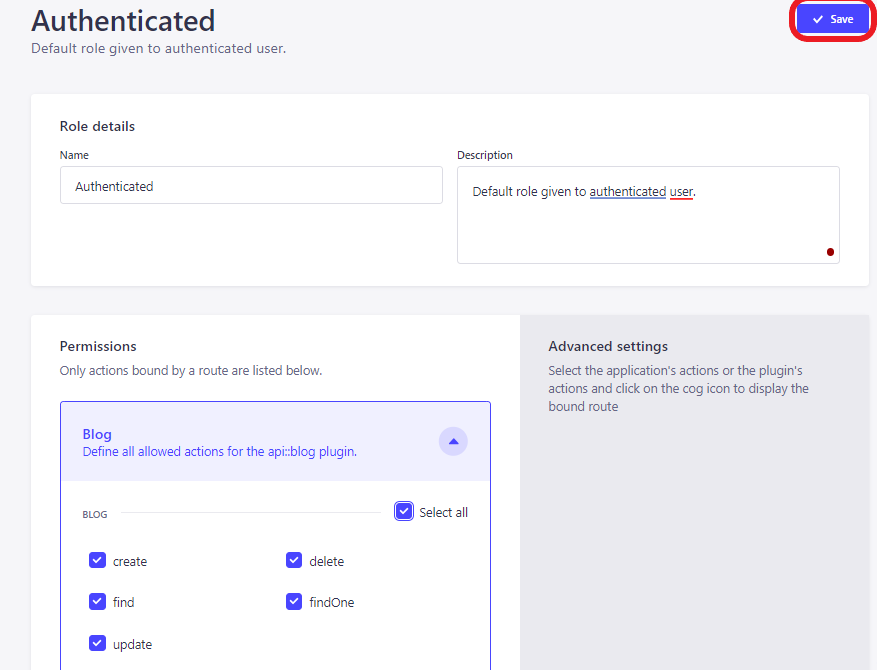
Click on Authenticated, click on the Blog accordion, tick the Select all box, and hit Save.
-
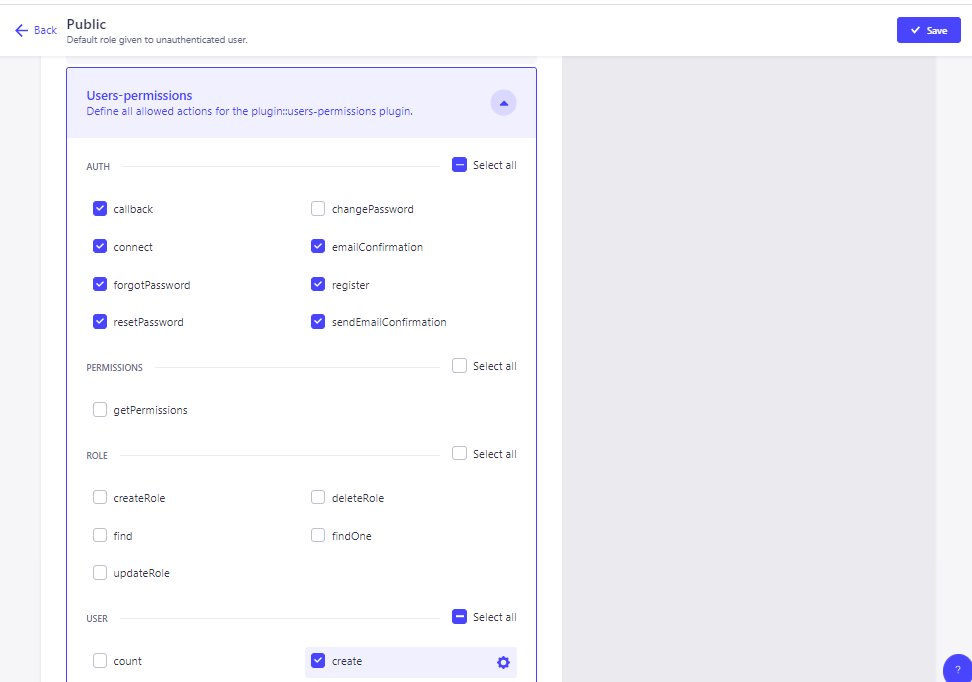
Go back to the Roles page and select Public. Scroll to the bottom of the page, click on the Users-permissions accordion, tick the create box in USER section, and hit Save.
Creating User API data validation
In this article, we will validate API data using an inbuilt Strapi validator called Yup. This article chooses this validator because of its rigorous manner of checking the data. You can opt for any other validator as this approach is not validator-specific.
Validating the User signup route
In this section, we will customize the api/auth/local/register route by creating a custom plugin. When creating a user, we will configure the User collection-type to accept only username and password. You can choose to customize it to take in other parameters.
Create a folder in the backend folder called Validation and a file in it called index.js. Add the following code to it.
// backend/Validation/index.js
const { yup } = require("@strapi/utils"); //Importing yup
const { object, string } = yup; //Destructuring object and string from yup
const UserSchema = object().shape({
  // Creating userSchema
  username: string().min(3).required(), // username validation
  password: string() // password validation
    .min(6) // password should be minimum 6 characters
    .required("Please Enter your password") // password is required
    .matches(
      /^(?=.*[a-z])(?=.*[A-Z])(?=.*[0-9])(?=.*[!@#\$%\^&\*])(?=.{6,})/,
      "Must Contain 6 Characters, One Uppercase, One Lowercase, One Number and One Special Case Character"
    ), // Regex for strong password
});
module.exports = {
  // Exporting UserSchema
  UserSchema,
};
Above, we created a schema for the User collection type that checks if the username is a string that contains a minimum of 3 characters and a maximum of 10 characters. We also ensured that the password matches a specified regex expression.
After setting up the user schema, create a folder in src/extensions called users-permissions, then create a file called strapi-server.js in it. In this file, we will create a plugin for the registration route.
Credits: strapi_v4_user_register_override.js
Open the strapi-server.js file and add the following code snippet.
// backend/src/extensions/users-permissions/strapi-server.js
"use strict";
const _ = require("lodash");
const jwt = require("jsonwebtoken");
const utils = require("@strapi/utils");
const { UserSchema } = require("../../../Validation"); // Importing UserSchema
const { sanitize } = utils;
const bycrypt = require("bcryptjs");
const { ApplicationError, ValidationError } = utils.errors; //Importing Error Handler
const sanitizeUser = (user, ctx) => {
  // Sanitizing user
  const { auth } = ctx.state;
  const userSchema = strapi.getModel("plugin::users-permissions.user");
  return sanitize.contentAPI.output(user, userSchema, { auth });
};
module.exports = (plugin) => {
  // JWT issuer
  const issue = (payload, jwtOptions = {}) => {
    _.defaults(jwtOptions, strapi.config.get("plugin.users-permissions.jwt"));
    return jwt.sign(
      _.clone(payload.toJSON ? payload.toJSON() : payload),
      strapi.config.get("plugin.users-permissions.jwtSecret"),
      jwtOptions
    );
  };
  //   Register controller override
  plugin.controllers.auth.register = async (ctx) => {
    // Validate user
    try {
      const { username, password } = await UserSchema.validate(
        ctx.request.body, // Validating the request body against UserSchema
        {
          stripUnknown: true, // Removing unknown fields
          abortEarly: false, // Returning all errors
        }
      );
      const lowerUsername = username.toLocaleLowerCase(); // Converting username to lowercase
      const usernameCheck = await strapi // Checking if username already exists
        .query("plugin::users-permissions.user")
        .findOne({
          where: { username: lowerUsername },
        });
      if (usernameCheck)
        throw new ApplicationError( // Throwing error if username already exists
          "Username already exists",
          `Username ${username} already exists in the database`
        );
      const hahedPassword = await bycrypt.hash(password, 10); // Hashing password
      let sanitizedUser;
      let jwt;
      await strapi
        .query("plugin::users-permissions.user")
        .create({
          // Creating user
          data: {
            username: lowerUsername,
            password: hahedPassword,
            role: 1
          },
        })
        .then(async (/** @type {any} */ user) => {
          sanitizedUser = await sanitizeUser(user, ctx); // Sanitizing user
          jwt = issue(_.pick(user, ["id"]));
        });
      return ctx.send({
        status: "success",
        jwt,
        user: _.omit(sanitizedUser, [
          // Returning user without password and other fields
          "email",
          "provider",
          "confirmed",
          "blocked",
        ]),
      });
    } catch (error) {
      // Handling error
      if (error.name === "ValidationError")
        throw new ValidationError("An Error occured", error.errors); // Throwing validation error
      throw error; // Throwing error
    }
  };

  plugin.routes["content-api"].routes.unshift({
    // Adding route
    method: "POST",
    path: "/auth/local/register", // Register route
    handler: "auth.register",
    config: {
      middlewares: ["plugin::users-permissions.rateLimit"],
      prefix: "",
    },
  });
  return plugin;
};
In the code we've just explored:
- We started by defining a function that 'sanctifies' user details. This function is designed to return user information while ensuring sensitive fields like passwords are excluded for security.
- Then, we generated a JSON Web Token (JWT), embedding the user's
idas its payload. This token plays a crucial role in managing user sessions and authentication. - We also included a step where the request body is validated against the
UserSchema. This is crucial to ensure that the input received aligns with our expected format and structure. - In cases where the username is already present in our database, our code is set up to trigger an
ApplicationError. This results in a 400 bad request response, accompanied by a relevant message to inform the user. - Conversely, if the username is new to our database, the user is created. In response, we send back a success message, the generated JWT, and the user details (minus any sensitive information).
- It's important to note the role specification when creating a user. Setting
role: 1indicates that you're creating an 'Authenticated' user. - Errors are an inevitable part of any process, so we've wrapped our logic in a
try-catchblock to gracefully handle any exceptions that might arise. - Finally, we wrapped up by configuring the
/api/auth/local/registerroute to be handled by theauth.registercontroller, thereby linking our back-end logic to a specific endpoint.
This approach not only streamlines the user registration process but also integrates important security and validation steps, crucial for any robust web application.
Validating the User login route
Next, we will create another plugin that will handle a POST request to /api/auth/local.
Still in the strapi-server.js file, add the following lines of code:
// backend/src/extensions/users-permissions/strapi-server.js
"use strict";
const _ = require("lodash");
const jwt = require("jsonwebtoken");
const utils = require("@strapi/utils");
const { UserSchema } = require("../../../Validation"); // Importing UserSchema
const { sanitize } = utils;
const { ApplicationError, ValidationError } = utils.errors; //Importing Error Handler
const sanitizeUser = (user, ctx) => {
  // Sanitizing user
  const { auth } = ctx.state;
  console.log(auth);
  const userSchema = strapi.getModel("plugin::users-permissions.user");
  return sanitize.contentAPI.output(user, userSchema, { auth });
};
module.exports = (plugin) => {
  // JWT issuer
  const issue = (payload, jwtOptions = {}) => {
    _.defaults(jwtOptions, strapi.config.get("plugin.users-permissions.jwt"));
    return jwt.sign(
      _.clone(payload.toJSON ? payload.toJSON() : payload),
      strapi.config.get("plugin.users-permissions.jwtSecret"),
      jwtOptions
    );
  };
  //   Register controller override
  plugin.controllers.auth.register = async (ctx) => {
    // The logic for the register route
  }

  // Login controller override
  plugin.controllers.auth.callback = async (ctx) => {
    let sanitizedUser;
    let jwt;
    try {
      const { username, password } = await UserSchema.validate(
        ctx.request.body, // Validating the request body against UserSchema
        {
          stripUnknown: true, // Removing unknown fields
          abortEarly: false, // Returning all errors
        }
      );
      const lowerUsername = username.toLocaleLowerCase();
      const user = await strapi // Checking if username exists
        .query("plugin::users-permissions.user")
        .findOne({
          where: { username: lowerUsername },
        });
      if (!user)
        throw new ApplicationError("Username or password does not exists"); // Throwing error if username doesn't exists
      await bycrypt // Comparing password
        .compare(password, user.password)
        .then(async (res) => {
          if (res) return (sanitizedUser = await sanitizeUser(user, ctx)); // Sanitizing user
          throw new ApplicationError("Username or password does not exists"); // Throwing error if password doesn't match
        })
        .catch((e) => {
          throw e; // Throwing error
        });
      jwt = issue(_.pick(user, ["id"])); // Issuing JWT
      return ctx.send({
        status: "success",
        jwt,
        user: _.omit(sanitizedUser, [
          // Returning user without password and other fields
          "email",
          "provider",
          "confirmed",
          "blocked",
        ]),
      });
    } catch (error) {
      // Handling error
      if (error.name === "ValidationError")
        throw new ValidationError("An Error occured", error.errors); // Throwing validation error
      throw error; // Throwing error
    }
  };

  plugin.routes["content-api"].routes.unshift({
    // Adding route
    method: "POST",
    path: "/auth/local", // Login route
    handler: "auth.callback",
    config: {
      middlewares: ["plugin::users-permissions.rateLimit"],
      prefix: "",
    },
  });

plugin.routes["content-api"].routes.unshift({
    // Adding route
    method: "POST",
    path: "/auth/local/register", // Register route
    handler: "auth.register",
    config: {
      middlewares: ["plugin::users-permissions.rateLimit"],
      prefix: "",
    },
  });
  return plugin;
};
From the above lines of code:
- A plugin was added to handle requests for the
/api/auth/localroute. - We validated the body of the request body against the
UserSchema. - Next, we checked if the
usernameprovided exists in the database and we returned an error if it doesn’t. - After that, we compared the password provided with the password in the database and we returned an error if it didn’t match.
- Lastly, we returned the JSON Web Token (
jwt) along with thesanitizedUser.
Creating Blog API data validation
Open the index.js file in backend/Validation and add the following lines of code to create a schema for creating and updating a blog post:
// backend/Validation/index.js
const { yup } = require("@strapi/utils"); //Importing yup
const { object, string, number } = yup; //Destructuring object and string from yup

// Code for UserSchema

const BlogCreateSchema = object().shape({
  // Creating BlogCreateSchema
  title: string().min(3).required(), // title validation
  post: string().min(6).required(), // post validation
});
const BlogUpdateSchema = object().shape({
  // Creating BlogUpdateSchema
  title: string().min(3).optional(), // title validation
  post: string().min(6).optional(), // post validation
});
module.exports = {
  // Exporting UserSchema
  UserSchema,
  // Exporting BlogCreateSchema
  BlogCreateSchema,
  // Exporting BlogUpdateSchema
  BlogUpdateSchema,
};
Referring to the added lines of code in the index.js file, we ensured that a title and a post content is provided for the BlogCreateSchema and we made the fields optional for the BlogUpdateSchema. After creating the various schemas, we exported them along with the UserSchema that was previously exported.
Creating a Blog post
Following the creation of various schemas, we will create a custom controller for the Blog collection.
In the backend folder, navigate to src/api/blog/controllers, open the blog.js file, and replace the current lines of code with the one below:
"use strict";
/**
 * blog controller
 */
const { createCoreController } = require("@strapi/strapi").factories;
const {
  BlogCreateSchema,
  BlogGetSchema,
  BlogUpdateSchema,
} = require("../../../../Validation"); // Importing BlogCreateSchema and BlogUpdateSchema
const utils = require("@strapi/utils");
const { ApplicationError, ValidationError } = utils.errors; //Importing Error Handler
module.exports = createCoreController("api::blog.blog", ({ strapi }) => ({
  async create(ctx) {
    try {
      const { title, post } = await BlogCreateSchema.validate(
        ctx.request.body, // Validating the request body against BlogCreateSchema
        {
          stripUnknown: true, // Removing unknown fields
          abortEarly: false, // Returning all errors
        }
      );
      const { id } = ctx.state.user // Getting the id
      const userCheck = await strapi // Checking if user exists
        .query("plugin::users-permissions.user")
        .findOne({
          where: { id },
        });
      if (!userCheck) throw new ApplicationError("User not found"); // Throwing an error if user not found
      const response = await strapi.query("api::blog.blog").create({
        // Creating the blog post
        data: {
          user: userCheck,
          title,
          post,
        },
      });
      return response;
    } catch (error) {
      if (error.name === "ValidationError")
        throw new ValidationError("An Error occured", error.errors); // Throwing validation error
      throw error;
    }
  },
}));
Here:
- We validated the
request.body, ensuring it contains the specified parameters. - Next, we checked for the user using the
idstored in the request. - We created a blog post and returned its
titleand thepostcontent along with other fields in the response.
Updating a Blog post
After handling the creation of a blog post, we will handle its update next:
// backend/src/api/blog/controllers/blog.js

// ...

module.exports = createCoreController("api::blog.blog", ({ strapi }) => ({
  async create(ctx) {
  // Create blog handler
  },

  async update(ctx) {
    try {
      const valid = await BlogUpdateSchema.validate(
        ctx.request.body, // Validating the request body against BlogCreateSchema
        {
          stripUnknown: true, // Removing unknown fields
          abortEarly: false, // Returning all errors
        }
      );
      const { id } = ctx.state.user;
      const userCheck = await strapi // Checking if user exists
        .query("plugin::users-permissions.user")
        .findOne({
          where: { id },
        });
      if (!userCheck) throw new ApplicationError("User not found"); // Throwing an error if user not found
      ctx.request.body = {
        data: {
          ...valid, // Passsing the validated data
        },
      };
      const response = await super.update(ctx);
      return response;
    } catch (error) {
      if (error.name === "ValidationError") {
        throw new ValidationError("An Error occured", error.errors); // Throwing validation error
      }
      throw error;
    }
  },
}));
Setting up the frontend
For the simplicity of this article, we will make use of basic HTML as our frontend, as it is just to demonstrate how API data validation works. You can choose to use any frontend framework of your choice.
This article makes use of a generated html template for the UI as it is just to demonstrate API validation
Create a folder in the root directory called frontend and create the following files in it.
    ┗ frontend
     ┃ ┣ auth.js
     ┃ ┣ edit.html
     ┃ ┣ edit.js
     ┃ ┣ index.html
     ┃ ┣ index.js
     ┃ ┣ login.html
     ┃ ┣ new.html
     ┃ ┣ new.js
     ┃ ┗ register.html
Registration and Login page
In this section, we will handle user registration and login functionality.
Open the register.html page and add the following lines of code to it:
<!-- frontend/register.html -->
<!DOCTYPE html>
<html lang="en">
  <head>
    <meta charset="UTF-8" />
    <meta name="viewport" content="width=device-width, initial-scale=1.0" />
    <title>Blog app</title>
    <style>
      body {
        font-family: Arial, sans-serif;
        background-color: #f4f4f4;
        text-align: center;
      }
      h1 {
        color: #333;
      }
      .errorMsg {
        background-color: rgb(49, 7, 7);
        width: fit-content;
        margin-bottom: 5px;
        text-transform: uppercase;
        border-radius: 5px;
        padding: 5px;
        color: rgb(231, 228, 228);
        display: none;
      }
      form {
        width: 300px;
        margin: 0 auto;
        background: #fff;
        padding: 20px;
        border-radius: 5px;
        box-shadow: 0 0 10px rgba(0, 0, 0, 0.1);
      }
      label {
        display: block;
        text-align: left;
        margin-bottom: 8px;
        color: #555;
      }
      input[type='text'],
      input[type='password'] {
        width: 80%;
        padding: 10px;
        margin-bottom: 10px;
        border: 1px solid #ccc;
        border-radius: 4px;
      }
      input[type='submit'] {
        background-color: #333;
        color: #fff;
        border: none;
        padding: 10px 20px;
        cursor: pointer;
        border-radius: 4px;
      }
      input[type='submit']:hover {
        background-color: #555;
      }
    </style>
  </head>
  <body>
    <!-- defining the type of request using the class "signup"-->
    <h1 class="signup">Signup</h1>
    <form>
      <div class="errorMsg"></div>
      <label for="username">Username:</label>
      <input type="text" id="username" name="username" required />
      <label for="password">Password:</label>
      <input type="password" id="password" name="password" required />
      <input type="submit" value="Signup" />
    </form>
    <!-- Adding the javasript file -->
    <script src="./auth.js"></script>
  </body>
</html>
Next, open the login.html file and add the following:
<!-- frontend/login.html -->
<!DOCTYPE html>
<html lang="en">
  <head>
    <meta charset="UTF-8" />
    <meta name="viewport" content="width=device-width, initial-scale=1.0" />
    <title>Blog app</title>
    <style>
      body {
        font-family: Arial, sans-serif;
        background-color: #f4f4f4;
        text-align: center;
      }
      h1 {
        color: #333;
      }
      .errorMsg {
        background-color: rgb(49, 7, 7);
        width: fit-content;
        margin-bottom: 5px;
        text-transform: uppercase;
        border-radius: 5px;
        padding: 5px;
        color: rgb(231, 228, 228);
        display: none;
      }
      form {
        width: 300px;
        margin: 0 auto;
        background: #fff;
        padding: 20px;
        border-radius: 5px;
        box-shadow: 0 0 10px rgba(0, 0, 0, 0.1);
      }
      label {
        display: block;
        text-align: left;
        margin-bottom: 8px;
        color: #555;
      }
      input[type='text'],
      input[type='password'] {
        width: 80%;
        padding: 10px;
        margin-bottom: 10px;
        border: 1px solid #ccc;
        border-radius: 4px;
      }
      input[type='submit'] {
        background-color: #333;
        color: #fff;
        border: none;
        padding: 10px 20px;
        cursor: pointer;
        border-radius: 4px;
      }
      input[type='submit']:hover {
        background-color: #555;
      }
    </style>
  </head>
  <body>
    <h1>Login</h1>
    <form>
      <div class="errorMsg"></div>
      <label for="username">Username:</label>
      <input type="text" id="username" name="username" required />
      <label for="password">Password:</label>
      <input type="password" id="password" name="password" required />
      <input type="submit" value="Login" />
    </form>
    <!-- Adding the javasript file -->
    <script src="./auth.js"></script>
  </body>
</html>
In the login.js and the register.js file, we added the auth.js file as the external JavaScript file. Now, let’s handle authentication/authorization in the auth.js file.
// frontend/auth.js
const form = document.querySelector('form'); // Getting the form
const errorElement = document.querySelector('.errorMsg'); // Getting the error element
const signup = document.querySelector('.signup'); // Getting the signup element which will be used to determine if the user is signing up or logging in
form.addEventListener('submit', async e => {
  // Adding an event listener to the form
  e.preventDefault();
  const formData = new FormData(form);
  const username = formData.get('username');
  const password = formData.get('password');
  const message = { username, password }; // Creating the data object
  const url = signup ? '/register' : ''; // Determining the url based on the signup variable
  await fetch(`http://localhost:1337/api/auth/local${url}`, {
    // Making the request
    method: 'POST',
    body: JSON.stringify(message),
    headers: {
      'content-type': 'application/json'
    }
  })
    .then(async e => {
      const { error, jwt } = await e.json();
      if (error) {
        let errorMsg = '';
        if (error.name === 'ValidationError') {
          // Checking if the error is a validation error
          error?.details?.map(err => {
            errorMsg += `${err}. <br/>`;
          });
        }
        if (error.name === 'ApplicationError') {
          // Checking if the error is an application error
          errorMsg = error.message;
        }
        errorElement.style.display = 'block';
        setTimeout(() => {
          // Hiding the error message after 10 seconds
          errorElement.style.display = 'none';
        }, 10000);
        return (errorElement.innerHTML = errorMsg); // Displaying the error message
      }
      localStorage.setItem('jwt', jwt); // Storing the jwt in localStorage
      window.location.href = '/frontend/index.html'; // Redirecting the user to the index page
    })
    .catch(e => {
      console.log(e.message);
    });
});
In the auth.js file:
- We got the form from the HTML file and added an event listener that listens for a
submitaction. - In the register.html file, we added a class called
signup, which will be used to determine the URL for the registration and login action. Next, we made the URL to contain/registerif thesignupclass is found. The login.html doesn’t have the classsignup, hence its URL will not contain/register. - In the event listener, we got the username and password from the
formand passed it as the request body to thePOSTrequest. - We display any errors that occurred when the
POSTrequest was made. - Lastly, we stored the
jwtreceived from the response to the local storage and then redirected the users to the index.html file.
Displaying the blog post
In the index.html file, add the following:
<!-- // frontend/index.html -->
<!DOCTYPE html>
<html lang="en">
  <head>
    <meta charset="UTF-8" />
    <meta name="viewport" content="width=device-width, initial-scale=1.0" />
    <title>Blog Posts</title>
    <style>
      body {
        font-family: Arial, sans-serif;
        background-color: #f4f4f4;
        text-align: center;
        color: #333;
      }
      h1 {
        color: #555;
      }
      .blog-post {
        background-color: #fff;
        border: 1px solid #ccc;
        padding: 20px;
        margin: 10px 0;
        border-radius: 4px;
        box-shadow: 0 0 5px rgba(0, 0, 0, 0.2);
        text-align: left;
      }
      .blog-title {
        font-size: 24px;
        font-weight: bold;
        margin-bottom: 10px;
      }
      .blog-content {
        font-size: 16px;
        line-height: 1.4;
      }
      .button-container {
        margin-top: 20px;
      }
      .button {
        background-color: #333;
        color: #fff;
        border: none;
        padding: 10px 20px;
        margin-right: 10px;
        border-radius: 4px;
        cursor: pointer;
      }
      .edit-button {
        background-color: #555;
      }
    </style>
  </head>
  <body>
    <h1>Blog Posts</h1>
    <div class="button-container">
      <button class="button" id="createButton">Create New Blog</button>
    </div>
    <div id="blogList"></div>
    <script src="./index.js"></script>
  </body>
</html>
Open the index.js to fetch and display all the blog posts:
// frontend/index.js
// Retrieve the JWT token from localStorage
const jwt = localStorage.getItem('jwt');
// Ensure the token is available
if (!jwt) {
  console.error('JWT token not found in localStorage. Please login first.');
  window.location.href = '/frontend/login.html';
} else {
  // Fetch the blog posts using the token for authentication
  fetch('http://localhost:1337/api/blogs', {
    method: 'GET',
    headers: {
      Authorization: `Bearer ${jwt}`
    }
  })
    .then(response => {
      if (!response.ok) {
        if (response.status == '401' || response.status == '403') {
          alert('Unauthorized');
          localStorage.setItem('jwt', '');
          window.location.href = '/frontend/login.html';
        }
        throw new Error(`HTTP Error! Status: ${response.status}`);
      }
      return response.json();
    })
    .then(({ data }) => {
      const blogList = document.getElementById('blogList');
      // Looping through the blog posts
      data.forEach(({ attributes, id }) => {
        // Creating and displaying the blog post elements
        const blogPostDiv = document.createElement('div');
        blogPostDiv.classList.add('blog-post');
        const titleElement = document.createElement('h2');
        titleElement.classList.add('blog-title');
        titleElement.textContent = attributes.title;
        const contentElement = document.createElement('p');
        contentElement.classList.add('blog-content');
        contentElement.textContent = attributes.post;
        const editButton = document.createElement('button');
        editButton.classList.add('button', 'edit-button');
        editButton.textContent = 'Edit';
        editButton.addEventListener('click', () => {
          // Redirecting the user to the edit page passing the blog post id as a query parameter
          window.location.href = '/frontend/edit.html?id=' + id;
        });
        blogPostDiv.appendChild(titleElement);
        blogPostDiv.appendChild(contentElement);
        blogPostDiv.appendChild(editButton);
        blogList.appendChild(blogPostDiv);
      });
    })
    .catch(error => {
      console.error('Fetch error:', error);
    });
}
// Create New Blog button logic
const createButton = document.getElementById('createButton');
createButton.addEventListener('click', () => {
  // Redirecting the user to the page for creating a new blog post
  window.location.href = '/frontend/new.html';
});
We did the following in the index.js file:
- We ensured that the
jwtis available else we will redirect users to the login page. - Next, we fetched all the blog posts using the
jwtin the local storage. - If we get a
401or a403error, we will redirect the user to the login page else we will display the blog posts. - In the index.html page, we added a
Create New Blogbutton that redirects users to the new.html page when clicked on. - Each blog post has an edit button that redirects users to the edit.html page, passing the
idof the blog post as query parameter.
Editing a blog post
After adding a button to each blog post on the index page, we will get the id from the query and make a get request to Strapi CMS.
Open the edit.html file and add:
<!-- frontend/edit.html -->
<!DOCTYPE html>
<html lang="en">
  <head>
    <meta charset="UTF-8" />
    <meta name="viewport" content="width=device-width, initial-scale=1.0" />
    <title>Blog app</title>
    <style>
      body {
        font-family: Arial, sans-serif;
        background-color: #f4f4f4;
        text-align: center;
      }
      h1 {
        color: #333;
      }
      .errorMsg {
        background-color: rgb(49, 7, 7);
        width: fit-content;
        margin-bottom: 5px;
        text-transform: uppercase;
        border-radius: 5px;
        padding: 5px;
        color: rgb(231, 228, 228);
        display: none;
      }
      form {
        width: 300px;
        margin: 0 auto;
        background: #fff;
        padding: 20px;
        border-radius: 5px;
        box-shadow: 0 0 10px rgba(0, 0, 0, 0.1);
      }
      label {
        display: block;
        text-align: left;
        margin-bottom: 8px;
        color: #555;
      }
      input[type='text'],
      textarea {
        width: 80%;
        padding: 10px;
        margin-bottom: 10px;
        border: 1px solid #ccc;
        border-radius: 4px;
      }
      input[type='submit'] {
        background-color: #333;
        color: #fff;
        border: none;
        padding: 10px 20px;
        cursor: pointer;
        border-radius: 4px;
      }
      input[type='submit']:hover {
        background-color: #555;
      }
    </style>
  </head>
  <body>
    <h1>Edit Blog</h1>
    <form>
      <div class="errorMsg"></div>
      <label for="title">Title:</label>
      <input type="text" id="title" name="title" required />
      <label for="post">Post:</label>
      <textarea id="post" name="post" rows="4" required></textarea>
      <input type="submit" value="Save" />
    </form>
    <script src="./edit.js"></script>
  </body>
</html>
In the edit.js add:
// frontend/edit.js

// Retrieve the JWT token from localStorage
const jwt = localStorage.getItem('jwt');
// Ensure the token is available
if (!jwt) {
  window.location.href = '/frontend/login.html';
} else {
  // Getting the id of the blog post from the query
  const queryString = window.location.search;
  const urlParams = new URLSearchParams(queryString);
  const id = urlParams.get('id');
  if (!id) {
    window.location.href = '/frontend/index.html'; // Redirecting users to the index.html if the id is not found
  }
  // Fetch the blog posts using the token for authentication
  fetch('http://localhost:1337/api/blogs/' + id, {
    method: 'GET',
    headers: {
      Authorization: `Bearer ${jwt}`
    }
  })
    .then(response => {
      if (!response.ok) {
        if (response.status == '401' || response.status == '403') {
          alert('Unauthorized');
          localStorage.setItem('jwt', '');
          window.location.href = '/frontend/login.html';
        }
        throw new Error(`HTTP Error! Status: ${response.status}`);
      }
      return response.json();
    })
    .then(({ data }) => {
      // Displaying the current title and content for the blog post with the id
      const title = document.getElementById('title');
      const post = document.getElementById('post');
      title.value = data.attributes.title;
      post.value = data.attributes.post;
    })
    .catch(error => {
      console.error('Fetch error:', error);
    });
}
const form = document.querySelector('form');
const errorElement = document.querySelector('.errorMsg');
form.addEventListener('submit', async e => {
  // Adding an event listener to the form
  e.preventDefault();
  const formData = new FormData(form);
  const title = formData.get('title');
  const post = formData.get('post');
  const message = { title, post }; // Creating the data object
  await fetch(`http://localhost:1337/api/blogs/${id}`, {
    // Making the request
    method: 'PUT',
    body: JSON.stringify(message),
    headers: {
      'content-type': 'application/json',
      Authorization: `Bearer ${jwt}`
    }
  })
    .then(async e => {
      const { data, error } = await e.json();
      console.log(error);
      if (error) {
        let errorMsg = '';
        // Checking if the error is a validation error
        if (error.name === 'ValidationError') {
          error?.details?.map(err => {
            errorMsg += `${err}. <br/>`;
          });
        }
        // Checking if the error is an application error
        if (error.name === 'ApplicationError') {
          errorMsg = error.message;
        }
        if (
          error.name === 'UnauthorizedError' ||
          error.name === 'ForbiddenError'
        ) {
          alert('Unauthorized');
          localStorage.setItem('jwt', '');
          window.location.href = '/frontend/login.html';
        }
        errorElement.style.display = 'block';
        setTimeout(() => {
          // Hiding the error message after 10 seconds
          errorElement.style.display = 'none';
        }, 10000);
        return (errorElement.innerHTML = errorMsg);
      }
      window.location.href = '/frontend/index.html'; // Redirecting the user to the index page
    })
    .catch(e => {
      console.log(e.message);
    });
});
Here:
- We fetched the blog post from Strapi using the
idin the query and redirected the user to the index page if the id or the blog post is not found - We made a
PUTrequest with the newly updatedtitleandpostas request body and then redirected the user to the index page.
Creating a blog post
Lastly, we will handle the creation of a new blog post. Add the following to the new.html file:
<!-- frontend/new.html -->
<!DOCTYPE html>
<html lang="en">
  <head>
    <meta charset="UTF-8" />
    <meta name="viewport" content="width=device-width, initial-scale=1.0" />
    <title>Blog app</title>
    <style>
      body {
        font-family: Arial, sans-serif;
        background-color: #f4f4f4;
        text-align: center;
      }
      h1 {
        color: #333;
      }
      .errorMsg {
        background-color: rgb(49, 7, 7);
        width: fit-content;
        margin-bottom: 5px;
        text-transform: uppercase;
        border-radius: 5px;
        padding: 5px;
        color: rgb(231, 228, 228);
        display: none;
      }
      form {
        width: 300px;
        margin: 0 auto;
        background: #fff;
        padding: 20px;
        border-radius: 5px;
        box-shadow: 0 0 10px rgba(0, 0, 0, 0.1);
      }
      label {
        display: block;
        text-align: left;
        margin-bottom: 8px;
        color: #555;
      }
      input[type='text'],
      textarea {
        width: 80%;
        padding: 10px;
        margin-bottom: 10px;
        border: 1px solid #ccc;
        border-radius: 4px;
      }
      input[type='submit'] {
        background-color: #333;
        color: #fff;
        border: none;
        padding: 10px 20px;
        cursor: pointer;
        border-radius: 4px;
      }
      input[type='submit']:hover {
        background-color: #555;
      }
    </style>
  </head>
  <body>
    <h1>Edit Blog</h1>
    <form>
      <div class="errorMsg"></div>
      <label for="title">Title:</label>
      <input type="text" id="title" name="title" required />
      <label for="post">Post:</label>
      <textarea id="post" name="post" rows="4" required></textarea>
      <input type="submit" value="Save" />
    </form>
    <script src="./new.js"></script>
  </body>
</html>
We add the functionality to the new.js file
// frontend/new.js
// Retrieve the JWT token from localStorage
const jwt = localStorage.getItem('jwt');
// Ensure the token is available
if (!jwt) {
  alert('Unauthorized');
  window.location.href = '/frontend/login.html';
}
const form = document.querySelector('form');
const errorElement = document.querySelector('.errorMsg');
form.addEventListener('submit', async e => {
  // Adding an event listener to the form
  e.preventDefault();
  const formData = new FormData(form);
  const title = formData.get('title');
  const post = formData.get('post');
  const message = { title, post }; // Creating the data object
  await fetch(`http://localhost:1337/api/blogs`, {
    method: 'POST',
    body: JSON.stringify(message),
    headers: {
      'content-type': 'application/json'
    }
  })
    .then(async e => {
      const { data, error } = await e.json();
      console.log(error);
      if (error) {
        let errorMsg = '';
        // Checking if the error is a validation error
        if (error.name === 'ValidationError') {
          error?.details?.map(err => {
            errorMsg += `${err}. <br/>`;
          });
        }
        // Checking if the error is an application error
        if (error.name === 'ApplicationError') {
          errorMsg = error.message;
        }
        if (
          error.name === 'UnauthorizedError' ||
          error.name === 'ForbiddenError'
        ) {
          alert('Unauthorized');
          localStorage.setItem('jwt', '');
          window.location.href = '/frontend/login.html';
        }
        errorElement.style.display = 'block';
        setTimeout(() => {
          // Hiding the error message after 10 seconds
          errorElement.style.display = 'none';
        }, 10000);
        return (errorElement.innerHTML = errorMsg);
      }
      window.location.href = '/frontend/index.html'; // Redirecting the user to the index page
    })
    .catch(e => {
      console.log(e.message);
    });
});
Conclusion
Congratulations on reaching the end of this tutorial! 🎉 Throughout this journey, you've learned how to customize the User collection type in Strapi and develop a plugin for managing blog post updates and creations. It's exciting to see what can be achieved with Strapi, isn't it? 😍 If you encounter any issues along the way, please don't hesitate to mention them in the comment section. We're here to help and will promptly address any concerns or errors you may have faced.